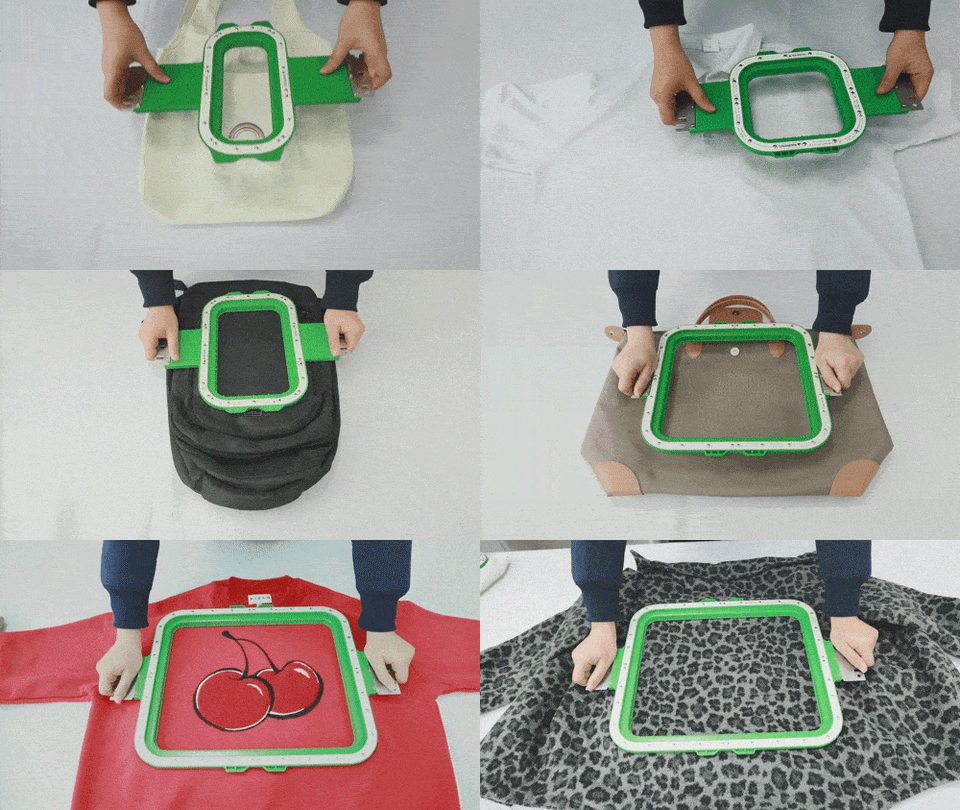
If you work in the embroidery field, you must know the importance of a good embrodery tool. It's possible to upgrade your embroidery project while saving time and money as long as you have the right tools and the best setup makes things easier.
This post will recommend good embroidery tools for you. It also demonstrates that you don’t need a million dollars to start your embroidery projects. Here are the top 2 tools for embroidery.
#1: Magnetic Hoop - MaggieFrame
1.1 What is a magnetic embroidery hoop?
A magnetic embroidery hoop is a type of embroidery frame that uses magnets to secure the fabric in place while stitching. The magnets hold the fabric taut, making it easier to embroider and reducing the need for frequent re-hooping. This type of hoop is popular among embroiderers for its ease of use and ability to work with a variety of fabrics.
Magnetic embroidery hoops can be used with almost any embroidery machine, like Brother, baby lock, Barudan, Janome, BabyLock, Barudan, Ricoma, Melco, Tajima or other embroidery machine. Because of its powerful magnetic force, it can hold the garment in place with magnetic forces and adjust automatically for different thicknesses without hooping or using stabilizers. magnetic hoops are differ from traditional embroidery hoops. I've used magnet frames on leather jackets and other delicate fabrics, but without leaving any hoop burn. Even projects that were once difficult to attach outside of the hoop are now easy to embroider. Save time and any reduce stress on arms and wrists.
Magnetic hoop is something I take for granted. So it surprises me when I meet embroiderers who are not familiar with magnetic embroidery hoop.
1.2 When to Use Magnetic Embroidery Hoops
Although I first acquired magnetic hoops for specific applications I now find that they can serve a number of embroidery tasks very helpful. How about it?- Quick and easy hoop placement: The magnetic feature allows for quick and easy placement of the fabric in the hoop, saving time during the setup process.
- Precise placement of the fabric: The magnets help to keep the fabric in place, which is especially useful for intricate designs that require precise placement.
- Convenience: Magnetic hoops eliminate the need for screwing the hoop tight, which can be time-consuming and difficult for those with arthritis or other physical limitations.
Got a magnetic hoop to make your embroidery business more easier and efficient. Get yourself magnetic hoops. It is the perfect tool to add connectivity to your sewing machine and the starting point for powering your embroidery creative journey! In this blog, we're talking mainly about industrial magnet frames, not snap hoops.
1.4 How to Use a Magnetic Embroidery Hoop?
First Step: First place the bottom hoop and stabilizer paper inside the fabric you wish to embroider on, and make the fabric more flat.
Second Step: Put the magnet hoops upper magnetic frame directly, no operation required. It will attach together automatically because it has a strong magnetic force.
A video for your reference:
1.5 Does the magnetic hoops leave hoop burn?
In general, magnet frames are considered to be gentle on fabric and do not leave hoop burn marks. Hoop burn is a term used to describe marks left on the fabric from the pressure of the hoop during the embroidery process.
However, the likelihood of hoop burn marks depends on several factors, including the type of fabric, the tension used while hooping, and the duration of the hooping process. To minimize the risk of hoop burn, it is recommended to use a suitable hoop size for the fabric, and to adjust the tension so that it is not too tight. It is also important to remove the hoop from the fabric as soon as the embroidery is completed.
#2: Hooping Station - MaggieFrame
If you're a home embroiderer or small embroidery business owner, you must not miss embroidery hooping station. You must be wondering why I must have a hooping station.
Consider this: how much time did you wasted chasing your embroidery hoop around the table? Or worse, how many items were ruined by accidentally hooping your fabric poorly? With this starter kit, You can avoid these problems. That's why you must have this hooping station kit. Also this kit fits entry level embroidery machines.
Embroidery hooping stations with consistent hooping system allow you to hoop quickly and accurately. This is essential for any embroidery job where the exact same location must be repeated multiple times.
2.1 What is a embroidery hooping station?
An embroidery hooping station is a device used to secure a garment or fabric onto a hoop for the purpose of embroidery. The hoop is then attached to an embroidery machine and the machine uses the hoop to precisely move the fabric while stitching the design. The hooping station helps to stabilize the fabric, ensuring the embroidery is correctly placed and evenly stitched.
2.2 When to Use a embroidery hooping station?
An embroidery hooping station is used when you want to embroider a design onto a garment or fabric. Hooping the garment or fabric before embroidering helps to keep it stable, so that the design is correctly placed and evenly stitched. The use of a hooping station is particularly useful when working with delicate or stretchy fabrics, as it helps to prevent distortion or stretching during the embroidery process. Hooping stations are also useful for accurately aligning designs on larger pieces of fabric, such as tablecloths or curtains.
2.3 Explore how it works on our embroidery projetcs.
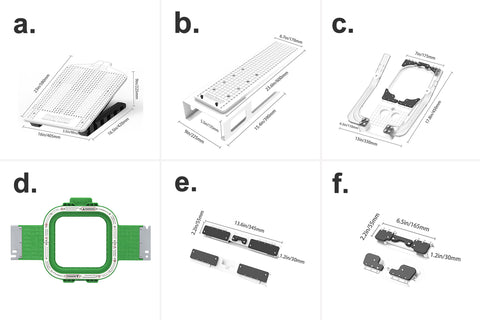
Simply place your bottom hoop on the Main Station or Sleeve Station (depending on your needs), secure it in place with Adjustable Fixture! The powerful magnetic hoops hold your inner hoop firmly in place. This will allow you to align your project correctly every time, avoiding crocked embroidery and wrinkles problems.
a. MainStation
b. Sleeve Station
c. M0505 / M7272 Fixture
d. M0505 / M7272 MaggieFrame Magnetic Hoop
e. A Pair of Large Adjustable Fixture
f. A Pair of Small Adjustable Fixture
2.4 Hooping Station for Embroidery - Four Collocation Usages
1. Main Station with 5.5" or 7.2" Fixture
- Attach M0505 Fixture or M0707 Fixture to the Main Station.
- Place your bottom hoop and stablizer paper on the Fixture.
- Place your garment on the Fixture.
- Just a little push, the outer ring automatically holds garments.
Perfect for: Embroiderying small patterns on T-shirts, polo shirt, collar, and other fabrics.

2. Main Station with Large Adjustable Fixture
- Attach bottom Adjustable Fixture to the Main Station.
- Place your bottom hoop and stablizer paper the Main Station, align bottom fixture. Then attach top fixture.
- Place your garment on the Fixture.
- The outer ring automatically holds garments.
3. Main Station with Small Adjustable Fixture
- Attach bottom Adjustable Fixture to the Main Station.
- Place your inner hoop and stablizer paper the Main Station, align bottom fixture. Then attach top fixture.
- Place your garment on the Fixture.
- The outer ring automatically holds garments.
Perfect for: Embroiderying small patterns on T-shirts, polo shirt, collar, and other fabrics.

4. Sleeve Station with Small Adjustable Fixture
- Attach bottom Adjustable Fixture to the Sleeve Station.
- Place your bottom hoop and stablizer paper the Main Station, align bottom fixture. Then attach top fixture.
- Place your garment on the Fixture.
- The outer ring automatically holds garments.
If you have no idea to install it, a video for your reference:
And don't forget to follow us on our social channels to make sure you're not missing anything:
Facebook: MaggieFrame
Ins: maggieframestore
Youtube: MaggieFrame

