1. Introduction to Fabric Embroidery Hoops
Embroidery hoops are the unsung heroes behind every crisp, beautifully stitched design—think of them as the secret ingredient that transforms wobbly fabric into a drum-tight canvas ready for your creative magic. Whether you are using small or large embroidery hoops, mastering their use is essential for achieving flawless tension, preventing puckering, and showcasing your work with pride. In this guide, we’ll explore everything from hoop decorating techniques and tension mastery to comparing hoop types and troubleshooting fabric-specific challenges. By understanding the art and science of hooping, you’ll elevate your embroidery practice, ensuring every project begins—and ends—on the right note.
Table of Contents
- 1. Introduction to Fabric Embroidery Hoops
- 2. Decorating Embroidery Hoops with Fabric
- 3. Fundamentals of Hoop Setup and Tension Control
- 4. Comparing Embroidery Hoop Types and Materials
- 5. Professional Finishing and Framing Techniques
- 6. Hoop Selection Guide for Different Fabrics
- 7. Machine Embroidery Hoop Mastery
- 8. Conclusion: Elevating Your Embroidery Practice
- 9. Frequently Asked Questions
2. Decorating Embroidery Hoops with Fabric
Customizing your embroidery hoop isn’t just about adding a splash of personality—it’s a practical upgrade that can transform your stitching experience. Let’s dive into the why and how of fabric-wrapped hoops, and discover step-by-step techniques that blend beauty with function.
2.1 Benefits of Fabric-Wrapped Hoops
Why wrap your hoop in fabric? It’s not just for looks—though a hoop dressed in your favorite print certainly makes your project pop! Wrapping your embroidery hoop with fabric delivers a trio of benefits:
1. Improved Tension Control:A fabric-wrapped surface increases friction between the hoop and your working fabric. This extra grip means your fabric stays taut, minimizing the risk of slippage and uneven stitches—especially during those marathon embroidery sessions. Bamboo hoops, notorious for their slickness, benefit greatly from this added friction.
2. Fabric Protection:Delicate or high-value fabrics can be easily marred by the hard edges of bare wooden hoops. Wrapping your hoop cushions the contact points, reducing the chance of permanent creases or “hoop burn.” This is especially important for large projects that require frequent repositioning.
3. Aesthetic Customization:Let’s not forget the fun! Wrapping your hoop allows you to coordinate with your project or use up those precious fabric scraps. Tutorials often recommend bias-cut cotton strips, linen tape, or twill tape for a polished, no-fray finish. The result? A hoop that’s as stylish as it is functional.
High-ranking tutorials and expert guides agree: a well-wrapped hoop not only looks great but also makes your embroidery smoother and more enjoyable. Say goodbye to fraying, slipping, and unsightly marks—hello to seamless, professional results!
2.2 Step-by-Step Wrapping Techniques
Ready to give your hoop a makeover? Here’s how to achieve a seamless, durable wrap—no fraying, no fuss.
Materials You’ll Need:- An embroidery hoop walmart, fabric strips (preferably cotton cut on the bias, about 1 inch wide)
- Linen tape or twill tape (for a professional touch)
- Scissors
- Hot glue or tacky glue (Aleene’s Original Tacky Glue is a favorite)
- Needle and thread (for sewn finishes)
- Disassemble the Hoop: Loosen and separate the inner and outer rings for easier handling.
- Secure the Starting End: Attach one end of your fabric strip to the outer hoop using a dab of glue.
- Wrap at an Angle: Hold the fabric at a slight angle and begin wrapping, overlapping each turn by about half the strip’s width. Keep the tension consistent—tight enough for a smooth finish, but not so tight as to warp the hoop.
- Continue Wrapping: Work your way around the hoop, maintaining the angle and overlap for even coverage.
- Secure the End: Tuck the final end inside the hoop and glue it down on the inner surface to hide the seam.
- The natural stretch of bias tape makes it ideal for curving smoothly around the hoop. Start as above, keeping the tape centered and taut. Twill tape offers finished edges, eliminating fraying worries.
- Adhesive Finish: For a permanent result, glue both ends of the wrap on the inside of the hoop. Allow 24 hours for the glue to cure before use.
- Sewn Finish: Prefer a removable wrap? Stitch the fabric ends together with small, even stitches using waxed linen thread for durability.
- Fabric Backing: For display hoops, cut a piece of felt or fabric just smaller than the hoop’s inner diameter. Attach it with a whip stitch for a tidy, professional look.
- Decorative Paper (Decoupage): For a unique effect, use Mod Podge and decorative paper strips, overlapping them for a seamless, artistic finish.
- Check tension as you wrap to avoid loose spots or wrinkles.
- Choose between wrapping the inner or outer hoop based on your project’s needs—inner for better tension, outer for protecting finished stitches.
- For long-term use, a sewn finish is more durable than glue alone.
By following these steps, you’ll create a hoop that not only looks stunning but also enhances your embroidery experience—no more slipping, no more fraying, just pure stitching satisfaction.
3. Fundamentals of Hoop Setup and Tension Control
A beautifully wrapped hoop is just the beginning. Setting up your hoop correctly and mastering tension control are the keys to embroidery that’s smooth, even, and frustration-free. Let’s break down the essentials.
3.1 Achieving Drum-Tight Fabric Tension
The gold standard for embroidery tension? “Drum-tight”—when you tap the fabric, it sounds just like a drum. Here’s how to get there:
1. Proper Hooping Sequence:- Loosen the Screw: Separate the inner and outer rings.
- Position the Fabric: Place your fabric over the inner ring, ensuring the weave is straight (this prevents distortion and keeps your stitches even).
- Attach the Outer Ring: Slide the outer ring over the fabric and inner ring, then gently tighten the screw—just enough to hold everything in place.
- Pull Evenly: Before fully tightening, gently pull the fabric edges all around the hoop. Work in a circle or alternate sides for even tension.
- Final Tightening: Once the fabric is taut, finish tightening the screw. For stubborn hoops, a small screwdriver can help—but don’t overdo it and risk warping the hoop.
- Tap the fabric. If it’s as tight as a drum, you’re set. If not, repeat the tightening and pulling process.
- Align the fabric’s grain with the hoop for neater stitches and less distortion—especially important for linen or specialty fabrics.
- Choose a hoop slightly larger than your design for best results. Small hoops (under 5 inches) are great for detail work; medium (5–8 inches) for versatility; large (over 8 inches) for big projects, though they require more strength to handle.
Pro Tip: For delicate fabrics, consider layering with tissue paper or a stabilizer to prevent hoop marks. For thick fabrics, use a larger, sturdier hoop to distribute pressure evenly.
3.2 Solving Slippage and Loosening Issues
Few things are more frustrating than fabric that slips or loosens mid-stitch. Here’s how to keep your fabric locked in place:
1. Binding Techniques:- Wrap the Inner Hoop: Use cotton twill tape, bias tape, or fabric strips to wrap the inner ring. This creates extra friction, preventing slippage—especially helpful with smooth bamboo or plastic hoops.
- No-Fray Solutions: Twill tape and linen tape provide finished edges, reducing fraying and adding grip.
- Some embroiderers use double-sided tape or silicone hoop huggers for extra hold, especially on slick plastic hoops.
- Invest in hoops with well-fitting rings and sturdy hardware. Flimsy bamboo or soft wood hoops are more prone to warping and slippage.
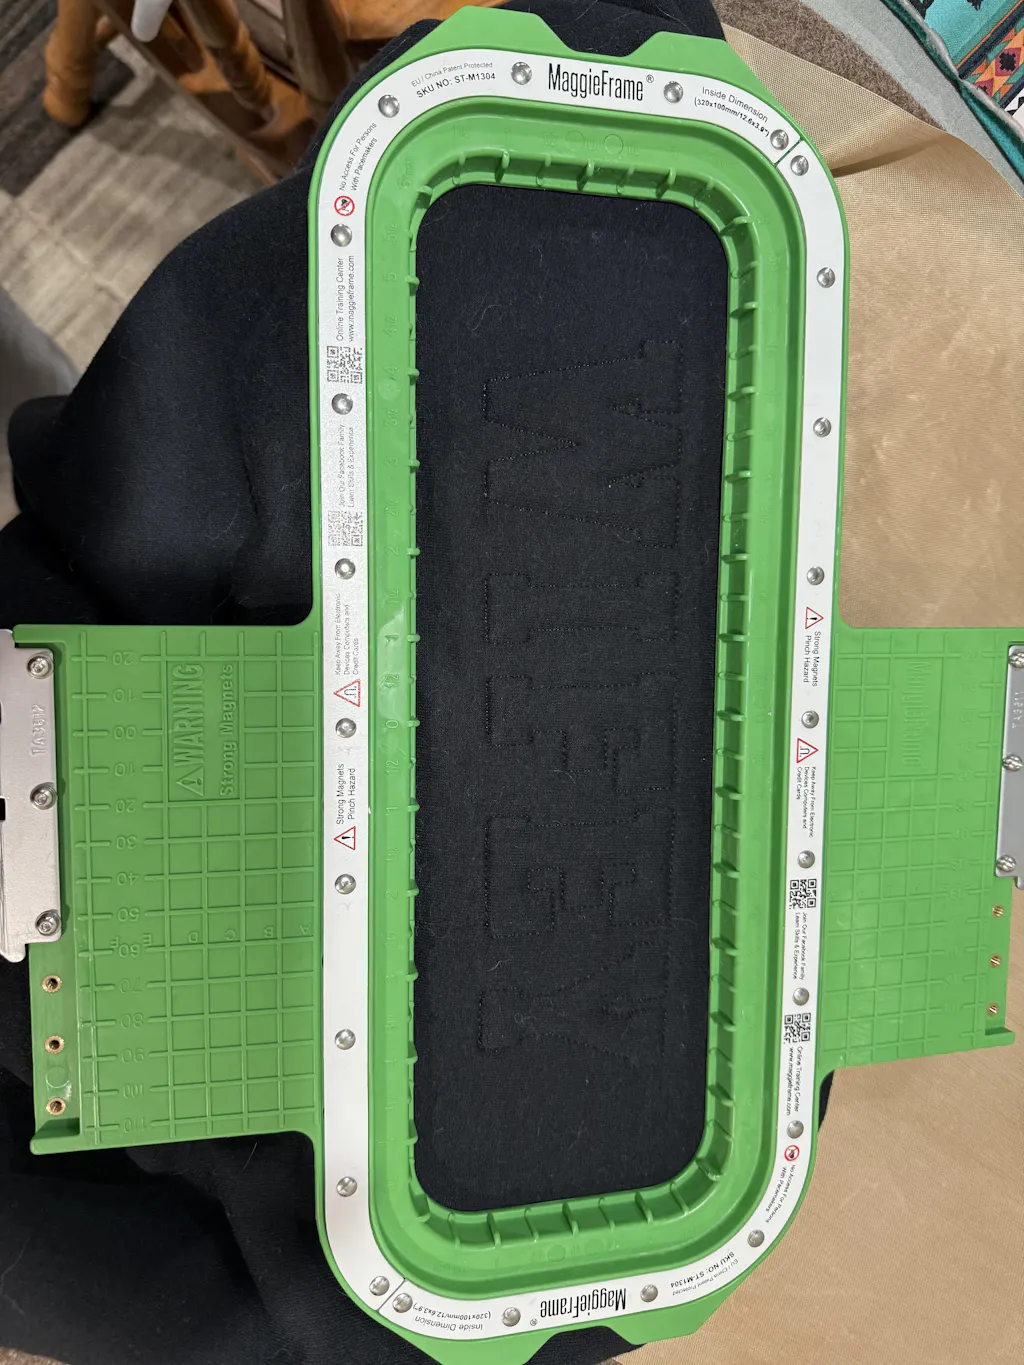
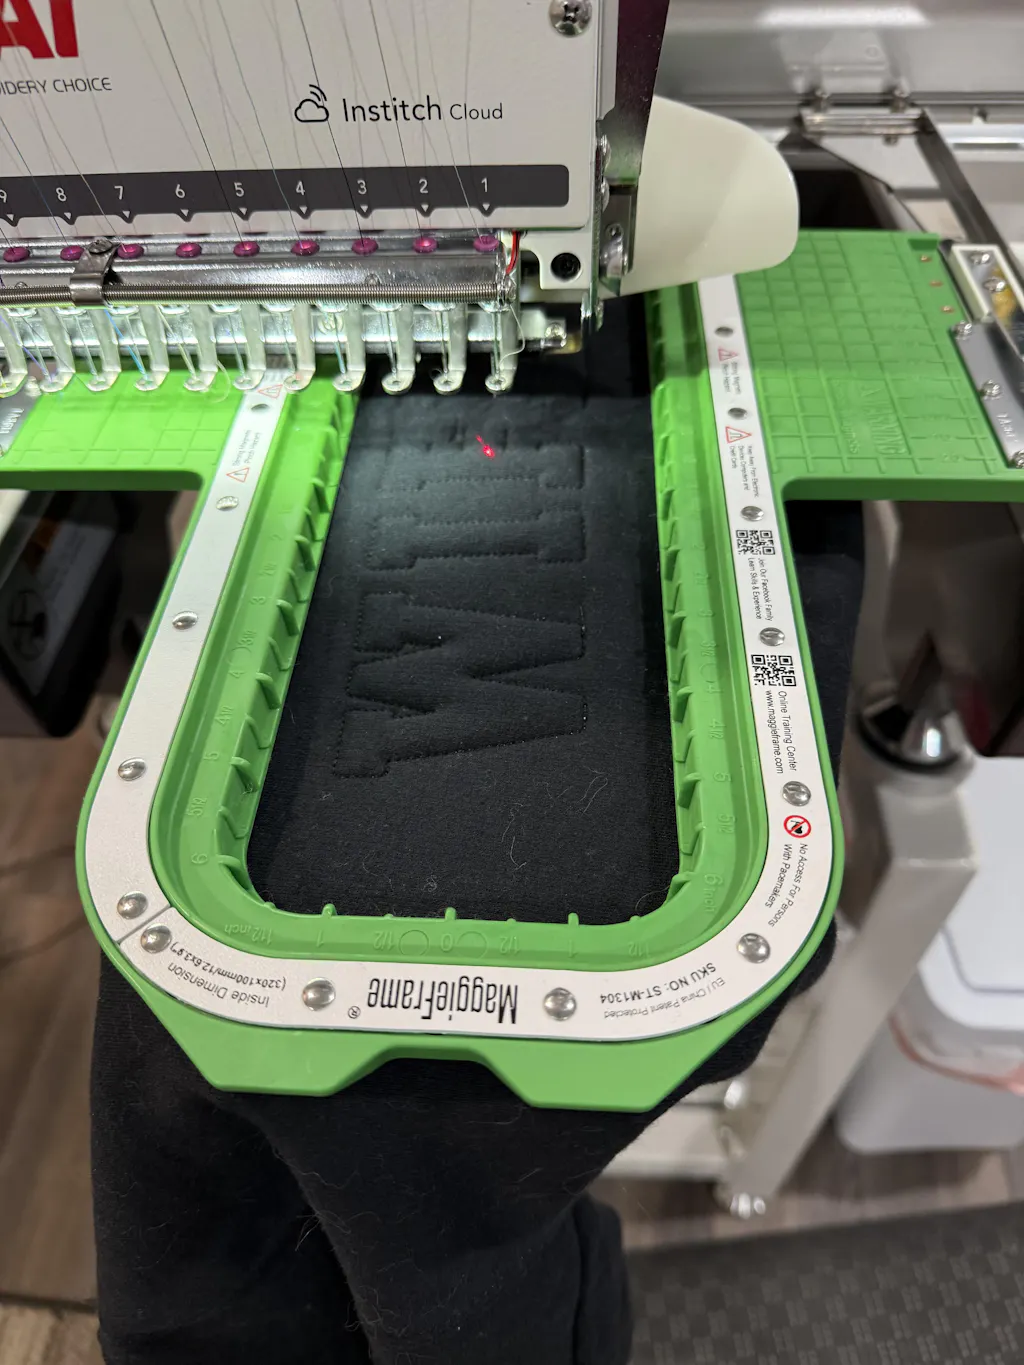
- For garment embroidery, magnetic hoops like MaggieFrame offer automatic tensioning and superior stability. Unlike traditional screw hoops, magnetic systems adapt to varying fabric thicknesses, prevent hoop burn, and dramatically reduce setup time. MaggieFrame, in particular, is praised for its industrial durability and compatibility with a wide range of machines—making it a standout choice for consistent, drum-tight tension.
- During long sessions, periodically check and adjust your fabric tension. Fabrics can relax over time, especially with larger hoops.
| Problem | Solution | Best For |
|---|---|---|
| Slippery bamboo hoop | Wrap inner ring with twill tape/fabric | All fabrics, esp. silk |
| Plastic hoop looseness | Use silicone huggers or tape | Lightweight fabrics |
| Uneven tension | Pull fabric evenly, tighten gradually | All projects |
| Persistent slippage | Upgrade to magnetic hoop (MaggieFrame) | Garment embroidery, thick fabrics |
By combining these techniques, you’ll conquer slippage, maintain perfect tension, and enjoy embroidery that’s as satisfying to stitch as it is to display. Ready to level up your hoop game? Your next masterpiece awaits!
4. Comparing Embroidery Hoop Types and Materials
Choosing the right embroidery hoop isn’t just about picking what’s on sale at the craft store. The hoop you select can make or break your stitching experience—think of it as the foundation for your creative masterpiece. Let’s break down the pros, cons, and quirks of wood, plastic, spring tension, and magnetic hoops, so you can stitch with confidence (and maybe a little swagger).
4.1 Wood vs. Plastic vs. Spring Tension Hoops
When it comes to embroidery hoops, not all are created equal. Each material brings its own personality to the table—some are reliable companions, while others might leave you in a tangle.
Wooden Hoops:- Beechwood: The gold standard for hand embroidery, premium beechwood hoops offer a natural grip that holds even slippery silks or heavy linen with ease. The organic texture provides consistent friction, maintaining tension throughout marathon sessions. High-quality beechwood hoops, especially those with brass fittings, are durable, resist warping, and feel solid in your hand. However, they require a bit of TLC—store them away from moisture, and don’t overtighten the screw to avoid wear.
- Bamboo: While bamboo hoops are eco-friendly and affordable, their performance is a mixed bag. Lower-quality bamboo is prone to warping, splintering, and losing grip—especially in humid environments. If you’ve ever had a hoop that feels like it’s auditioning for a life as a pretzel, it was probably bamboo.
- Unbranded Woods: These can be hit-or-miss. Sometimes you’ll stumble upon a gem, but more often, they’re lightweight and flimsy, with unpredictable performance.
- Premium Plastic: High-quality molded plastic hoops can be surprisingly sturdy, resisting warping and holding tension well thanks to engineered edges. They’re moisture-resistant and ideal for workshops where spills or temperature swings are common. Snap-fit designs make setup quick, but fine-tuning tension isn’t as precise as with screw systems.
- Budget Plastic: Cheaper plastic hoops are a gamble—think cracking, bending, and a tendency to lose their grip mid-project. If you’re after longevity, invest in a reputable brand.
- Designed primarily for machine embroidery, spring tension hoops use a mechanical spring to automatically keep fabric taut. They excel with thicker materials and workwear, offering drum-tight tension without manual adjustments. However, for delicate handwork, the pressure can be overkill, and the bulky handles often get in the way. Ergonomically, they’re not the friendliest—your hands might protest after a long session.
| Performance Factor | Beechwood | Bamboo | Premium Plastic | Budget Plastic | Spring Tension |
|---|---|---|---|---|---|
| Fabric Holding | Excellent | Good-Variable | Good | Poor-Fair | Excellent |
| Tension Retention | Excellent | Variable | Moderate | Poor | Excellent |
| Durability | High | Low-Variable | High | Low | Moderate |
| Warping Resistance | High | Low | High | Low | N/A |
| Machine Compatibility | Limited | Limited | Limited | Limited | Excellent |
What does this mean for you?
- For hand embroidery and delicate fabrics, premium beechwood hoops are your best bet—think of them as the luxury sedan of hoops: smooth, reliable, and built to last.
- For everyday projects or humid studios, a high-quality plastic hoop might be your go-to workhorse.
- For heavy-duty machine work, spring tension hoops shine, but they’re less suited for intricate handwork.
YouTube Insights:
Video reviewers echo these findings: bamboo hoops are notorious for warping and poor tension, while premium beechwood (especially brands like Nerge) consistently win praise for their solid build and reliable grip. Plastic hoops get points for convenience, but only when you avoid the bargain bin.
In short: invest in quality where it counts, and your stitches will thank you.
4.2 Magnetic Hoop Technology for Modern Embroidery
Welcome to the future—where magnets do the heavy lifting, and your wrists get a well-deserved break. Magnetic embroidery hoops have redefined what’s possible in both commercial and creative embroidery, and MaggieFrame sits at the forefront of this revolution.
Why Magnetic Hoops?- Automatic Tensioning: Magnetic hoops like MaggieFrame use powerful rare-earth magnets to clamp fabric instantly, adapting to any thickness—from delicate silks to rugged denim—without manual screw adjustments.
- Fabric Protection: The even distribution of magnetic force means no more hoop burn or unsightly marks. Your finished piece looks pristine, every time.
- Efficiency Gains: Say goodbye to the endless cycle of tightening screws. With MaggieFrame, hooping time drops by up to 90%. What used to take three minutes now takes thirty seconds—imagine what you could do with all that extra time!
- Industrial Durability: MaggieFrame hoops are engineered for longevity, with more and stronger magnets than competing brands. They undergo rigorous impact and pressure testing, ensuring they outlast traditional hoops by a factor of 40 in high-frequency use.
- User-Friendly Design: Features like reference lines for quick alignment and compatibility with hooping stations make setup a breeze, whether you’re a beginner or running a production line.
How does MaggieFrame compare to traditional screw systems?
- Traditional Hoops: Rely on manual screw adjustments, which can be time-consuming, inconsistent, and tough on your hands—especially with thick or layered fabrics.
- MaggieFrame Magnetic Hoops: Deliver consistent, even tension automatically, reduce fabric waste, and dramatically cut down on labor costs. They’re compatible with over 200 machine brands and come in more than 17 sizes, making them a versatile choice for any embroidery operation.
Efficiency in Action:
For garment embroidery, MaggieFrame’s magnetic system isn’t just a convenience—it’s a game-changer. By slashing hooping time and reducing defects by 15%, it quickly pays for itself, especially in high-volume settings.
The Bottom Line:
If you’re looking for a hoop that combines industrial strength, effortless operation, and professional results, MaggieFrame’s magnetic embroidery hoops are your best embroidery partner. Once you experience the ease and precision of magnetic hooping, you’ll wonder how you ever stitched without it.
5. Professional Finishing and Framing Techniques
You’ve poured hours into your embroidery—now it’s time to give it the finishing touch it deserves. The right finishing method transforms your work from "pretty project" to "gallery-worthy masterpiece." Whether you love the permanence of glue, the classic look of felt, or the flexibility of sewn finishes, there’s a technique to suit every style and skill level.
5.1 Glue-Based and Felt Backing Methods
Glue-Based Finishing: The Fast Track to a Polished Look
If you want a durable, fuss-free finish, glue is your best friend. Here’s how to achieve a crisp, professional result:
- Trim the Excess: Once your embroidery is centered and taut in the hoop, use pinking shears to trim the excess fabric, leaving about 1/3 to 1/2 inch beyond the hoop’s edge. This prevents fraying and ensures the fabric doesn’t peek out from the back.
- Apply the Glue: Work in sections—Fabri-Tac dries quickly! Apply a thin line of glue around the outer edge of the inner hoop.
- Fold and Press: Fold the trimmed fabric over the glue line and press firmly. Go around the hoop, pressing as you go, and add extra glue to any loose spots.
- Drying Protocol: Let the glue cure fully (check your glue’s instructions—typically 24 hours) before displaying or gifting your piece.
Why glue?
Properly executed, glue-based finishes hold their shape for years, making them ideal for pieces destined for long-term display or sale.
Felt Backing: The Classic Professional Touch
Felt isn’t just for kindergarten crafts—it’s the secret to a tidy, elegant finish that protects your stitches and gives your hoop a luxurious feel.
How to Add a Felt Backing:
- Cut the Felt: Trace the inner hoop onto a piece of wool felt, then cut just inside the line for a snug fit.
- Dry Fit and Trim: Press the felt into the back of the hoop, crease it along the edges, and trim off any excess (about 1/4 inch from the crease).
- Glue or Stitch: Apply Fabri-Tac along the inside edge of the hoop, then press the felt circle into place. Hold briefly to secure.
Whip-Stitch Option:
For a more secure, decorative finish, use a whip stitch to attach the felt. Thread a needle with matching floss, angle the needle to catch both the gathered fabric and felt, and work your way around the hoop for a seamless look.
Personalization Tip:
Embroider a date, name, or special message onto the felt before attaching it—perfect for gifts or keepsakes.
Summary Table: Finishing Techniques
| Method | Materials Needed | Durability | Appearance | Skill Level |
|---|---|---|---|---|
| Glue-Based | Fabri-Tac, pinking shears | High | Clean, permanent | Beginner |
| Felt Backing (glued) | Wool felt, glue | High | Elegant, opaque | Beginner |
| Felt Backing (stitched) | Wool felt, needle, thread | Very High | Decorative, secure | Intermediate |
5.2 Sewn Finishing and Decorative Options
Running Stitch Gathering: The Flexible Classic
If you want a finish that’s tidy but not permanent, the running stitch gathering method is your go-to. Here’s how it works:
- Trim Generously: Leave 1.5–3 inches of fabric beyond the hoop edge (more for larger hoops).
- Stitch Around the Edge: Use a running stitch about 1/4 inch from the edge, circling the entire hoop.
- Gather and Secure: Pull both thread ends to gather the fabric tightly at the back, adjust for evenness, and knot securely.
Why choose this method?
It’s perfect if you may want to remove the embroidery from the hoop later, or if you prefer a less bulky back.
Fabric Backing Alternatives:
For a modern twist, use a coordinating fabric instead of felt. Select a weight similar to your embroidery fabric for best results, and attach using glue or a whip stitch for a seamless, display-ready finish.
Decoupage and Decorative Paper:
Feeling adventurous? Try Mod Podge and decorative paper strips for a unique, artistic backing that’s as much a part of the artwork as the embroidery itself.
Modern Backing Approaches:
As seen in Clever Poppy’s tutorials, combining tight drum-like tension with a neatly sewn or glued fabric or felt back creates a professional, gift-worthy finish. Consistency in stitch length and angle, careful trimming, and patience are the keys to success.
Pro Display Tips:
- Always ensure your fabric is drum-tight before finishing—any slack will show in the final result.
- For layered or specialty fabrics, magnetic hoops like MaggieFrame help maintain even tension throughout the finishing process, minimizing puckering and distortion.
Your embroidery deserves a finish that matches your effort—choose the method that fits your style, and let your work shine!
6. Hoop Selection Guide for Different Fabrics
Not all fabrics are created equal—and neither are hoops. The secret to flawless embroidery? Pairing the right hoop with the right fabric. Here’s your roadmap to stress-free stitching, whether you’re working with whisper-thin silk or heavyweight denim.
6.1 Delicate and Lightweight Materials
Silks, Chiffons, and Organza: Handle With Care
Delicate fabrics are like the divas of the embroidery world—gorgeous, but demanding. They’re prone to distortion, snags, and overstretching, so your hooping approach needs a gentle touch.
Best Practices:
- Use Small Hoops (4–5”): Smaller hoops reduce stress on fragile fabrics, giving you better control over tension and minimizing the risk of warping.
- Choose Padded or Wrapped Hoops: Wrap the inner ring with bias-cut cotton or twill tape to create a cushioned interface. This prevents snags and adds friction, keeping slippery fabrics in place.
- Minimal Tension: Don’t overtighten—just enough to keep the fabric taut without pulling it out of shape.
- Smooth Surfaces: Select hoops with polished, snag-free edges. A rough surface is a recipe for heartbreak (and ruined fabric).
Pro Tip:
For silk embroidery, a padded wooden hoop is your best ally. Check tension frequently and adjust as needed—delicate fabrics can relax over time.
6.2 Heavyweight and Specialty Fabrics
Denim, Canvas, and Thick Materials: Bring Out the Big Guns
Heavy fabrics need a hoop that can handle the pressure—literally. Here’s how to keep your stitches even and your fabric flat:
Best Practices:
- Opt for Larger Hoops (8”+): Bigger hoops distribute pressure evenly, preventing puckering and making it easier to manage stubborn, dense weaves.
- Magnetic Systems for the Win: Magnetic hoops like MaggieFrame are a game-changer for thick materials. Their automatic pressure distribution adapts to varying thicknesses, holding even the bulkiest fabrics securely—no more wrestling with screws or risking hoop burn.
- Spring Tension Hoops: For machine embroidery on heavy workwear, spring tension hoops provide the grip and consistency needed for flawless results.
Adaptation Strategies:
- Adjust your stabilizer choice to match fabric weight—cutaway for stretch, tear-away for stability.
- For multi-layered or textured fabrics, magnetic hoops offer superior tension management, minimizing distortion and keeping designs crisp.
Why MaggieFrame?
When working with heavyweight fabrics, MaggieFrame’s magnetic hoops shine. Their robust construction and automatic tensioning system mean less time adjusting, more time stitching, and professional results—every single time.
Ready to elevate your embroidery, no matter the fabric?
Choose your hoop with intention, match it to your material, and let your creativity take center stage. Whether you’re stitching on silk or denim, the right hoop makes all the difference.
7. Machine Embroidery Hoop Mastery
Machine embroidery is where artistry meets precision engineering—and your choice of hoop and stabilizer can make or break the final result. Whether you’re monogramming silk pajamas or producing hundreds of custom tees, mastering stabilizer selection, hooping techniques, and magnetic systems will set you apart from the crowd. Let’s dive into the secrets of professional results, from the “hoop sandwich” to high-efficiency magnetic frames.
7.1 Stabilizer Selection and Hooping Techniques
Ever wondered why some machine embroidery looks flawless while other pieces pucker, shift, or sag? The answer often lies in the stabilizer and how you hoop your fabric.
The “Hoop Sandwich” Approach Start with your stabilizer—this is the unsung hero that keeps your fabric from stretching and your designs from distorting. Place the stabilizer on the outer hoop first, then lay your fabric on top. This layered setup, often called the “hoop sandwich,” ensures optimal tension and prevents shifting during stitching. For machine embroidery, this step is non-negotiable.
Choosing the Right Stabilizer:
- Cut-Away Stabilizers: These are your go-to for stretchy fabrics like knits, t-shirts, or sweatshirts. They stay with the finished piece, providing ongoing support and preventing distortion—even after multiple washes.
- Tear-Away Stabilizers: Best for stable woven fabrics that don’t need permanent support. These are removed after stitching, leaving your design crisp and the fabric flexible.
- Wash-Away Stabilizers: Perfect for sheer fabrics or freestanding lace. These dissolve completely in water, leaving no trace behind—ideal for projects where you want a clean, soft finish.
Pro Tips from the Pros (and YouTube):
- When embroidering on tricky fabrics like satin or silk, double up: use a cutaway stabilizer for structure and a water-soluble topper to protect the delicate surface. This combo prevents puckering and keeps stitches sharp, as demonstrated in the “Satin Pajamas~No Puckers!” tutorial.
- Always smooth your fabric and stabilizer before hooping—wrinkles here will haunt you later.
- Use the correct needle (e.g., a sharp 75/11 for silk) to avoid snags and shredding.
Hooping for Success:
- Position your design using reference marks or printed templates to ensure perfect placement.
- Don’t overstretch! The goal is taut, not tortured—fabric should be drum-tight but retain its natural feel.
- For garment embroidery, apply adhesive stabilizer to the reverse side before hooping for extra accuracy.
Machine Compatibility and Setup:
- Modern embroidery machines support a variety of hoop sizes. Choose one that fits your design without excess fabric bunching.
- Pay attention to bobbin direction (usually counterclockwise) for smooth thread flow.
- Use the machine’s numbered threading path for foolproof setup—especially important for beginners.
Quality Control:
- Always test your setup with a scrap piece before committing to your final garment.
- Consistent hooping technique, proper stabilizer, and precise alignment are your recipe for professional, pucker-free results.
7.2 Magnetic Systems for Commercial Efficiency
If you’ve ever wrangled with screws, fought fabric slippage, or dreaded hoop burn, it’s time to meet the future: magnetic embroidery hoops. For commercial and high-volume settings, magnetic systems like MaggieFrame are a game-changer—think of it as upgrading from a flip phone to a smartphone. Once you experience the speed and ease, you’ll never look back.
Why Magnetic Hoops?
- Dramatic Time Savings: Magnetic hoops can reduce hooping time by 30–50% (and in some cases, up to 90%), letting you breeze through large orders with less fatigue.
- Consistent, Even Tension: The powerful magnetic force adapts automatically to any fabric thickness, from delicate silks to heavy denim, holding everything drum-tight without manual adjustment.
- Puckering Prevention: Even pressure distribution means no more hoop marks or puckering—your finished pieces look crisp and professional.
- Effortless Operation: No more repetitive twisting or sore wrists. Hooping and removing fabric is quick and nearly effortless, making production lines faster and less stressful.
MaggieFrame stands out for its industrial-grade durability, high-strength magnets, and user-friendly design. With compatibility across 200+ machine brands and over 17 sizes and with hooping stations such as Echidna hooping station, it’s built for both versatility and heavy use. Reference lines on the frame make alignment a breeze, and the robust construction means you’ll spend less on replacements and repairs.
ROI That Speaks for Itself:
- MaggieFrame’s efficiency and defect reduction can recoup your investment in as little as half a year for high-volume operations.
- Its longevity—outlasting other brands by up to 40 times in durability tests—means more uptime and fewer headaches.
Real-World Results:
Commercial embroiderers report smoother workflow, less fabric waste, and happier staff after switching to MaggieFrame. Whether you’re running a factory or a boutique studio, the time and labor savings add up fast.
The Bottom Line:
If you’re ready to elevate your machine embroidery game, magnetic hoops like MaggieFrame deliver the speed, consistency, and professional finish that modern embroidery demands. Say goodbye to screw-induced frustration—your hands (and your bottom line) will thank you.
8. Conclusion: Elevating Your Embroidery Practice
Mastering fabric embroidery hoops is about more than just holding fabric tight—it’s the gateway to flawless tension, perfect stitches, and gallery-worthy finishes. By choosing the right hoop for your fabric, dialing in stabilizer and hooping techniques, and embracing innovations like magnetic systems, you set yourself up for professional results every time. Don’t be afraid to experiment with new methods—wrapping, binding, or magnetic hooping—to discover what works best for your unique projects. The perfect finish is within reach; all it takes is the right tools, a bit of practice, and the courage to try something new.
9. Frequently Asked Questions
9.1 Q: How do I fix persistent fabric slippage in my embroidery hoop?
A: Try wrapping the inner ring with cotton twill tape or bias-cut fabric to increase grip, especially with smooth hoops. For stubborn cases, consider a magnetic hoop system, which offers automatic tensioning and reduces slippage.
9.2 Q: What size embroidery hoop should I use for my project?
A: Choose a hoop slightly larger than your design area. Smaller hoops (4–5") are ideal for delicate work, while larger hoops (8"+) suit heavy fabrics. Always leave enough excess fabric around the hoop for tension adjustments and finishing.
9.3 Q: How can I prevent “hoop burn” or creases on my fabric?
A: Use padded or wrapped hoops to cushion delicate fabrics, and avoid overtightening. For sensitive materials, magnetic hoops distribute pressure more evenly, minimizing marks.
9.4 Q: What’s better for tension—binding the hoop or using a magnetic system?
A: Binding (wrapping) the inner ring adds friction and helps with tension, especially for hand embroidery. Magnetic systems offer automatic, even pressure and are especially effective for machine embroidery and thick fabrics.
9.5 Q: Can I leave my fabric in the hoop between stitching sessions?
A: It’s best to remove your fabric from the hoop when not stitching to prevent permanent creases. If you must leave it, loosen the tension slightly to minimize marks.
9.6 Q: Are plastic or wood hoops better for beginners?
A: High-quality wooden hoops (like beechwood) offer superior grip and durability, while premium plastic hoops are moisture-resistant and easy to use. Avoid cheap bamboo or low-grade plastic hoops, as they tend to warp and lose tension.
9.7 Q: How do I choose the right stabilizer for my fabric?
A: Use cut-away stabilizers for stretch fabrics, tear-away for stable wovens, and wash-away for sheer or specialty projects. Match stabilizer weight to your fabric and design density for the best results.
9.8 Q: Why does my embroidery pucker after stitching?
A: Puckering is often caused by insufficient stabilizer, uneven tension, or overstretching the fabric during hooping. Ensure your fabric is drum-tight, use the appropriate stabilizer, and avoid pulling fabric out of shape.
9.9 Q: Can I use the same hoop for both hand and machine embroidery?
A: While some hoops are versatile, machine embroidery often benefits from specialized hoops (like magnetic or spring tension types) for consistent results, especially with thick or layered fabrics.
Ready to take your embroidery to the next level? With the right hoop, stabilizer, and a few pro tricks, every stitch can be a work of art. Happy stitching!