1. Introduction to the Kenmore Ergo3 Ecosystem
Once hailed as a powerhouse in the sewing and embroidery world, the Kenmore Ergo3 now stands as the best embroidery machine among vintage enthusiasts. Discontinued yet far from forgotten, this dual-function marvel bridges the gap between classic craftsmanship and early digital innovation. Whether you’re a studio owner, hobbyist, or a collector, the Ergo3’s legacy is defined by its robust feature set, versatile operation, and surprising compatibility with modern workflow enhancements.
In this guide, we’ll unravel everything you need to know: from the machine’s technical specifications and built-in embroidery capabilities, to practical maintenance routines and troubleshooting tips. We’ll also explore essential purchasing considerations for the discontinued model market, and tease smart upgrades—like magnetic hoop solutions—that can breathe new life into your vintage Ergo3. Ready to unlock the full potential of this iconic machine? Let’s dive in.
Table of Contents
- 1. Introduction to the Kenmore Ergo3 Ecosystem
- 2. Technical Specifications and Core Functionality
- 3. Operational Mastery and Troubleshooting
- 4. Purchasing Considerations in the Discontinued Model Market
- 5. Maintenance Protocols for Long-Term Performance
- 6. Digitization Workflows with Legacy Systems
- 7. Enhancing Vintage Machines with Modern Upgrades
- 8. Conclusion: Maximizing Your Ergo3 Investment
- 9. FAQ: Kenmore Ergo3 Essentials
2. Technical Specifications and Core Functionality
The Kenmore Ergo3 isn’t just a sewing machine—it’s a hybrid workhorse engineered for both traditional sewing and computerized embroidery machine. Closely related to the Janome MC 9700, the Ergo3 shares many of the same technical specs and user-friendly features that have made its twin a favorite among seasoned embroiderers.
2.1 Dual-Function Architecture: Sewing vs Embroidery Modes
At its core, the Ergo3 offers seamless switching between sewing and embroidery, empowering users to tackle a wide range of projects without missing a beat. Here’s how its architecture sets it apart:
- Speed Control Lever: Adjust your stitching pace on the fly, from slow, precise work to rapid runs—just like toggling between a tortoise and a hare. This lever is especially handy when switching from delicate fabrics to sturdier materials.
- Feed Dog Adjustments: Drop or raise the feed dogs with ease, enabling smooth transitions between free-arm sewing and embroidery. For embroidery, simply lower the feed dogs and let the machine take over the fabric movement.
- SET Key Customization: The SET key is your gateway to advanced customization. Switch between inch and millimeter measurements, calibrate touchscreen sensitivity, and fine-tune machine settings to suit your workflow.
- Extension Table: Tackle larger projects with confidence by attaching the extension table, giving you ample space for quilts or oversized garments.
- Pressure Dial: Adjust the presser foot tension to accommodate everything from lightweight silks to thick denim, ensuring even stitches and professional results.
The intuitive touchscreen interface ties it all together, letting you select modes, adjust settings, and troubleshoot with built-in guides. Whether you’re sewing a hem or digitizing a monogram, the Ergo3’s architecture adapts to your creative ambitions.
2.2 Built-In Embroidery Capabilities and Accessory Compatibility
Embroidery is where the Ergo3 truly shines, offering a suite of features that rival many modern machines:
- Built-In Designs and Monograms: With 447 built-in embroidery designs, plus monogramming options, you’ll never run short of inspiration. The on-board software even allows for basic editing and pattern digitization.
- Memory Card Compatibility: The Ergo3 uses CF (Compact Flash) cards for storing and transferring designs. This means you can import custom patterns and expand your creative library—just pop in a card and you’re ready to go.
- Embroidery Foot (Foot P): A dedicated embroidery foot stabilizes fabric during stitching, ensuring crisp, distortion-free results.
- Quilting Bar and Walking Foot: Attach the quilting bar to the walking foot for perfectly spaced parallel stitches—a must for quilters and those working with layered fabrics.
| Foot Type | Functionality |
|---|---|
| Zigzag Foot (A) | General-purpose zigzag stitching |
| Straight Stitch (H) | Straight-line sewing |
| Automatic Buttonhole (R) | One-step buttonhole creation |
| Zipper Foot (E) | Zipper installation and repair |
| Overedge (C) | Preventing fabric fraying |
| Satin Stitch (F) | Smooth satin stitching |
| Blind Hem (G) | Invisible hemming |
| 1/4" Seam (O) | Precision seam allowances |
| Walking Foot | Managing thick or slippery fabrics |
Janome MC9700 Cross-Compatibility: Accessories and hoops designed for the Janome MC9700 are fully compatible with the Ergo3. This opens up a world of aftermarket options and ensures you’re never short on replacement parts or upgrades.
The machine’s memory card slot, intuitive editing features, and robust accessory lineup make it a versatile tool for both embroidery purists and creative experimenters.
3. Operational Mastery and Troubleshooting
Mastering the Kenmore Ergo3 is all about understanding its nuanced setup and knowing how to keep it running smoothly. Whether you’re threading for the first time or deciphering an error code, a little know-how goes a long way.
3.1 Embroidery Setup: From Bobbin Insertion to Thread Path Optimization
Setting up your Ergo3 for embroidery is a ritual that, once perfected, transforms frustration into flow. Here’s a step-by-step guide inspired by both the owner’s manual and hands-on YouTube demonstrations:
1. Bobbin Insertion
- Place the bobbin in the holder with the thread running counterclockwise.
- Guide the thread into the notch on the front side of the bobbin holder, then slide it between the tension spring blades.
- Pull out about 6 inches (15 cm) of thread and secure the hook cover plate.
2. Machine Threading
- Raise the thread take-up lever to its highest position by turning the handwheel counterclockwise.
- Place the spool on the spool pin, ensuring the thread feeds from the bottom toward the front.
- Guide the thread around the upper thread guide, then down around the check spring holder, and through the take-up lever eye.
3. Presser Foot Management
- Use the red button at the back of the presser foot holder to switch between feet—universal for everyday stitches, decorative for specialty work, and embroidery foot for your designs.
Pro Tip: Video tutorials show how easy it is to switch modes, select designs, and adjust settings using the touchscreen. Don’t forget to lower the presser foot before starting embroidery—a simple step that’s easy to overlook in the excitement.
3.2 Decoding Error Codes and Preventive Maintenance
Even the best machines need a little TLC. The Ergo3 comes equipped with built-in diagnostics to help you troubleshoot common issues:
| Error Code | Issue | Resolution |
|---|---|---|
| X/Y Carriage Motor Failure | Wiring or motor fault | Check wiring connections; test motor resistance. Replace motor or A control board if faulty. |
| Zigzag Motor Failure | Motor or control board fault | Inspect wiring; test motor resistance. Replace as needed. |
| Feed Motor Failure | Motor malfunction | Verify wiring; test resistance. Replace as needed. |
| Y Cable Failure | Data signal disruption | Reconnect Y cable; replace if damaged. |
Preventive Maintenance Checklist:
- Thread Path Inspection: Ensure thread isn’t caught in tubes or tension springs.
- Bobbin Area Cleaning: Use compressed air to clear debris and lint from the bobbin compartment.
- Needle Alignment: Confirm needles face the correct direction and are securely locked.
Regular cleaning, oiling, and careful threading are your best defenses against downtime. For in-depth troubleshooting, the 90-page owner’s manual and video guides are invaluable resources—don’t hesitate to consult them when in doubt.
Ready to take your Kenmore Ergo3 experience to the next level? In the next sections, we’ll explore purchasing tips, maintenance routines, and modern upgrades that can transform your vintage machine into a contemporary embroidery powerhouse.
4. Purchasing Considerations in the Discontinued Model Market
The Kenmore Ergo3 has become something of a legend in the embroidery world—not just for its capabilities, but for the journey it’s taken from a high-ticket retail item to a beloved vintage find. If you’re considering adding this machine to your studio or collection, understanding the market dynamics and how it stacks up to its Janome sibling is crucial.
4.1 Price History Analysis: From $3,500 MSRP to $200 Secondary Market
Let’s take a quick trip down memory lane. When the Kenmore Elite Ergo 3 19010 first hit the shelves, it commanded a retail price of $3,000–$3,500—a serious investment for any embroiderer. According to user reviews and Google search anecdotes, the average paid price hovered around $1,604, reflecting both the machine’s premium positioning and the value placed on its robust feature set.
Fast forward to today, and the landscape has shifted dramatically. The Ergo3 is now discontinued, which means new-in-box units are unicorn-rare. Most buyers encounter the machine as refurbished embroidery machine or used listings on platforms like Craigslist, eBay, or OfferUp. Here, prices typically range from $200–$600—sometimes with a treasure trove of original accessories included (think digitizing software, hoops, threads, and manuals). There are even stories of pristine, barely-used machines changing hands for as little as $200, especially when sellers are eager to reclaim space or simply intimidated by the machine’s complexity.
This steep price drop is a double-edged sword: it makes the Ergo3 incredibly accessible for hobbyists and small studios, but also means that resale value is limited. If you’re looking for a budget-friendly entry into computerized embroidery, the Ergo3 is a compelling option—just be sure to verify the completeness of included accessories and the machine’s working condition.
4.2 Ergo3 vs Janome MC9700: Feature-by-Feature Breakdown
Curious how the Kenmore Ergo3 stacks up against its close cousin, the Janome MC9700? Here’s a side-by-side look at the features that matter most:
| Feature | Kenmore Ergo 3 19010 | Janome MC 9700 |
|---|---|---|
| Embroidery Field Size | 5" x 4.29" | 7.9" x 5.5" |
| USB Compatibility | Requires 8GB FAT32 drives | Native USB support |
| Stitches/Designs | 673 stitches, 447 embroidery designs | 98 stitches, 7 buttonholes |
| Price (Used vs. New) | $200–$600 (used) | $3,000–$4,000 (new) |
Workflow and Design Considerations:
- Embroidery Field: The Ergo3’s smaller field is perfect for monograms, patches, and small motifs, but may limit your ambitions for larger, multi-color projects. The MC9700’s expanded field opens the door to more complex designs.
- Design Transfer: The Kenmore relies on PC card readers and .SEW files for design transfer—a process that feels a bit like sending a message by carrier pigeon compared to the MC9700’s direct USB workflow.
- Accessories: While the Kenmore often comes bundled with a generous set of tools, the Janome may require additional purchases to match its full potential.
Cost-Benefit Analysis:
| Factor | Kenmore Ergo 3 | Janome MC 9700 |
|---|---|---|
| Budget-Friendly | Ideal for hobbyists & small projects | Best for commercial/complex designs |
| Ease of Use | Can be intimidating for beginners | User-friendly LCD touchscreen |
| Long-Term Value | Limited resale due to discontinuation | Higher resale, ongoing support |
For the budget-conscious or those seeking a feature-rich introduction to embroidery, the Kenmore Ergo3 delivers substantial value. If you’re after larger embroidery fields, streamlined design transfer, or long-term manufacturer support, the Janome MC9700 may justify its premium.
5. Maintenance Protocols for Long-Term Performance
A well-loved Kenmore Ergo3 can last for decades—if you treat it right. Regular cleaning, mindful oiling, and the occasional light bulb swap are your tickets to a smooth-running, frustration-free embroidery experience.
5.1 Cleaning Routines: Hook Area Maintenance & Light Bulb Replacement
Hook Area and Bobbin Race Cleaning:
- Remove the bobbin and its casing to access the hook race.
- Use a cotton swab dampened with rubbing alcohol to gently wipe away lint, thread debris, and oil residue. Repeat until the swab comes away clean.
- For the needle bar and nearby mechanisms, use a dry swab to clear loose debris before applying oil.
Thread Path and Tension Disc Care:
- Clean tension discs and thread guides with a dry swab to prevent thread buildup.
- For tight spots, run fishing line or strong thread through to pull out trapped fibers.
Top Mechanism and Presser Foot Area:
- Unscrew the top cover to access the needle bar and presser foot area. Clean with a dry swab, avoiding oil around cables or electronic parts.
Oiling Points:
- Apply 1–2 drops of sewing machine oil to the needle bar and hook race after cleaning. Avoid getting oil on cables or electronics.
- Check feed and zigzag motors for resistance (≥6 ohms) if troubleshooting; replace if resistance is low.
Light Bulb Replacement:
- Face Cover Bulb: Remove the face cover as per the manual, swap in a compatible bulb, and reassemble.
- Sewing Arm Bulb: Remove the arm cover, replace the bulb, and follow manual instructions to reassemble.
Preventive Maintenance & Troubleshooting:
| Issue | Solution |
|---|---|
| X/Y Carriage Motor Failure | Check wiring, test resistance (≥6 ohms), replace parts |
| Thread Breakage | Clean tension discs and thread path, check threading |
| Error Codes | Refer to manual or Sears PartsDirect for solutions |
Key Recommendations:
- Clean the bobbin and hook area every 10–15 hours of use.
- Oil monthly, using only sewing machine oil.
- Always consult the official 90-page manual for diagrams and detailed steps.
By sticking to these routines, you’ll keep your Ergo3 humming along for years—no drama, no downtime.
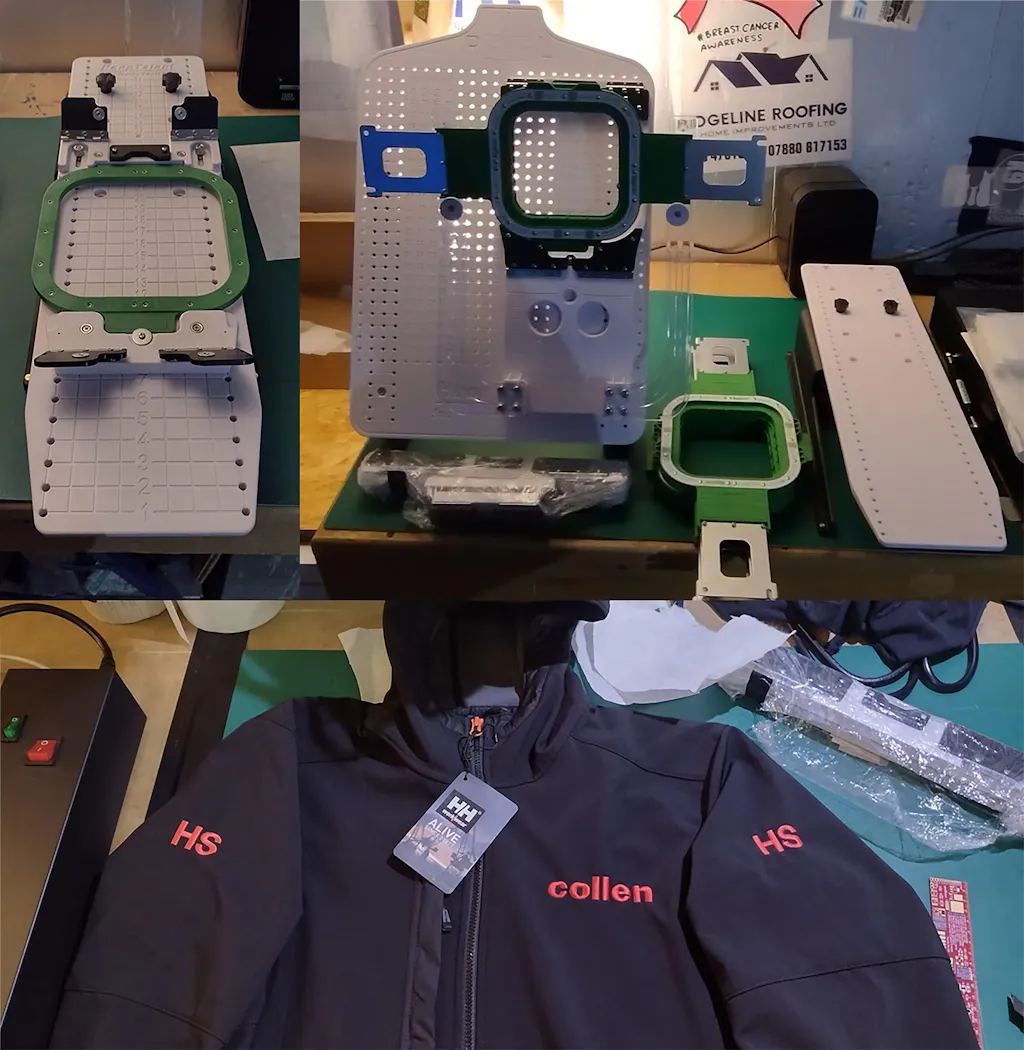
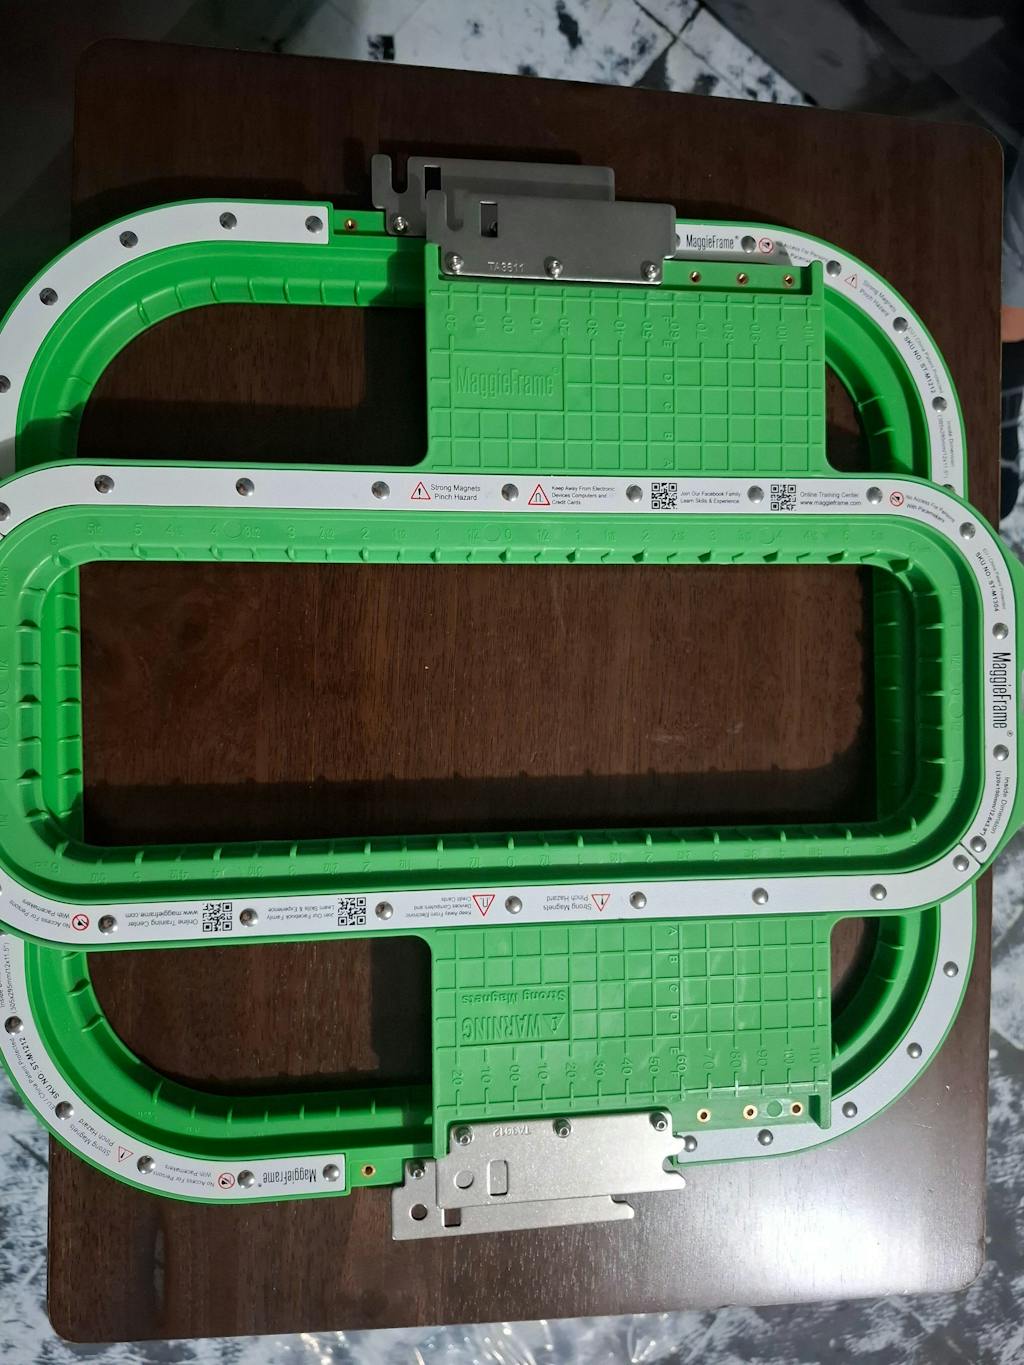
5.2 Modern Hooping Solutions for Garment Embroidery
Let’s talk about the unsung hero of embroidery productivity: the hoop. If you’re still wrestling with traditional plastic hoops—twisting screws, fighting fabric slippage, or wincing at hoop burn—there’s a better way.
Enter MaggieFrame Magnetic Hoops.
MaggieFrame’s magnetic hoops for embroidery machines are a game-changer for garment embroidery. Here’s why:
- Speed: Hooping a garment with MaggieFrame is up to 90% faster than with traditional screw-based hoops. What used to take three minutes now takes thirty seconds—imagine the time you’ll save on a production run!
- Fabric Protection: The powerful magnetic system automatically adapts to different fabric thicknesses, clamping everything from delicate silks to heavy denim with even tension. This dramatically reduces fabric distortion and hoop marks.
- Ease of Use: No more sore wrists from tightening screws. Just snap the hoop in place, align your fabric using the built-in reference lines, and you’re ready to embroider.
- Durability: Crafted from high-grade PPSU engineering plastic and N50-grade magnets, MaggieFrame hoops outlast ordinary plastic hoops by a factor of 40—meaning fewer replacements and more reliable results.
For garment embroiderers, especially those running high-volume jobs, MaggieFrame delivers a rare blend of speed, precision, and comfort. Once you experience magnetic hooping, it’s hard to go back.
6. Digitization Workflows with Legacy Systems
The Kenmore Ergo3 is a marvel of early digital embroidery—but its design transfer process can feel like a time capsule from the Windows XP era. If you’re determined to bring custom designs to life, understanding the machine’s digitization workflow and modern workarounds is essential.
6.1 ATA PC Card Operations and .JEF/.SEW File Management
Hardware & File Transfer:
- The Ergo3 uses ATA PC cards to transfer embroidery designs, supporting .JEF and .SEW file formats.
- These cards act as the bridge between your computer and machine, letting you load designs directly for stitching.
Legacy Software Compatibility:
- The Kenmore Elite 93300 Customizer software (for Windows 98/ME/2000/XP) enables users to:
- Import clip art from .WMF or .BMP files via EasyImport.
- Edit layouts and stitch parameters using EasyEdit.
- This software ecosystem is closed and limited to older Windows versions, making it tricky for modern users.
| Format | Purpose | Compatibility |
|---|---|---|
.JEF |
Embroidery designs | Kenmore Ergo3, Janome MC9700 |
.SEW |
Embroidery designs | Kenmore Ergo3 (via card readers) |
.WMF, .BMP
|
Source artwork | Converted via EasyImport |
Digitization Workflow:
1. Prepare artwork in .WMF or .BMP format.
2. Convert and edit using the Customizer software.
3. Save as .JEF or .SEW.
4. Load onto an ATA PC card and insert into the Ergo3.
Challenges & Limitations:
- Firmware Updates: Difficult to obtain; limited support from Kenmore/Sears.
- Software Obsolescence: Incompatibility with modern operating systems.
- File Constraints: Designs with more than 12 color stops must be split into multiple files.
Key Takeaway: The ATA PC card remains the heart of the Ergo3’s workflow. While the process works, it’s undeniably dated and can be a barrier for those used to USB-based design transfers.
6.2 Modern Workarounds for Design Transfer Challenges
So, what if you want to break free from legacy limitations? Here’s how contemporary embroiderers are bridging the gap:
- Third-Party Conversion Tools: Modern digitizing software (like Adobe Illustrator or CorelDRAW) can create designs, which are then converted to .JEF or .SEW formats using digitizing software for embroidery. This sidesteps the need for obsolete operating systems.
- Janome Compatibility: Because of the hardware similarities between the Kenmore Ergo3 and Janome MC9700, some users have found partial success using Janome firmware or software solutions, though full compatibility isn’t guaranteed.
MaggieFrame & Updated Workflows: If you’re upgrading your hooping setup to MaggieFrame magnetic hoops, you’ll find they fit seamlessly into both vintage and modern workflows. MaggieFrame’s broad compatibility means you can focus on improving your embroidery results—no matter how you get your designs into the machine.
In Summary: While the Kenmore Ergo3’s digitization workflow is rooted in the past, a little ingenuity—and the right tools—can bring your creative visions to life. Pairing legacy hardware with modern accessories like MaggieFrame hoops ensures your embroidery experience is as efficient and enjoyable as possible, even in a digital world that never sits still.
7. Enhancing Vintage Machines with Modern Upgrades
Breathing new life into the Kenmore Ergo3 is a blend of art and engineering—a dance between honoring vintage craftsmanship and embracing the conveniences of today’s embroidery world. If you’ve ever wondered how far you can push your Ergo3’s capabilities, this section is your backstage pass to the world of hardware tweaks and workflow upgrades.
7.1 Hardware Modification Opportunities and Limitations
Let’s start with the elephant in the room: the Kenmore Ergo3’s hardware is both its greatest charm and its biggest constraint. According to in-depth analysis and community experience, here’s what you need to know about upgrades and their boundaries:
Embroidery Hoop Upgrades:
- The Ergo3 is locked into a 4x4-inch embroidery field—a limitation hardwired into its arm and carriage. No amount of wishful thinking (or aftermarket tinkering) will let you stitch larger designs, but you can upgrade the type of hoop you use.
- Third-party magnetic embroidery hoop solutions, such as those from MaggieFrame, offer modern hooping features like magnetic alignment and even tension, though the physical size cap remains.
USB Connectivity and Storage:
- The machine relies on CompactFlash (CF) cards for design transfers—a relic of a bygone digital era.
- While the Ergo3 has no native USB port, some users have experimented with USB-to-CF adapters or even USB-C solutions to bridge the gap. These workarounds hinge on your computer’s ability to interface with the CF card, not the machine itself.
- Firmware constraints (often stuck at version 1.0) mean you’ll need to convert designs to .JEF or .SEW formats using compatible software.
Firmware and Software Workarounds:
- Official firmware updates are, for all practical purposes, extinct. Most users are locked into what shipped with their machine.
- Third-party embroidery software—like Embrilliance—can convert modern file formats to those the Ergo3 understands.
- Since the Ergo3 is a rebranded Janome MC9700, some have explored using Janome’s firmware or software, but compatibility is not guaranteed.
Maintenance and Repair:
- The X/Y carriage, zigzag, and feed motors are the usual suspects when it comes to hardware failures. Diagnosing with a multimeter and replacing parts as needed is essential for longevity.
- The A control board (which manages motor functions) and Y-cable integrity are also critical—community forums and parts suppliers can be invaluable resources.
Community Wisdom:
- User forums, YouTube tutorials, and downloadable manuals (like the 90-page owner’s guide) are your best friends for troubleshooting and creative solutions.
The Bottom Line:
While you can modernize the workflow and improve usability, the Ergo3’s physical limits—like embroidery field size and lack of direct USB—are here to stay. Embrace these quirks, and you’ll find a machine that rewards patience and ingenuity.
7.2 Magnetic Hoop Solutions for Improved Workflow
If you’re ready to ditch the struggle of traditional plastic hoops, it’s time to meet the modern marvel: MaggieFrame magnetic embroidery hoops.
Why MaggieFrame?
- Seamless Compatibility: MaggieFrame hoops are engineered to fit a wide range of embroidery machines, including those compatible with the Janome MC9700—the Ergo3’s twin.
- Durability That Lasts: Thanks to high-grade PPSU engineering plastic and N50-grade magnets, MaggieFrame hoops are up to 40 times more durable than ordinary plastic hoops. That’s not marketing fluff—it’s the result of rigorous impact and pressure testing.
- Superior Magnetic Strength: The N50 magnets deliver a clamping force that keeps even thick or slippery fabrics taut, minimizing misalignment and hoop marks.
- Effortless Hooping: Forget about fiddling with screws or battling hoop burn. With MaggieFrame, hooping is as simple as snap, align, and go—saving you up to 90% of the time compared to old-school methods.
| Feature | MaggieFrame Magnetic Hoop | Traditional Plastic Hoop |
|---|---|---|
| Fixation Method | Magnetic, automatic, screw-free | Manual screw tightening |
| Durability | 40x longer lifespan | Prone to cracks, frequent replace |
| Magnetic Strength | N50-grade, even tension | No magnetic force |
| Fabric Protection | Reduces hoop burn, distortion | Higher risk of hoop marks |
Real-World Impact:
Imagine prepping a batch of shirts for embroidery. With MaggieFrame, you’ll breeze through hooping in seconds, not minutes. The magnetic system adapts to varying fabric thicknesses, so you can switch from silk to denim without breaking stride. And because these hoops are built to withstand the rigors of daily use, you’ll spend less time replacing parts and more time creating.
A Smart Upgrade:
For vintage machines like the Ergo3, a MaggieFrame magnetic hoop isn’t just an accessory—it’s a workflow revolution. You get the best of both worlds: the reliability of classic engineering and the convenience of modern technology.
Ready to leave frustration behind? MaggieFrame is your ticket to faster, smoother, and more enjoyable embroidery—no matter how vintage your machine may be.
8. Conclusion: Maximizing Your Ergo3 Investment
The Kenmore Ergo3 may be a relic of a different era, but with the right care and a few smart upgrades, it can still be a powerhouse in your embroidery studio. Regular maintenance—like cleaning, oiling, and replacing worn parts—keeps it running smoothly. When it comes to workflow, investing in a MaggieFrame magnetic hoop transforms hooping from a chore into a breeze, slashing setup time and protecting your fabrics.
Embrace the blend of vintage charm and modern innovation, and your Ergo3 will reward you with years of creative satisfaction.
9. FAQ: Kenmore Ergo3 Essentials
9.1 Q: Can I upgrade the Kenmore Ergo3 with a USB port for direct design transfer?
A: No, the Ergo3 does not support native USB upgrades. Design transfers rely on CompactFlash cards. Some users use USB-to-CF adapters for file management, but the machine itself cannot be retrofitted with a USB port.
9.2 Q: Is the Ergo3 compatible with modern magnetic hoops like MaggieFrame?
A: Yes, MaggieFrame magnetic embroidery hoops are compatible with the Kenmore Ergo3 (and Janome MC9700). They offer improved durability, faster hooping, and better fabric protection compared to traditional plastic hoops.
9.3 Q: Are firmware updates or modern software available for the Ergo3?
A: Official firmware updates are no longer available. However, third-party software can convert modern embroidery files to formats (.JEF, .SEW) recognized by the Ergo3.
9.4 Q: What should I do if my Ergo3 displays a motor or carriage error?
A: Check wiring connections, test motor resistance with a multimeter, and inspect the A control board. Replace faulty parts as needed. Community forums and the 90-page owner’s manual provide detailed troubleshooting steps.
9.5 Q: How do I ensure the best embroidery results with my Ergo3?
A: Regularly clean and oil the machine, use compatible presser feet, and consider upgrading to a MaggieFrame magnetic hoop for faster, more reliable hooping and reduced fabric distortion.