1. Introduction: Mastering Bobbin Tension for Professional Results
Imagine spending hours on a beautiful embroidery project, only to discover unsightly loops, tangled threads, or uneven stitches marring your work. The culprit? Often, it’s improper bobbin tension. In machine embroidery for beginners, precise bobbin tension is the unsung hero behind flawless, balanced stitches. When set correctly, it prevents headaches like bird nesting (those dreaded thread tangles under your fabric) and looping threads that can ruin your design.
In this guide, we’ll unravel the mystery of bobbin tension—why it matters, how to adjust it step by step, and how to troubleshoot common issues. You’ll learn not just the “how,” but the “why,” gaining confidence to tackle tension problems and keep your stitches crisp and professional. Ready to turn tension troubles into triumphs? Let’s dive in.
Table of Contents
- 1. Introduction: Mastering Bobbin Tension for Professional Results
- 2. Step-by-Step Guide to Tightening Bobbin Tension
- 3. Diagnosing and Fixing Common Tension Problems
- 4. When to Adjust Bobbin vs. Top Tension
- 5. Tension Testing Tools and Techniques
- 6. Machine-Specific Adjustment Guides
- 7. Preventive Maintenance for Consistent Tension
- 8. Advanced Troubleshooting When Adjustments Fail
- 9. Conclusion: Key Takeaways for Perfect Tension
- 10. FAQ: Bobbin Tension Essentials
2. Step-by-Step Guide to Tightening Bobbin Tension
Perfect bobbin tension isn’t magic—it’s methodical. Follow these steps to achieve balanced stitches and say goodbye to looping threads and bird nesting.
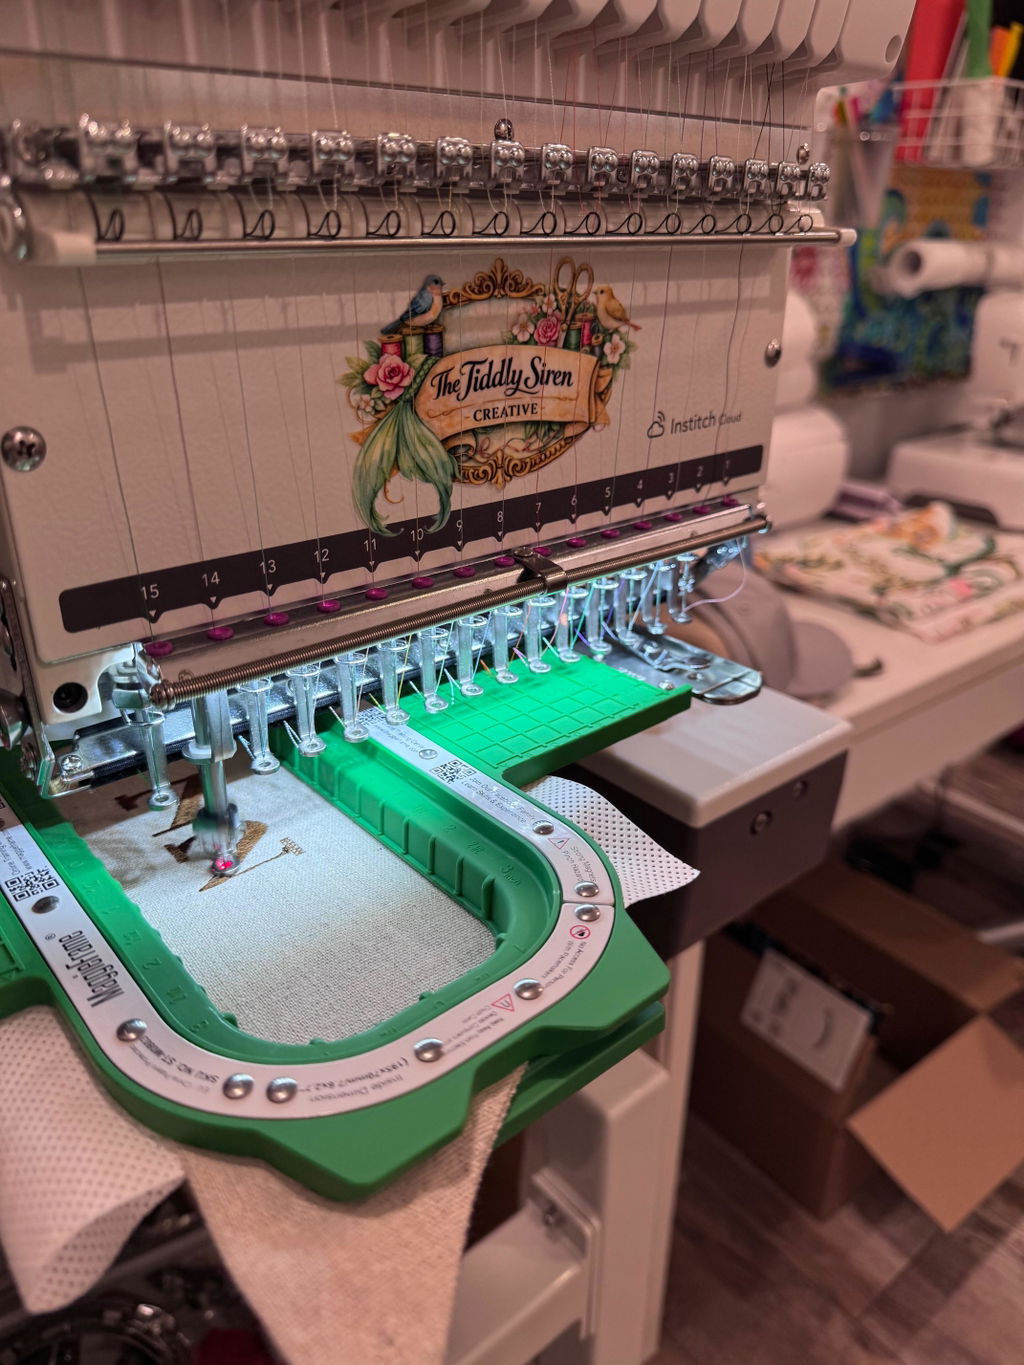
2.1 Identifying Your Bobbin System Type
Before you can adjust anything, you need to know your machine’s bobbin system. There are two main types:
- Top-Loading (Drop-In) Bobbin Systems: Here, the bobbin sits horizontally under the needle plate. Brands like Brother and Janome often use this design. To spot it, look for a clear cover plate you lift to drop the bobbin in. The tension screw is typically on the side of the bobbin case, but you might need to remove the throat plate to access it. For Brother machines, always check your manual for guidance—sometimes a coin can help unscrew tight plates.
- Front-Loading (Vertical) Bobbin Systems: Found in brands like Bernina and Singer, these systems have the bobbin case positioned vertically in a shuttle at the front. You’ll need to remove the case to access the tension screw, which is usually easy to spot.
Pro Tip: Before making any adjustments, snap a quick photo of your bobbin case and screw position. That way, you can always return to your starting point if needed.
2.2 Precise Adjustment Techniques
Now, let’s get hands-on. Adjusting bobbin tension is a game of millimeters—tiny changes make a big difference.
- Locate the Tension Screw: On the side of the bobbin case, find the small flat-head screw (never touch the Phillips screw). This is your adjustment point.
- Clock Method for Adjustments: Think of the screw as a clock face. To tighten (increase tension), turn the screw clockwise (“righty tighty”). To loosen, turn it counterclockwise (“lefty loosey”). How much? Make tiny moves: just 1/8 to 1/4 of a turn at a time—imagine moving from 12 o’clock to 1 o’clock. Even a “15-minute” turn can have a noticeable impact.
- Test After Each Adjustment: Don’t rush. After every tweak, test your tension (see next section). If you go too far, gently reverse in even smaller increments.
- Using a TOWA Gauge: For those who crave precision, a TOWA bobbin tension gauge assigns a numerical value to your tension. Just insert the loaded bobbin case, pull the thread, and read the resistance. This is especially handy when swapping thread types or striving for repeatable results.
2.3 Verifying Balanced Tension
How do you know you’ve nailed it? Testing is everything.
- Drop Test (“Spider Test”): Hold the loaded bobbin case by the thread. Bounce it gently up and down about an inch. The case should drop slowly, not plummet. If it falls too fast, tension is too loose; if it barely moves, it’s too tight. You’re aiming for a smooth, controlled drop—think “spider descending a web,” not “yo-yo gone wild.”
-
Stitch Test on Fabric: Hoop a piece of medium-weight fabric with stabilizer. Stitch a design with satin columns or borders—these make imbalances obvious. Flip your work over:
- Balanced Tension: You’ll see about 1/3 of the bobbin thread on the underside, with no bobbin thread peeking on top.
- Too Loose: Bobbin thread shows on the top.
- Too Tight: Top thread dominates the underside, fabric may pucker.
- Iterate: Adjust, test, repeat. Patience pays off—those tiny screw turns are your best friends.
3. Diagnosing and Fixing Common Tension Problems
Even with careful adjustments, tension issues can sneak in. Here’s how to spot and solve them before they sabotage your stitches.
3.1 Symptom Identification: Too Loose vs. Too Tight
Let’s play embroidery detective. The fabric tells all:
- Too Loose (Bobbin Tension):
- Bobbin thread shows on the top side of your fabric.
- Stitches look loose and may unravel easily.
- You might see thread nests (“bird nesting”) under the fabric.
- The bobbin case drops too quickly in the drop test.
- Too Tight (Bobbin Tension):
- Top thread is pulled to the underside, dominating the back of your work.
- Fabric puckers or gathers.
- Threads may break frequently.
- The bobbin case barely moves in the drop test.
Visual Guide: YouTube tutorials and troubleshooting videos often show side-by-side stitch samples. Look for visible knots or loops—these are clues to which tension needs attention.
3.2 Solutions for Bird Nesting and Looping
Bird nesting and looping can turn a dream project into a nightmare. Here’s a step-by-step rescue plan, inspired by expert advice and Ricoma’s 5-reason analysis:
- Stop and Assess: Don’t keep stitching! Remove your project and inspect the bobbin area for thread jams.
- Check Thread Path: Ensure both upper and bobbin threads are correctly threaded. An incorrectly placed bobbin or missed groove is a common culprit.
- Clean the Bobbin Area: Lint and debris can wreak havoc on tension. Remove the bobbin case and brush out any dust or stray threads.
- Adjust Bobbin Tension: Use the clock method—tiny clockwise turns to tighten, testing after each adjustment. Remember, over-adjusting can make things worse.
- Test on Scrap Fabric: Always test on similar fabric and thread before returning to your main project.
- Verify Top Thread Tension: Sometimes, the upper tension is to blame. If loops appear on the underside, try increasing the top tension slightly.
- Repeat as Needed: Tension issues are often a balancing act. Adjust, test, and repeat until your stitches are smooth and balanced.
Pro Tip: Keep a reference chart or sticky note with your “home base” screw position. If you get lost, you’ll have a map back to perfect tension.
4. When to Adjust Bobbin vs. Top Tension
Knowing when to adjust bobbin tension instead of top tension is the secret sauce for embroidery mastery—and the difference between a quick fix and a frustrating spiral of stitch problems. Let’s crack open the “95% Rule,” then spotlight those rare exception cases where bobbin tweaks are truly needed.
4.1 The 95% Rule: Prioritizing Top Tension Adjustments
Here’s the golden rule echoed by experts, manufacturers, and seasoned sewists: In more than 95% of tension issues, you should adjust the top (needle) tension first, not the bobbin tension. Why? The top tension dial is designed for easy, incremental changes, while the bobbin tension screw is tiny, ultra-sensitive, and set by the factory for a reason.
Think of your sewing machine as a tug-of-war between the upper and bobbin threads. Most of the time, if your stitches look off—loops on the underside, puckering, or visible bobbin thread on top—the culprit is the upper thread tension. It’s meant to be adjusted frequently, with a numbered dial for quick reference. The bobbin tension, by contrast, is like the foundation of a house: stable, rarely changed, and only touched when all else fails.
Before you even think about reaching for that minuscule bobbin screw, run through this checklist:
- Adjust the upper tension dial through its full range (usually 1–9)
- Rethread both upper and bobbin threads from scratch
- Clean lint from tension discs and the bobbin area
- Use the correct needle size and thread type for your fabric
If you’ve done all this and still see bobbin thread on top or persistent loops, only then should you consider a bobbin adjustment. As one expert puts it, “The bobbin tension is controlled by a tiny screw that’s very sensitive and difficult to fine-tune. In contrast, the upper thread tension is easy to access and adjust.”
Pro tip: Mark your bobbin screw’s original position with a fine-tip marker or snap a photo before making any changes—so you can always return to “home base” if needed.
4.2 Exception Cases for Bobbin Adjustment
Specialty Threads
- Metallic, monofilament, or fine silk threads: These threads behave differently than standard polyester or cotton. If you’re using metallic thread in the bobbin and see loops on top even after minimizing top tension, a slight bobbin tightening can help secure the stitch.
- Heavyweight threads (30–40 weight): Sometimes, you may need to loosen bobbin tension if the thread feels choked, but tightening is required if fine threads are used with heavy top threads and top tension is already at its lowest.
Fabric Weight Extremes
- Heavyweight fabrics (denim, canvas, leather): If you’re using fine bobbin thread with heavy top thread and top tension is already minimized, a slight bobbin tightening may be needed to balance the stitch.
- Quilt sandwiches (multiple layers): If top tension adjustments alone don’t center the stitch in the fabric “sandwich,” a small bobbin tweak can help.
When Top Tension Is Already at Its Minimum
If you’ve dialed the top tension all the way down (to 1 or 2) and bobbin thread still shows on the top, it’s a sign your bobbin tension is too loose relative to the top. Now’s the time for a careful, tiny clockwise turn of the bobbin screw—just 1/8 to 1/4 turn at a time, testing after each adjustment.
Machine-Specific Needs
Some specialty machines (like those for leatherwork) or certain embroidery techniques may call for different tension strategies. In these cases, always consult your manual or trusted resources.
Caution: Unnecessary bobbin adjustments can lead to a cascade of new problems—so always exhaust top tension options first. When you do adjust the bobbin, document your baseline and move in the smallest increments possible.
5. Tension Testing Tools and Techniques
Perfect tension isn’t guesswork—it’s science, with a dash of artistry. Whether you’re a home sewist or a production pro, these tools and techniques will help you dial in flawless stitches every time.
5.1 Mastering the Drop Test
The drop test—sometimes called the “spider test”—is the classic, time-tested way to check bobbin tension using nothing but your hands (and maybe a household clip).
How to perform the drop test:
- Remove the bobbin and case from your machine.
- Hold the thread tail and let the bobbin case dangle.
- Gently jerk or bounce the thread—think of a spider descending on its silk.
-
Watch how the bobbin case moves:
- Ideal tension: The case drops about 1–2 inches when bounced.
- Too loose: The case plummets or keeps unspooling.
- Too tight: The case barely moves, or not at all.
If you’re feeling creative, household items like an inch-and-a-quarter binder clip (as seen in BERNINA Jeff’s YouTube demo) can mimic the “standard weight” sometimes used in professional settings. Tie the clip to your thread and bounce—if the bobbin case slides a little, you’re golden. If it zips down, tighten the screw. If it won’t budge, loosen it.
Troubleshooting tips:
- Always test with the same thread and fabric you’ll use in your project.
- Adjust in tiny increments—1/8 turn at a time.
- Retest after each adjustment for consistent results.
5.2 Professional Tools: TOWA Gauges and Dynamometers
If you crave precision or work with a variety of threads and fabrics, professional tools like the TOWA gauge or a spring dynamometer bring science to your stitch.
TOWA Gauge:
- Measures the resistance (gram-force) of the bobbin thread as it’s pulled from the case.
- Insert the loaded bobbin case, pull the thread, and read the value—ideal tension for domestic machines is typically 18–25gf.
- Assigns a numerical value, making it easy to repeat settings for different projects or threads.
Spring Dynamometer:
- Offers a cost-effective way to measure tension (0.2–0.5N for most domestic machines).
- Especially useful when switching between thread weights (e.g., V138, Serafil 40).
Calibration tips:
- Always test with the actual thread and fabric you’ll use.
- Adjust the bobbin screw in tiny increments, retesting after each change.
- For heavy-duty or specialty threads, consult your machine’s manual or manufacturer’s guidelines for recommended tension ranges.
Best practices:
- Work incrementally—change only 1/8 to 1/4 turn at a time.
- Keep a log or chart of your tension settings for repeat projects.
- Remember: The sensitivity of the bobbin tension mechanism means patience pays off.
6. Machine-Specific Adjustment Guides
Every machine has its quirks. Whether you’re using one of the best embroidery machines from Brother, Bernina, Janome, or running an industrial workhorse, these brand-specific tips will help you adjust bobbin tension with confidence.
6.1 Brother Machine Focus: Top-Loading Systems
Step-by-step:
-
Access the bobbin case:
- For top-loading (drop-in) systems, lift the needle plate cover. You may need a coin or small screwdriver to remove tight screws.
- For front-loading systems, remove the front cover or plate to access the vertical bobbin case.
-
Locate the tension screw:
- It’s usually a small, slotted (flat-head) screw on the side of the bobbin case. Never touch the Phillips screw.
-
Set your baseline:
- Mark the current screw position with a fine-tip marker or snap a photo for reference.
-
Adjust in tiny increments:
- Turn the screw clockwise (“righty tighty”) to tighten, counterclockwise (“lefty loosey”) to loosen—just 1/8 to 1/4 turn at a time.
- Brother’s official guideline: 30–45 degrees per adjustment.
-
Test tension:
- Use the drop test or stitch test (preferably with a zig-zag stitch).
- Ideal tension: The bobbin case drops 1–2 inches when bounced, and stitches look even on both sides of your fabric.
-
Realign for reassembly:
- For front-loading cases, align the white arrow on the bobbin case with the dot on the machine.
- Listen for a “click” when the case is properly seated.
Maintenance notes:
- Clean the bobbin area before adjusting.
- Use the “P” trick for correct bobbin insertion: The thread should form a “P” shape as it unwinds.
- For specialty bobbin cases (e.g., gray for bobbin work), use only as directed and switch back to the standard case for regular sewing.
Warnings:
- Don’t force the screw—if it’s hard to turn, stop and consult your manual.
- Only adjust the slotted screw; leave all others alone.
Troubleshooting tip: If you get lost, Brother recommends keeping a second, unadjusted bobbin case as a baseline.
6.2 Universal Principles for Bernina, Janome, and Industrial Machines
Bernina:
- Most models use a front-loading, vertical bobbin case.
- Adjust the tension screw in 1/4-turn increments, testing after each change.
- Mark the original screw position so you can return to “normal” if needed.
- For specialty threads, Bernina recommends having a second bobbin case set for those threads.
Janome:
- Top-loading bobbin cases are common.
- Remove the throat plate to access the bobbin case for tension adjustments.
- Adjust the flat-head screw only, in small increments.
- Always test with the same thread and fabric as your project.
Industrial Machines:
- The drop test (“spider test”) is the gold standard—hold the bobbin case by the thread and bounce it gently.
- Adjust the tension screw using the clock method (imagine moving from 12 to 1 o’clock for a minimal change).
- For thicker threads or heavy fabrics, adjust in even smaller increments (30 minutes on the “clock”).
- Always test with the actual materials you’ll be sewing.
Universal advice:
- Clean out lint and stray threads before making adjustments.
- Use contrasting thread colors for top and bobbin during testing to clearly see stitch balance.
- Keep a log of your settings for different threads and fabrics.
Final thought: No matter your machine, patience and precision are your best friends. Tiny tweaks, thorough testing, and a methodical approach will keep your stitches balanced and your embroidery looking professional.
Ready to tackle tension like a pro? With these rules, tools, and machine-specific tips, you’ll be stitching with confidence—no more guesswork, just gorgeous, balanced embroidery every time.
7. Preventive Maintenance for Consistent Tension
A perfectly balanced stitch starts long before you ever touch the bobbin screw. Preventive maintenance—regular cleaning and oiling—forms the backbone of consistent bobbin tension. Think of it as flossing for your sewing machine: skip it, and you’ll soon face snags, gunk, and a world of frustration. Let’s break down the essential routines that keep your machine humming and your stitches flawless.
7.1 Lint Removal Protocols
Lint is the silent saboteur of perfect tension. Every hour your machine runs, tiny fibers from thread and fabric accumulate inside the bobbin area, tension discs, and feed dogs. Left unchecked, this buildup acts like a speed bump for your thread, throwing off tension and causing skipped stitches, loops, or even bird nests.
Step-by-Step Cleaning Protocol:
-
Safety First:
Always unplug your machine before cleaning. This isn’t just a suggestion—it’s your first line of defense against accidental mishaps. -
Disassemble for Access:
Remove the presser foot and needle, then take off the throat or needle plate to expose the bobbin area. Take out the bobbin and bobbin case for a thorough clean. -
Attack the Lint:
Use the small brush that came with your machine (or a specialty brush) to sweep out every nook and cranny, especially the bobbin race and tension discs. For stubborn lint, a gentle blast of compressed air can work wonders—just be careful not to blow debris further inside. -
Frequency is Key:
Clean your machine after every 8–10 hours of use, or more often if you’re working with lint-heavy fabrics like cotton. Heavy users or those embroidering daily may benefit from even more frequent cleaning.
Critical Areas to Target:
- Tension discs
- Needle guide
- Bobbin case
- Under the needle plate, including feed dogs
Regular cleaning not only prevents tension headaches but also extends your machine’s life. As one expert put it, "If you haven’t cleaned your machine in a while, you’ll be amazed—and maybe horrified—by how much lint comes out!"
7.2 Oiling and Long-Term Care
If cleaning is flossing, oiling is the moisturizer that keeps your machine’s moving parts gliding smoothly. Without proper lubrication, friction builds up, leading to erratic tension, noisy operation, and even permanent damage.
Oiling Protocol:
-
Prep and Clean:
Unplug your machine and remove the needle. Always clean out lint before oiling—otherwise, you risk creating a sticky, abrasive paste. -
Identify Oiling Points:
Consult your machine’s manual for precise oiling locations. Look for small holes or wicks, sometimes marked with red dots, and don’t forget the bobbin case area if specified. -
Apply the Right Oil:
Use only clear sewing machine oil. One drop per oiling point is enough—over-oiling can attract lint or stain your fabric. Never substitute with kitchen or household oils. -
Distribute and Test:
After oiling, turn the handwheel a few times to spread the oil. Wipe away any excess, reassemble your machine, and stitch a few lines on scrap fabric to ensure no oil stains remain.
Oiling Frequency:
- After each day’s work or every 8–10 hours of use
- Even if you sew infrequently, oil occasionally to prevent the oil from drying out and gumming up
Pro Tips:
- Replace your needle every 8–10 hours or at the first sign of tension issues—old needles can wreak havoc on tension.
- Schedule a full maintenance session quarterly, including a deep clean of the bobbin area.
By making cleaning and oiling a habit, you’ll spend less time troubleshooting tension and more time enjoying crisp, professional stitches.
8. Advanced Troubleshooting When Adjustments Fail
Sometimes, despite your best efforts, tension problems persist. When incremental screw turns, rethreading, and preventive maintenance don’t fix the issue, it’s time to dig deeper—into the realm of mechanical diagnostics and smart fabric-handling solutions.
8.1 Mechanical Diagnostics: Worn Parts and Alignment
If your bobbin tension screw is maxed out—turned as far as it will go—and your stitches are still off, you’ve likely crossed from routine adjustment into mechanical trouble.
What to Check:
-
Worn or Damaged Bobbin Case:
Inspect for burrs, nicks, or visible wear on the tension spring and thread path. Even tiny imperfections can cause inconsistent thread release. If your drop test results are erratic or tension adjustments have no effect, it’s time to replace the bobbin case. -
Lint and Debris:
Lint can hide in the smallest crevices, sabotaging tension. Use a brush and compressed air to clean the tension discs, under the needle plate, and especially the bobbin race. -
Damaged or Incompatible Components:
A bent or dull needle, a poorly wound bobbin, or using the wrong bobbin type for your machine can all distort tension. Roll your needle on a flat surface to check for bends, and always use manufacturer-recommended bobbins. -
Bobbin Race Alignment and Hook Timing:
If you hear unusual clicks or see uneven wear in the bobbin race, or if the needle and hook aren’t interacting smoothly, you may have a timing issue. This requires professional adjustment—don’t force it.
When to Replace or Seek Service:
- If your bobbin case shows visible wear or the adjustment screw is at its limit with no improvement, replace the case.
- If hook timing or race alignment is off, or you spot uneven wear, consult a technician.
Preventive Takeaway:
Wind bobbins evenly, clean your machine regularly, and use only compatible parts to minimize the risk of mechanical failures.
8.2 Fabric-Handling Solutions for Garment Embroidery
Sometimes, the problem isn’t with your machine—it’s with the way your fabric is held during embroidery. Uneven fabric tension can mimic bobbin tension issues, leading to unnecessary adjustments and wasted time.
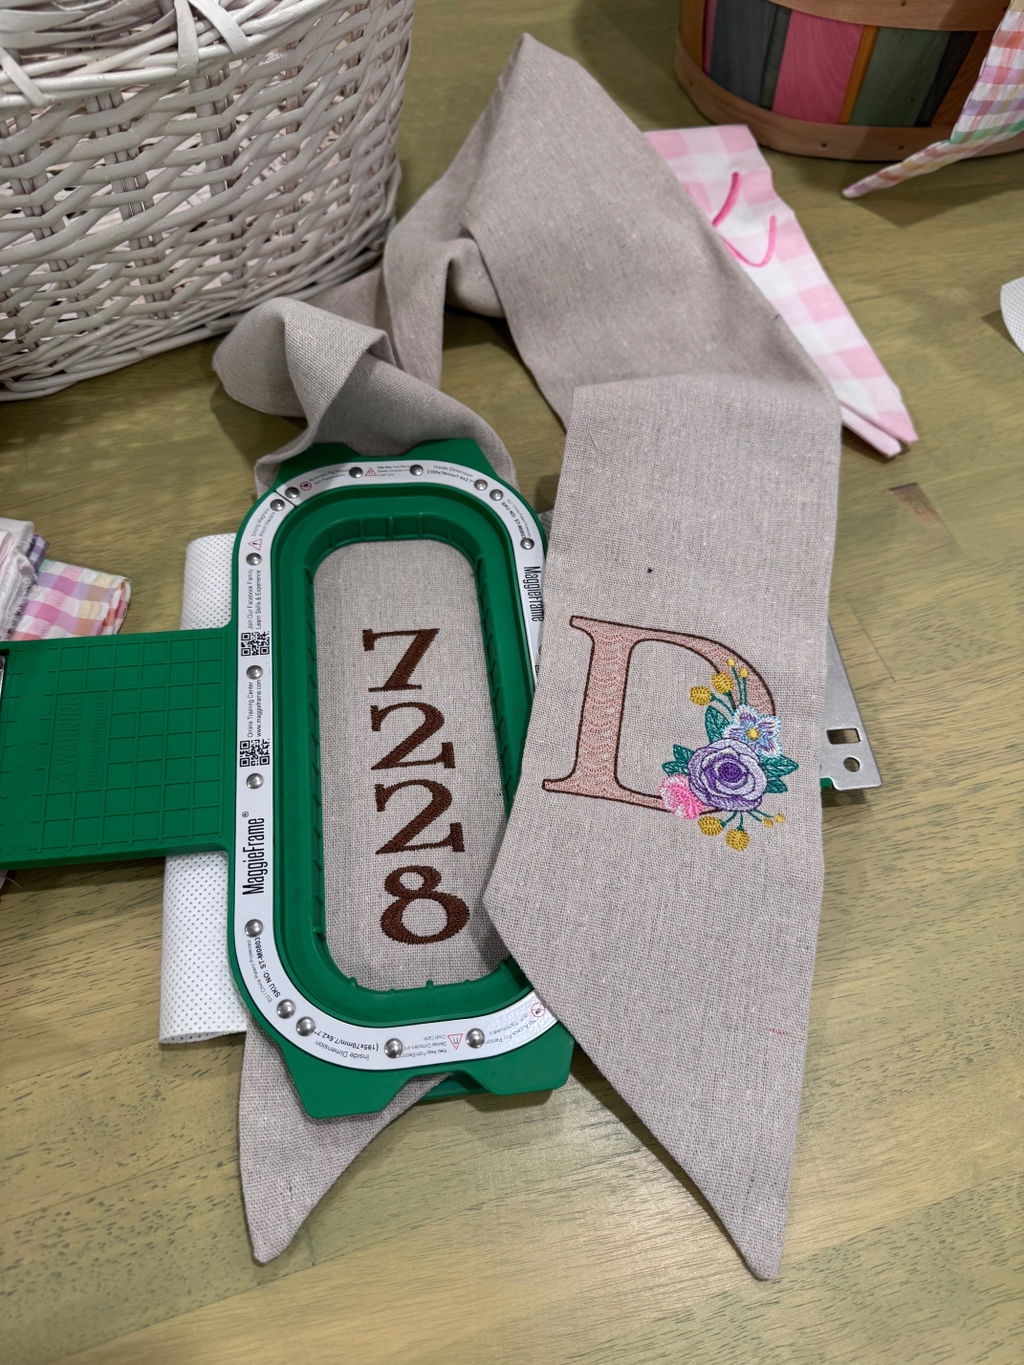
Enter MaggieFrame magnetic embroidery hoops:
For garment embroidery, MaggieFrame magnetic hoops offer a game-changing solution. Their powerful magnetic clamping system automatically adapts to various fabric thicknesses, holding material firmly and evenly throughout the embroidery process. This even tension minimizes shifting and distortion, so your stitches stay balanced—reducing the need for constant bobbin tension tweaks.
Why MaggieFrame?
-
Consistent Fabric Tension:
Prevents slippage and distortion, especially on tricky garments or multi-layered fabrics. -
Quick and Easy Hooping:
No more fiddling with screws or fighting fabric movement—just snap in place and go. -
Protects Your Work:
Even magnetic pressure means fewer hoop marks and less fabric damage.
By stabilizing your fabric from the start, MaggieFrame hoops help ensure that your tension adjustments actually work—so you spend less time troubleshooting and more time creating.
9. Conclusion: Key Takeaways for Perfect Tension
Achieving flawless bobbin tension is a blend of art, science, and a bit of routine TLC. Remember: start with preventive maintenance—regular cleaning and oiling are your first defense against recurring issues. Make tension adjustments in tiny increments, always test on scrap fabric, and keep a record of your settings.
If problems persist, follow a diagnostic hierarchy: check for worn parts, alignment issues, and ensure your machine is free of lint and debris. For garment embroidery, consider upgrading your fabric-handling tools—MaggieFrame magnetic hoops excel at maintaining even tension, reducing unnecessary adjustments and boosting your embroidery quality.
Perfect stitches aren’t just luck—they’re the result of smart habits, careful troubleshooting, and the right tools. Ready to elevate your embroidery? Start with maintenance, master your tension, and let MaggieFrame help you achieve professional results, project after project.
10. FAQ: Bobbin Tension Essentials
10.1 Q: How often should I adjust bobbin tension?
A: For most embroidery and sewing projects, adjusting the bobbin tension is a rare event. The majority of tension issues are resolved by tweaking the top (needle) tension, which is designed for frequent, incremental changes. Bobbin tension, on the other hand, is factory-set and intended to remain stable over time. You’ll typically only need to adjust it when you change to a drastically different thread type or thickness, switch between very fine and heavy threads, or notice persistent issues that top tension adjustments can’t fix. It’s a good habit to test your tension whenever you change thread or fabric, but actual bobbin screw adjustments are seldom required unless you see clear signs of imbalance.
10.2 Q: Can tight bobbin tension damage my machine?
A: Yes, over-tightening the bobbin tension can lead to several problems. If the tension is set too high, the thread may break frequently, causing frustration and interrupting your workflow. Excessive tension can also force the needle to deflect, which impacts stitch quality and may contribute to skipped stitches or even needle breakage. Over time, running your machine with overly tight tension accelerates wear on both the bobbin case and the thread path, potentially shortening the lifespan of these components. Always make adjustments in tiny increments and test on scrap fabric to avoid these risks.
10.3 Q: Why does my tension keep changing?
A: Shifting tension can be traced to a few common culprits. Lint buildup is a frequent offender—tiny fibers from thread and fabric accumulate in the bobbin area and tension discs, impeding smooth thread flow. Oil degradation is another factor; old or contaminated oil can gum up moving parts, affecting how the thread moves through the machine. Thread quality also plays a role: lower-quality or inconsistent threads may cause tension fluctuations, as can switching between different thread weights or materials. Regular cleaning, proper oiling, and using high-quality threads are your best defenses against changing tension. If issues persist, double-check that you’re using the correct bobbin for your machine and that all threading paths are clear and properly set.