1. Introduction to Machine Embroidery on Jackets
Machine embroidery on jackets is the ultimate blend of creativity and craftsmanship—think of it as turning a blank canvas into wearable art. But let’s be honest: jackets aren’t your average flat, single-layer fabric. They’re tough, layered, sometimes stretchy, and often lined, which means embroidery comes with its own set of challenges and rewards. Whether you’re personalizing denim with bold motifs or adding a subtle monogram to a down-filled vest, the right approach makes all the difference.
In this guide, we’ll unravel the essentials for professional jacket embroidery: how to tackle different materials, select stabilizers, master hooping, and troubleshoot common issues like puckering or needle breaks. You’ll also discover how the right tools and techniques—especially innovative solutions like magnetic hoops—can transform your process, making it faster and more precise. Ready to elevate your jackets from ordinary to extraordinary? Let’s dive into the world of machine embroidery and unlock the secrets to flawless, customized results.
Table of Contents
- 1. Introduction to Machine Embroidery on Jackets
- 2. Material-Specific Embroidery Approaches
- 3. Stabilizers and Hooping Solutions
- 4. Troubleshooting Common Challenges
- 5. Design Customization and Placement
- 6. Digitizing and Machine Settings
- 7. Aftercare for Embroidered Jackets
- 8. Conclusion: Mastering Jacket Embroidery
- 9. FAQ: Jacket Embroidery Essentials
2. Material-Specific Embroidery Approaches
Not all jackets are created equal—each material brings its own quirks to the embroidery table. Understanding these differences is the first step to achieving crisp, long-lasting designs.
2.1 Denim Jackets: Handling Sturdy Fabrics
Denim jackets are an embroidery favorite for a reason: their sturdy weave can handle dense stitching and bold designs. But that same thickness can be a double-edged sword if you’re not prepared.
Key Techniques for Denim:
- Stabilizer Use: While denim’s rigidity sometimes allows for embroidery without stabilizer, machine embroidery benefits greatly from a tear-away stabilizer like Sulky Stiffy™. Pairing it with a magnetic hoop helps maintain consistent tension and prevents shifting during stitching.
- Thread & Needle Selection: Opt for Sulky 40 wt. Poly Deco™ polyester thread for strength and colorfastness, especially on bold designs. For larger, textured patterns (think statement backs), 30 wt. Blendables® thread adds dimension. Use size 3 embroidery needles (such as John James or Clover) to punch through denim without breaking.
- Design Strategies: Denim shines with bold, geometric patterns and textured stitches like chain stitch or cross-stitch. While satin stitches deliver a polished look for logos or text, chain stitches add durability and a handcrafted vibe. Avoid overly intricate details that could strain the fabric—or your needles.
- Fabric Prep: Pre-wash your jacket to prevent future shrinkage and puckering. Iron out any wrinkles before hooping for a smooth embroidery surface.
| Stitch Type | Best For | Durability | Fabric Suitability |
|---|---|---|---|
| Satin Stitch | Logos, smooth textures | High | Denim, lined fabrics |
| Chain Stitch | Textured, continuous | Moderate | Denim, structured fabrics |
| Tackle Twill | Bold lettering, logos | High | Heavyweight fabrics |
| Appliqué | Dimensional designs | High | Mixed fabrics |
2.2 Lined and Down-Filled Jackets: Managing Layers
Lined and down-filled jackets require finesse—one wrong move and you risk puckering, insulation loss, or a misaligned design.
Approaches for Multi-Layer Jackets:
- Stabilizer Placement: For lined jackets, apply stabilizer only to the outer fabric, not the lining. Temporary spray adhesives like Sulky KK 2000™ can help hold everything in place. For down-filled jackets, use a heavy-duty stabilizer (tear-away or cut-away) to manage thickness and prevent distortion.
- Tension Adjustments: Multi-layer jackets can cause hooping instability. Magnetic hoops (covered in detail later) are especially effective at distributing pressure evenly across layers, reducing slippage and hoop burn.
- Stitch Density Optimization: Choose satin or fill stitches to minimize bulk—these stitches add detail without compressing the jacket’s insulation. Lighter threads (like 40 wt.) reduce stress on the fabric.
- Preserving Insulation: When embroidering down-filled jackets, be mindful that dense designs may reduce insulation in the stitched area. If possible, shift the down away from the embroidery zone before hooping.
- Quality Control: Always test your finished embroidery with a gentle wash to ensure thread integrity and lining stability.
Pro Tip: It’s common to embroider both the outer shell and lining together—just inform your clients that the reverse side of the design may show on the lining, which is standard for post-assembly embroidery.
3. Stabilizers and Hooping Solutions
The right stabilizer and hooping method are the backbone of professional jacket embroidery. Let’s break down your options for flawless results.
3.1 Cutaway vs. Water-Soluble: Choosing Wisely
Selecting the correct stabilizer can make or break your project—literally. Here’s how to choose:
Cutaway Stabilizer
- Best For: Stretchy or unstable fabrics (like knits, sweatshirts, fleece) and structured materials (like denim) when paired with adhesive stabilizers.
- Features: Permanent support, remains attached after embroidery, available in various weights (e.g., 2.5 oz standard).
- Advantages: Prevents puckering and stretching, ideal for dense designs like appliqué.
- Application: Fuse to fabric for added stability; trim excess carefully with scissors.
Water-Soluble Stabilizer
- Best For: Delicate, sheer fabrics (organza, tulle) or free-standing lace designs.
- Features: Dissolves completely in water, leaving no residue.
- Advantages: Perfect for intricate designs or appliqué needing a clean finish; prevents stitches from sinking into textured surfaces.
- Limitations: Not suitable for stretchy fabrics—lacks structural support; requires careful handling to avoid residue.
| Factor | Cutaway Stabilizer | Water-Soluble Stabilizer |
|---|---|---|
| Fabric Type | Stretchy, structured (denim) | Sheer, textured |
| Stitch Density | High (appliqué, dense designs) | Low–medium (lace, delicate) |
| Residue | Permanent | None (dissolves in water) |
| Durability | Long-lasting | Temporary |
| Tools Required | Scissors for cutting | Water rinse post-embroidery |
Application Guidelines:
- Use cutaway stabilizer for stretchy or thick jackets (like fleece or denim).
- Combine cutaway with adhesive backing for rigid fabrics.
- Reserve water-soluble stabilizer for sheer panels or lace accents.
Specialty Tips:
- Adhesive stabilizers are helpful for hard-to-hoop areas (collars, corners).
- Web mesh/no-show mesh is a sheer stabilizer for delicate fabrics, though less common in jackets.
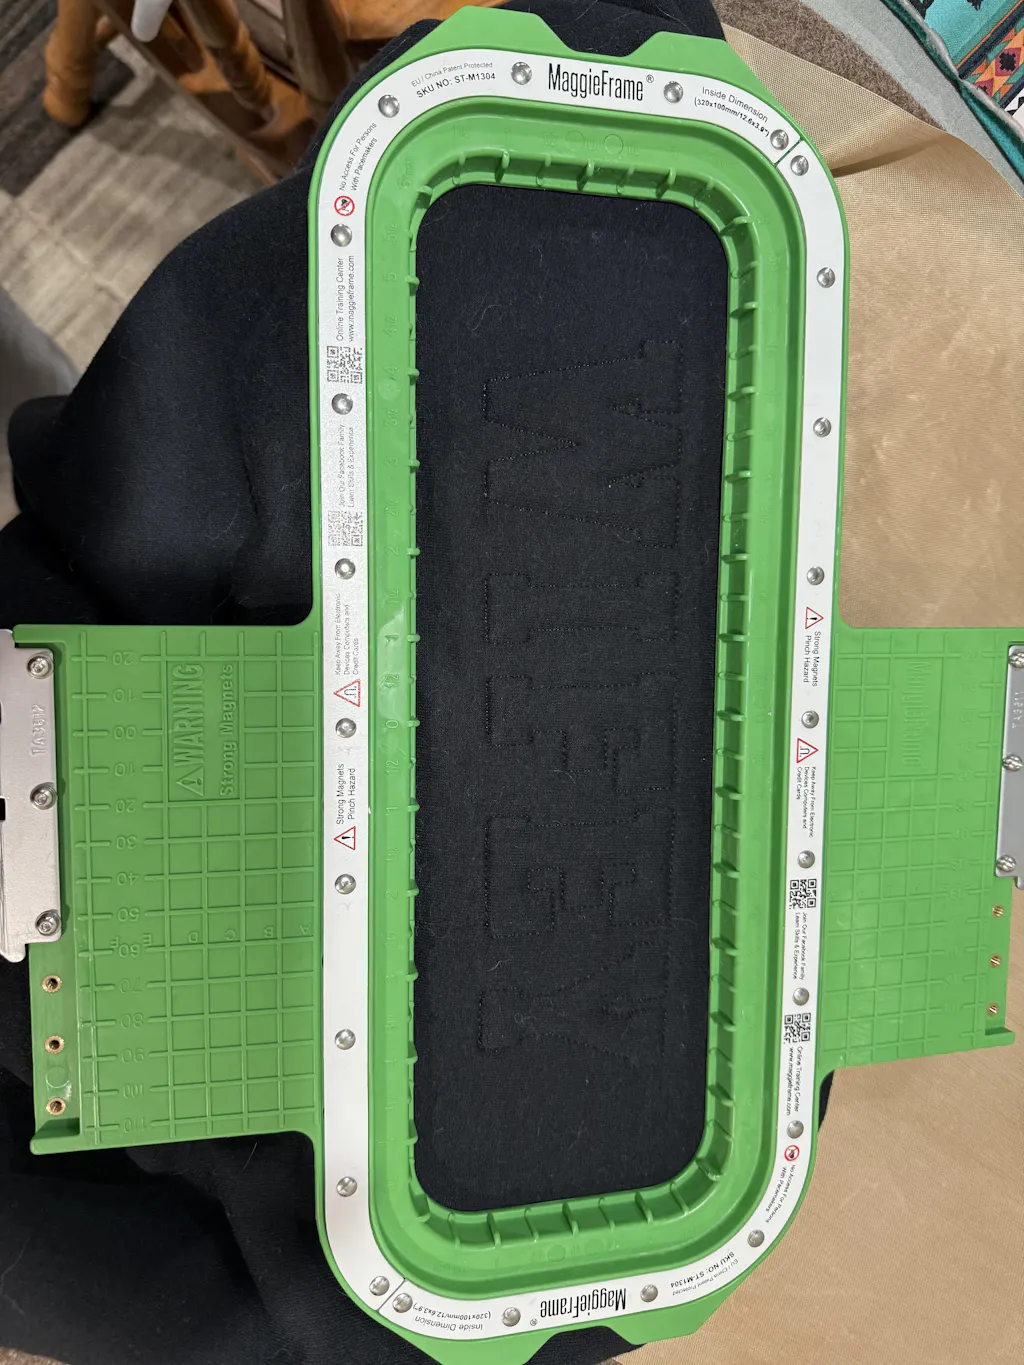
3.2 Magnetic Hoops: Revolutionizing Garment Embroidery
Let’s talk game-changer: magnetic hoops. Specifically, MaggieFrame magnetic hoops are transforming how embroiderers approach jacket projects.
Why MaggieFrame Magnetic Hoops?
- Speed: Hooping is up to 90% faster than traditional screw-based hoops—think 30 seconds instead of 3 minutes per garment.
- Automatic Thickness Adaptation: The powerful magnetic system automatically adjusts to different fabric layers, from thin linings to thick denim, ensuring even tension every time.
- No Hoop Burn: Unlike traditional hoops that can leave unsightly marks, MaggieFrame’s even magnetic pressure prevents hoop burn, preserving your jacket’s appearance.
- Durability: Made from industrial-grade PPSU plastic and equipped with N50-grade magnets, MaggieFrame hoops are built to withstand heavy use—lasting up to 40 times longer than standard hoops.
- User-Friendly: Multiple reference lines on the hoop make alignment and placement a breeze, while the textured surface keeps fabrics from slipping during embroidery.
In Practice:
Whether you’re tackling a batch of denim jackets or a single lined coat, MaggieFrame magnetic hoops save time, reduce fabric waste, and deliver professional results. Their compatibility with most commercial and industrial embroidery machines means you can integrate them seamlessly into your workflow—no matter your setup.
Bottom Line:
Investing in the right stabilizer and hooping solution—especially a magnetic hoop like MaggieFrame—turns embroidery from a struggle into a streamlined, satisfying process. Ready to take your jacket embroidery to the next level? The right tools are your secret weapon.
4. Troubleshooting Common Challenges
Embroidery on jackets is a thrilling creative pursuit, but let’s be real—sometimes things unravel (literally) in ways you didn’t expect. From puckering fabric to snapped needles and wrestling with thick, multi-layered seams, every embroiderer faces these headaches at some point. The good news? With the right strategies and tools, you can tackle these challenges head-on and keep your projects looking sharp.
4.1 Preventing Puckering and Needle Breaks
Ever finish a design only to find your fabric looks like a wavy lake at sunrise? That’s puckering—a classic embroidery nemesis. And if you’ve ever heard the dreaded snap of a needle breaking mid-stitch, you know how quickly a project can go sideways. Here’s how to keep your stitching smooth and your needles intact:
Why Does Puckering Happen?
- Stabilizer Mismatch: Using a tear-away stabilizer on stretchy or slippery fabrics (like nylon or satin) can lead to slippage and puckering. Always match your stabilizer to your fabric’s needs.
- Loose Hooping: If your fabric isn’t taut in the hoop, it’ll shift as the machine stitches, causing ripples.
- Dull Needles: Blunt needles snag fabric, creating uneven tension and puckering.
- Improper Fabric Prep: Skipping the pre-wash or not pressing out wrinkles can set you up for disaster.
Proven Solutions:
- Stabilizer Choice: Use a cutaway stabilizer for thick or slippery fabrics (think windbreakers or lined jackets). For extra smoothness, pair with a water-soluble topper to keep stitches crisp.
- Hooping Technique: Hoop both the outer fabric and lining together to prevent shifting—avoid “floating” stabilizers on tricky materials. Basting spray (like June Tailor JT440) can help secure layers.
- Needle Maintenance: Swap out needles every 1–2 projects to keep them sharp. For medium-weight jackets, size 75/11 or 90/14 needles are ideal.
- Thread Management: Use high-quality, universal embroidery thread and always rethread with the presser foot up. Clean the thread path regularly to avoid lint build-up.
- Tension Tuning: Gently pull the thread to test resistance; it should feel firm but not tight enough to snap. Adjust tension dials as needed.
- Basting Stitch: Basting around the design area can help anchor layers and reduce movement.
| Problem | Cause | Solution |
|---|---|---|
| Thread looping | Incorrect tension/threading | Adjust tension, rethread machine |
| Skipped stitches | Dull needle/threading issue | Replace needle, check threading |
| Excessive noise | Lack of lubrication | Clean and oil moving parts |
Insider Tips from the Pros:
- Modern stabilizers like water-soluble films or self-adhesive tear-away types are game-changers for slippery fabrics.
- Regular needle changes are non-negotiable for consistent results.
- Always test your design on a scrap of similar fabric before committing to the final piece.
From the Workshop: A popular YouTube tutorial on fixing puckering emphasizes the importance of matching stabilizer to fabric, hooping securely, and digitizing designs with appropriate stitch density and direction. Sometimes, dialing back on artistic complexity in your design can dramatically reduce puckering—think of it as trading a little flair for a lot of polish.
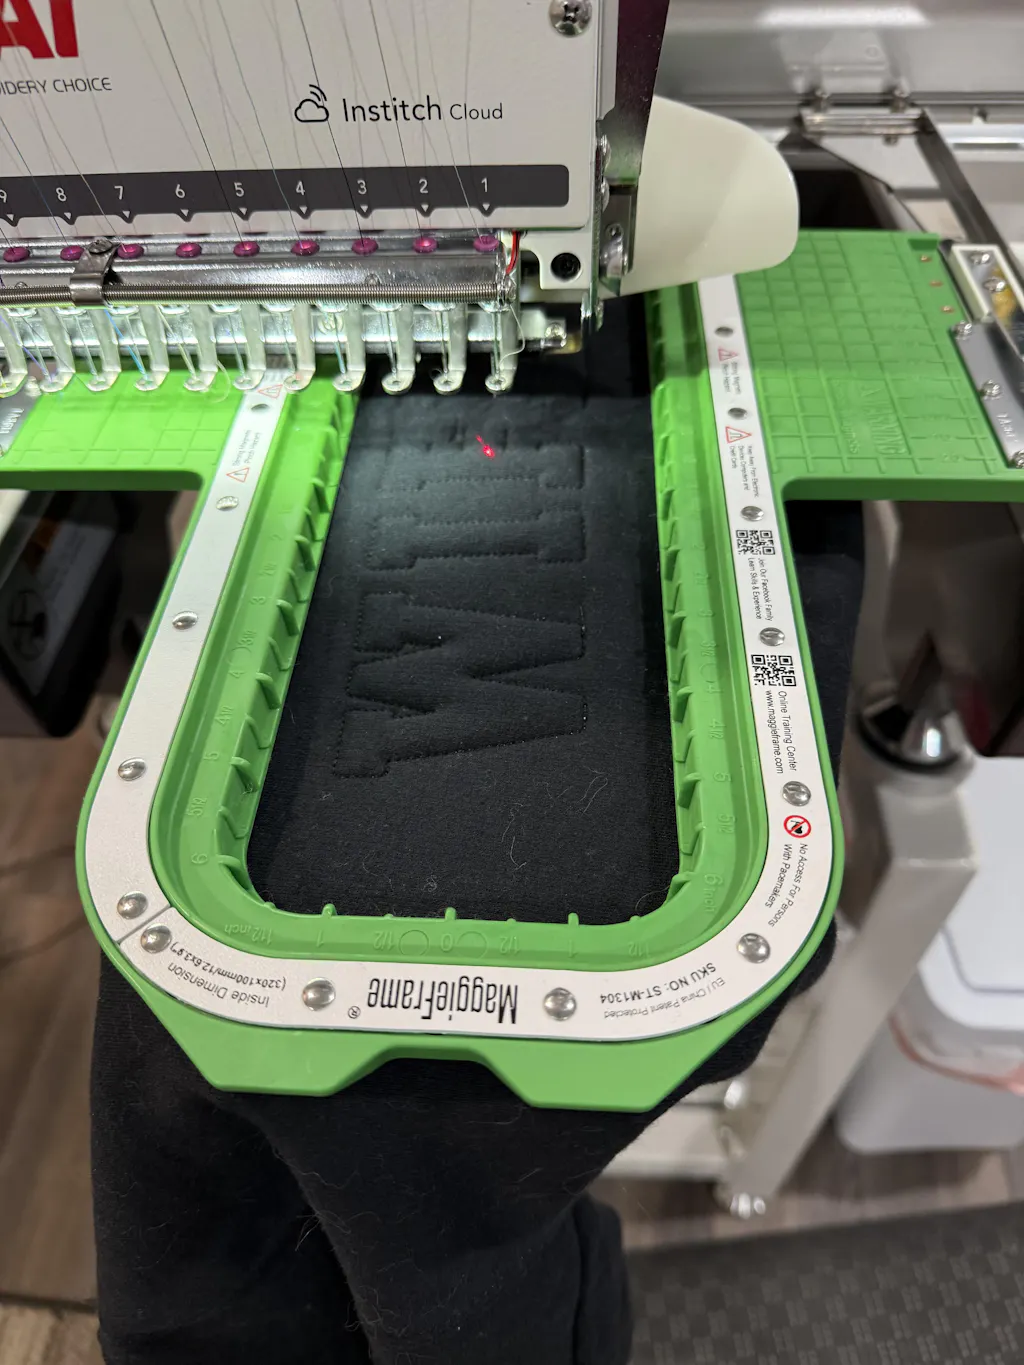
4.2 Managing Thick Layers with Magnetic Hoops
Jackets are rarely simple—think denim seams, linings, insulation, and more. Managing all those layers without shifting, slipping, or hoop burn can feel like a high-wire act. This is where the right hoop makes all the difference.
How MaggieFrame Magnetic Hoops Make It Easy:
- Even Pressure Distribution: MaggieFrame’s powerful magnetic system automatically adapts to varying fabric thicknesses, distributing pressure evenly across the hoop. This means no more crushed seams or uneven stitching—even when working over bulky denim or multiple jacket layers.
- No-Slip Surface: The textured contact area keeps even slippery linings from shifting, so your design stays perfectly aligned from start to finish.
- Durability for the Long Haul: MaggieFrame hoops are crafted from industrial-grade PPSU plastic and equipped with N50-grade magnets, making them up to 40 times more durable than traditional plastic hoops. Impact tests show they withstand heavy, repeated use without losing strength or alignment.
- Time-Saving: Hooping thick, multi-layered jackets with MaggieFrame is up to 90% faster than with screw-based hoops. No more wrestling with screws or worrying about hoop separation mid-stitch.
Real-World Impact: When tackling thick, multi-layered jackets, hoop all layers together with a cutaway stabilizer on the back. Use a temporary adhesive to secure layers before hooping. For extremely thick fabrics, stack a no-show mesh with your cutaway stabilizer for extra support. Heavy-duty needles (size 100/16 or 110/18) are your best friends here.
Why It Matters: MaggieFrame’s combination of strength, adaptability, and slip resistance means you can confidently embroider over seams, linings, and insulation—without the frustration of misaligned designs or ruined garments.
5. Design Customization and Placement
Jacket embroidery isn’t just about technique—it’s about expressing identity, telling stories, and making a statement. Whether you’re adding a bold logo for a brand or a subtle monogram for a personal touch, placement and customization are where your creativity shines.
5.1 Logo and Monogram Techniques
Strategic Placement for Professional Branding:
- Chest Positioning: The classic spot for logos and monograms is the left chest—easy to see, professional, and universally recognized.
- Size Considerations: For chest logos, keep designs between 3–4 inches wide for balance and readability. Oversized designs can overwhelm the space, while tiny details may get lost.
Digitizing Tips:
- Use sans-serif or cursive fonts for clarity; avoid decorative or serif styles that can blur at small sizes.
- For minimum text size, stick to at least 0.25” height for lowercase and 0.3” for uppercase letters, with a minimum thickness of 0.05” for satin stitches.
- Increase letter spacing (tracking) for small text to ensure legibility.
- Simplify complex logos by removing tiny details that won’t translate well to stitches.
Minimalist vs. Bold Approaches:
- Minimalist: Clean lines and subtle thread colors on leather or suede jackets create a refined, understated look—perfect for monograms or initials.
- Bold: High-density, colorful designs pop on denim or bomber jackets, making a statement with retro graphics, team logos, or vibrant patterns.
Pro Tips:
- Test your design on scrap fabric before embroidering the final jacket.
- Use high-quality threads for depth and durability.
- Employ Pinpoint Placement tools on your embroidery machine for precise alignment.
Trend Watch: 2025 is seeing a surge in gender-fluid designs, oversized fits, and sustainable materials. Minimalist logos on premium fabrics and eco-friendly embroidery techniques are especially popular for both personal and corporate branding.
5.2 Strategic Placement on Sleeves and Backs
Why limit yourself to the chest? The sleeves and back of a jacket are prime real estate for creative expression and on-trend designs.
2025 Placement Trends:
- Oversized Back Designs: Think statement graphics, large monograms, or intricate artwork spanning the width of the back—perfect for making a bold entrance (or exit).
- Cuff Accents: Small motifs or initials on cuffs add a personalized touch that’s both subtle and stylish.
- 3D Puff Techniques: Raised, textured embroidery creates a tactile, eye-catching effect—especially popular for varsity or streetwear-inspired jackets.
Technical Tips for Challenging Surfaces:
- Curved Surfaces: Use cylinder hoops or magnetic hoops (like MaggieFrame) for sleeves and cuffs to maintain even tension and avoid distortion.
- Axis Alignment: Mark center points and axis lines with air-erase pens and rulers. Extend these lines onto both fabric and stabilizer for precise hooping.
- Template Use: Print templates of your design for accurate placement. Mirror designs for symmetrical sleeve or side accents.
From the Field: A top-ranked Google tutorial recommends opening jacket seams for flat embroidery on sleeves, then resewing afterward for a flawless finish. For back designs, start about ¾” below the seam line for optimal visibility and balance.
Creative Inspiration: Don’t be afraid to mix embroidery with other techniques—like digital printing or appliqué—for unique, hybrid designs. The only limit is your imagination.
6. Digitizing and Machine Settings
Digitizing is the secret sauce that turns your artwork into stitch-ready magic. Get it right, and your jacket embroidery will look crisp, professional, and distortion-free—even on tricky fabrics.
File Formatting Essentials:
-
Know Your Machine:
- Brother: .PES
- Janome: .JEF
- Most commercial machines: .DST
- Vector Files: Submit designs as vector files (AI, PDF) for precise digitization. Avoid low-res raster images.
- Software Tools: Use professional software like Wilcom or Brother PE Design to convert and optimize your artwork.
Density Adjustments for Fabric Stability:
| Adjustment | Purpose | Implementation |
|---|---|---|
| Underlay Stitches | Stabilizes fabric, prevents shifting | Use short, dense stitches as a base layer |
| Pull Compensation | Balances tension in stretchy fabrics | Adjust stitch length and density dynamically |
| Stitch Density | Avoids puckering or excessive thickness | Reduce density for heavy fabrics; increase for thin materials |
Critical Metrics:
- Minimum Line Thickness: 0.05” for satin stitches; use run stitches for thinner lines.
- Text Size: Lowercase ≥ 0.25” height, Uppercase ≥ 0.3” height, Thickness ≥ 0.05”.
Design Optimization:
- Simplify: Remove intricate details that won’t translate well to stitches.
- Font Choice: Use clear, sans-serif or cursive fonts.
- Spacing: Increase tracking for small text to prevent crowding.
- Size Constraints: For machine embroidery designs on jacket backs, aim for 4–5.5” wide by 1.75–2.2” tall.
Best Practices:
- Color Management: Use sRGB color profiles to match thread colors accurately.
- Sample Testing: Always run a prototype on similar fabric to check stitch quality and fabric response.
- File Submission: Submit vector files for digitization; avoid pre-digitized files from unknown sources.
Common Pitfalls and Solutions:
| Issue | Solution |
|---|---|
| Fabric Distortion | Apply underlay stitches, adjust pull compensation |
| Illegible Text | Use minimum 0.25” height, sans-serif fonts |
| Incompatible Files | Convert to machine-specific formats |
Final Thought: Digitizing is both art and science. Take the time to optimize your files, adjust density and compensation, and test before you stitch. Your jackets—and your clients—will thank you.
Ready to conquer jacket embroidery? With these troubleshooting tips, placement strategies, and digitizing know-how, you’re set to create professional, head-turning results every time.
7. Aftercare for Embroidered Jackets
Machine-embroidered jackets are wearable masterpieces, but their beauty and durability depend on thoughtful aftercare. Whether you’re working with bold denim, delicate linings, or down-filled shells, proper washing, drying, and storage will keep your stitches vibrant and your fabric in top shape.
Washing Techniques:
Before tossing your embroidered jacket in the wash, secure any loose threads and turn the garment inside out—this shields the embroidery from friction and abrasion. Always use cold water (at or below 30°C/86°F) and select a delicate cycle with minimal agitation to prevent thread damage or color bleeding. Opt for a mild detergent free from chlorine bleach and harsh chemicals, and avoid overloading the machine. If you prefer, hand washing is an excellent alternative: soak the jacket in cold water with a gentle detergent for 15–20 minutes, rinse thoroughly, and never scrub the embroidery.
Drying Methods:
Air drying is your embroidery’s best friend. Lay the jacket flat on a clean towel, away from direct sunlight or heat sources, to maintain the design’s integrity. Hanging the jacket can cause stretching or distortion, so resist the urge to use a hanger while it’s wet. If machine drying is recommended by the care label, use a normal setting and preheat the dryer, but never wring or twist the garment.
Ironing Guidelines:
If wrinkles appear, always iron on the reverse side of the embroidery, placing a clean towel or cloth between the threads and the iron. Use a low-temperature setting (such as silk or wool mode) and skip the steam to avoid damaging dyes or adhesives.
Long-Term Maintenance:
Store your embroidered jackets on padded hangers in a cool, dry place out of direct sunlight. This prevents creasing and fading. Before the first wash, test for colorfastness on a hidden area to ensure threads won’t bleed. Avoid chlorine bleach, optical brighteners, and harsh pre-spotting agents, especially for dark or vibrant embroidery. While dry cleaning is permissible, exercise caution—red and orange threads are especially prone to dye migration.
| Factor | Recommendation |
|---|---|
| Water Temperature | Cold (≤30°C/86°F) |
| Detergent | Mild, non-chlorine, no optical brighteners |
| Washing Cycle | Delicate, minimal agitation |
| Drying Method | Air dry flat; machine dry only if label allows |
| Ironing | Reverse side, low heat, towel barrier, no steam |
By following these aftercare steps, your embroidered jackets will retain their color, structure, and wow-factor for years to come. Gentle handling and a little extra attention go a long way—embrace the journey of machine embroidery for beginners and treat your stitched creations as the art they are!
8. Conclusion: Mastering Jacket Embroidery
Embroidery on jackets is both an art and a science—a fusion of creative vision and technical know-how. From understanding material-specific approaches and choosing the right stabilizers, to troubleshooting challenges like puckering or needle breaks, every step shapes your final result. Remember, mastery comes from experimentation and the willingness to try new tools and techniques. With efficient solutions like magnetic hoops, you can streamline your process and unlock new creative possibilities. So go ahead—embrace the journey, personalize your jackets, and let your embroidery tell your story.
9. FAQ: Jacket Embroidery Essentials
9.1 Q: Can I embroider over jacket seams?
A: Yes, you can embroider over jacket seams. For best results, use a stabilizer to support the fabric and maintain design accuracy.
9.2 Q: How do I prevent the lining from showing through the embroidery?
A: To prevent lining show-through, use a cutaway backing. This provides a stable base and keeps the embroidery crisp without the lining becoming visible.
9.3 Q: What is the best needle size for embroidering denim?
A: For denim, a size 100/16 needle is recommended. This sturdy needle can handle the thickness of denim without breaking or causing skipped stitches.