1. Introduction to Brother Computerized Machines
Step into the world of Brother computerized sewing machines—a space where tradition meets innovation, and creative possibilities expand with every stitch. Over the past decade, Brother has transformed the sewing landscape by integrating advanced computerized technology into their sewing and embroidery machines, making them not just tools, but creative partners for embroidery artists, garment makers, and quilting enthusiasts alike.
Gone are the days of laboring over manual dials and threading woes. Brother’s computerized line brings features like automated needle threading, expansive stitch libraries, and intuitive LCD or touchscreen interfaces right to your fingertips. Whether you’re a seasoned pro or just starting your sewing journey, these machines are designed to simplify complex tasks, boost precision, and open doors to new techniques.
In this guide, we’ll explore the core features that set Brother’s computerized machines apart, help you navigate model selection for your unique needs, and share expert techniques to unlock their full potential. Ready to discover how technology can supercharge your sewing and embroidery workflow? Let’s dive in.
Table of Contents
- 1. Introduction to Brother Computerized Machines
- 2. Core Features and Technological Advantages
- 3. Selecting Your Ideal Brother Model
- 4. Essential Operations and Maintenance
- 5. Advanced Techniques and Creative Applications
- 6. Model Comparison: CP2160P vs. CS7000X
- 7. Troubleshooting Complex Errors
- 8. Conclusion: Mastering Your Brother Workflow
- 9. Frequently Asked Questions
2. Core Features and Technological Advantages
Brother computerized sewing machines are engineered to elevate your sewing experience, blending automation, customization, and cutting-edge technology. Here’s a closer look at the features that make these machines stand out—and how they compare to traditional mechanical models.
2.1 Automated Efficiency Functions
Imagine sewing without the usual hassle—no more squinting to thread needles, no more tangled bobbins, and no more guesswork with speed control. Brother’s computerized models deliver a suite of automated features that streamline every project:
- Automatic Needle Threading: Models like the CP2410, CS6000i, and CS7000i feature advanced needle threading systems. With a simple push or lever, the machine threads itself, saving time and sparing your eyes—especially handy for frequent color changes in embroidery.
- Jam-Resistant Bobbins: The “Quick-Set™ drop-in top bobbin” system, found in models like the CP2410, minimizes thread jams and keeps your sewing running smoothly.
- Variable Speed Control: Whether you’re a beginner easing into your first stitches or a pro tackling heavy fabrics, adjustable speed settings (as seen in the CS6000i/CS7000i) let you tailor the pace to your comfort and project needs.
- Auto Thread Cutting: High-end models such as the Stellaire 2 offer automatic thread cutting, making transitions between tasks seamless and efficient.
Comparison: Computerized vs. Mechanical Machines
| Feature | Computerized (Brother) | Mechanical |
|---|---|---|
| Stitch Control | Digital buttons/touchscreens; 100+ stitches | Manual dials; limited stitch options |
| Ease of Use | Learning curve, high automation | Intuitive for basics |
| Customization | Save preferences, adjust parameters | Fixed settings |
| Price | Higher ($450–$1,000+) | Lower ($100–$300) |
Key Takeaway: Computerized models scale from entry-level to advanced, offering robust automation, durability (thanks to metal frames and feed systems like on the CP100X), and seamless embroidery capabilities—making them a smart investment for both hobbyists and professionals.
2.2 Stitch Libraries and Customization
Brother’s computerized machines are a playground for creative expression, boasting expansive stitch libraries, versatile customization, and access to Brother embroidery designs:
- Built-In Stitches: Models range from 70 to over 240 built-in stitches. For example, the CP2410 offers 240 stitches (including 110 alphanumeric), while the CS6000i/CS7000i provide 130+ stitches. Buttonhole options are plentiful, with up to 8 one-step styles.
- Specialty Presser Feet: Accessory feet like open-toe, adjustable zipper, and quilting feet empower precision for decorative work and specialty projects. The CP2410 includes 13 feet, while the CS6000i/CS7000i offer 9.
- Programmable Settings: Machines like the Brother CS10S allow you to save your favorite stitch lengths, needle positions, and backstitch defaults for repeat perfection.
- Touchscreen Interfaces: The Stellaire 2 elevates usability with a 3.2-inch color touchscreen, enabling intuitive stitch selection, on-screen editing, and even video instructions—no manual required.
- Laser Guides and Embroidery Integration: Advanced models feature laser alignment for flawless seams and can switch between sewing and embroidery modes with minimal effort.
Trends and Innovations:
- USB Connectivity & Wireless Transfer: Import custom embroidery designs directly into high-end machines.
- Multi-Presser Feet & Free-Arm Access: Expand your creative toolkit and easily handle cylindrical items like sleeves.
Bottom Line: Brother’s computerized machines blend automation, customization, and advanced interfaces to deliver a sewing experience that’s both precise and remarkably convenient—making them a favorite for users at every skill level.
3. Selecting Your Ideal Brother Model
Choosing the right Brother computerized sewing machine is all about matching your skills, ambitions, and project types with the perfect set of features. Here’s how to find your sewing soulmate.
3.1 Matching Machines to Skill Levels
| Skill Level | Recommended Models | Key Features |
|---|---|---|
| Beginner | PS300T, PS700 | Simplified interface, 100–180 stitches, auto-threading |
| Intermediate | BQ1350, PS700 | 180–290 stitches, combinable stitches, pivot functions |
| Advanced | BQ2500, SA1900 | 240–759 stitches, large embroidery fields, dual feed, advanced automation |
- Beginners: The PS300T and PS700 are user-friendly, offering essential stitches and automatic threading—perfect for learning the ropes without feeling overwhelmed.
- Intermediates: The BQ1350 and PS700 step up with more stitch options and features like pivot functions for easier fabric handling.
- Advanced Users: The BQ2500 and SA1900 provide high stitch counts, expansive embroidery fields, and automation for complex, large-scale projects.
3.2 Project-Based Model Selection
| Project Type | Ideal Models | Critical Features |
|---|---|---|
| Quilting | BQ2500, BQ1350 | Large throat space, free-motion quilting, dual feed, pivot |
| Embroidery | SA1900, SE2000 | Large embroidery fields (5"x7" to 8"x14"), built-in designs, wireless transfers |
| Garment Sewing | PS300T, PS700 | 100–180 stitches, variable speed, reinforcement stitches |
- Quilters: Look for models like the BQ2500 or BQ1350 with wide throat spaces and dual feed systems, ensuring smooth handling of bulky projects.
- Embroidery Enthusiasts: The SA1900 and SE2000 shine with generous embroidery fields and wireless design management via the Artspira app.
- General Sewing: For everyday garment work, the PS300T and PS700 offer a reliable balance of stitches and user-friendly automation.
Pro Tip: Always consider your budget, the complexity of your projects, and your appetite for automation. For those who crave versatility and room to grow, comparing Brother embroidery machines you can find a future-proof investment—ready to evolve as your skills and ambitions do.
4. Essential Operations and Maintenance
Brother embroidery and sewing machines are designed to make your creative journey as smooth as possible, but mastering the basics of setup and care is key to unlocking their full potential. Whether you're threading for the first time or maintaining your machine for years of flawless stitching, these step-by-step guides and best practices will keep your creativity flowing.
4.1 Threading and Stitch Setup
Let's demystify the setup process—no more tangled threads or guesswork. Brother's intuitive design and clear LCD prompts make getting started surprisingly easy, even if you're new to computerized machines.
**Upper Thread Setup**
1. **Spool Placement:** Insert your thread spool onto the spool pin, ensuring the thread unwinds toward you.
2. **Thread Guide:** Guide the thread through the top thread guide, then around the tension control dial from right to left, engaging the thread check spring.
3. **Needle Bar Guide:** Pass the thread behind the needle bar thread guide.
4. **Presser Foot:** Lower the presser foot to complete the threading path.
**Bobbin Winding and Lower Thread Setup**
- **Bobbin Winding:** Slide the bobbin winder shaft to the right. Wind the thread clockwise around the bobbin 5–6 times, then pass the end through the slit in the bobbin winder seat to automatically cut excess thread. Start the winding process using the foot controller or the start/stop button, and stop when the bobbin slows.
- **Bobbin Installation:** Insert the wound bobbin into the bobbin case so the thread unwinds clockwise. Pass the thread through the tension spring slit, unwind about 10 cm, and secure the bobbin case in the shuttle race.
**Pro Tip:** Always use Brother-designed bobbins—other types may cause mechanical issues.
**Stitch Selection and Adjustment**
1. **Category Navigation:** Use the stitch category selection key to browse straight, zigzag, decorative, and specialty stitches.
2. **Stitch Number Input:** Adjust the stitch number using the +/- buttons; left buttons for left digits, right for right digits.
3. **Presser Foot Matching:** The LCD will display the recommended presser foot (e.g., "J" for general use). Always raise the needle and presser foot before starting.
**Troubleshooting Common Issues**
| Issue | Solution |
|---|---|
| Thread Tangles | Re-thread both upper and lower threads; check bobbin tension. |
| Machine Malfunction | Power cycle the machine to reset digital glitches. |
| Incorrect Stitch | Confirm stitch category/number and presser foot. |
| Bobbin Thread Breaks | Rewind bobbin with consistent tension; avoid overfilling. |
**Critical Safety Notes**
- When using the foot controller, the start/stop button is disabled.
- Only use compatible Brother bobbins to prevent damage.
For a visual walkthrough, Brother's official YouTube tutorials provide real-time demonstrations of threading, bobbin winding, and stitch selection. And remember, your model's manual is a treasure trove for variant-specific tips.
4.2 Long-Term Maintenance Protocols
A well-maintained Brother machine is a reliable creative partner for years to come. Here's how to keep yours running at its best:
**Needle Replacement**
- **Frequency:** Replace needles every 8–10 hours of continuous use or when you notice skipped stitches or fabric snags.
- **How-To:** Loosen the needle clamp screw with the included screwdriver, remove the old needle, and insert a new one with the flat side facing the back. Tighten the screw securely—just don't overdo it!
- **Safety First:** Always unplug the machine before changing needles.
**Cleaning Procedures**
- **Tools:** Use the included cleaning brush or a vacuum, and a screwdriver to remove the presser foot and needle plate.
- **Steps:** Unplug the machine, remove the needle and presser foot, then slide off the needle plate cover to access the bobbin area. Brush or vacuum away lint and debris, especially around the bobbin case and needle plate. Reassemble carefully, ensuring everything aligns.
- **Storage:** Keep your machine away from direct sunlight, humidity, and heat sources. Clean the exterior with neutral soap—never use harsh chemicals.
**Lubrication Guidelines**
- **Hook:** Apply one drop of Brother-recommended oil daily before use.
- **Lower Needle Bar Felt Washer:** Add a drop every 40–50 hours of sewing.
- **Tip:** Wipe away excess oil to prevent lint buildup.
**Long-Term Preservation**
- **Software Updates:** Check Brother's official support site monthly for firmware updates.
- **Professional Servicing:** Schedule annual check-ups with a certified technician for diagnostics and part replacement.
- **Needle Selection:** For thicker fabrics, use larger-eye needles to reduce strain.
| Aspect | Details |
|---|---|
| Needle Replacement | Every 8–10 hours; flat side backward |
| Oiling Frequency | Hook: daily; lower needle bar: every 40–50 hrs |
| Cleaning Tools | Brush/vacuum, screwdriver, neutral soap |
| Storage Conditions | Avoid sunlight, humidity, and heat |
| Professional Servicing | Annual check-ups |
**Critical Avoidances**
- Never drop or strike your machine.
- Avoid storing near halogen lamps, irons, or heaters.
- Use only Brother-approved needles and oil.
By following these protocols, you'll ensure years of smooth, consistent stitching—and fewer surprises mid-project.
5. Advanced Techniques and Creative Applications
Ready to level up your sewing? Brother’s computerized features open the door to techniques that once seemed reserved for pros. From mirrored stitches to personalized embroidery, these advanced methods will help you turn everyday projects into showstoppers.
5.1 Specialized Stitching Methods
Mirror Image Stitching
Brother machines make symmetrical designs a breeze. Select the “mirror image” option via the stitch category key, input your stitch pattern number, and the machine flips your chosen stitch left-to-right—ideal for decorative borders, appliqué, or perfectly balanced quilting motifs. The LCD will prompt you to swap presser feet if needed, ensuring every detail is just right.
Character Embroidery and Lettering
Personalize garments, quilts, or gifts with built-in fonts. Models like the PS700 offer five sewing lettering fonts, letting you embroider names, labels, or phrases directly. Adjust stitch length, width, and spacing digitally, and preview your text alignment or density on advanced models like the Stellaire 2. Seamlessly switch between sewing and embroidery modes by swapping out the free arm for an embroidery frame.
Tension Adjustment for Specialized Fabrics
Whether you’re working with delicate silk or hearty denim, Brother’s adaptive tension systems and manual controls let you fine-tune for perfect results. Models such as the Innov-ís NS80E feature needle plate detection sensors to prevent thread breakage, while dials or digital interfaces (as shown in the HC1850 tutorial) allow for precise tension tweaks. Reinforced feed dogs and specialty presser feet (like the zigzag foot) help manage tricky or layered fabrics.
Workflow Optimization
- Laser Alignment: The Stellaire 2’s laser guide ensures flawless seam or embroidery placement—no more manual marking.
- On-Screen Tutorials: Built-in help centers walk you through stitch usage and presser foot selection.
- Speed Control: Electronic variable speed (e.g., on the PS300T) gives you the finesse needed for intricate work.
| Model | Stitch Count | Advanced Features |
|---|---|---|
| PQ1600S | Straight only | 1,500 spm, ideal for quilting and heavy-duty projects |
| PS700 | 180 | 40 combinable stitches, 5 fonts, 8.3" arm for quilting |
| Stellaire 2 | Embroidery | Laser alignment, help center, quick mode transitions |
| HC1850 | 100+ | Reverse stitching, mirror image, tension adjustments |
With these tools, you can tackle layered quilts, custom embroidery, and technical garment construction with confidence and creativity.
5.2 Garment Embroidery Optimization
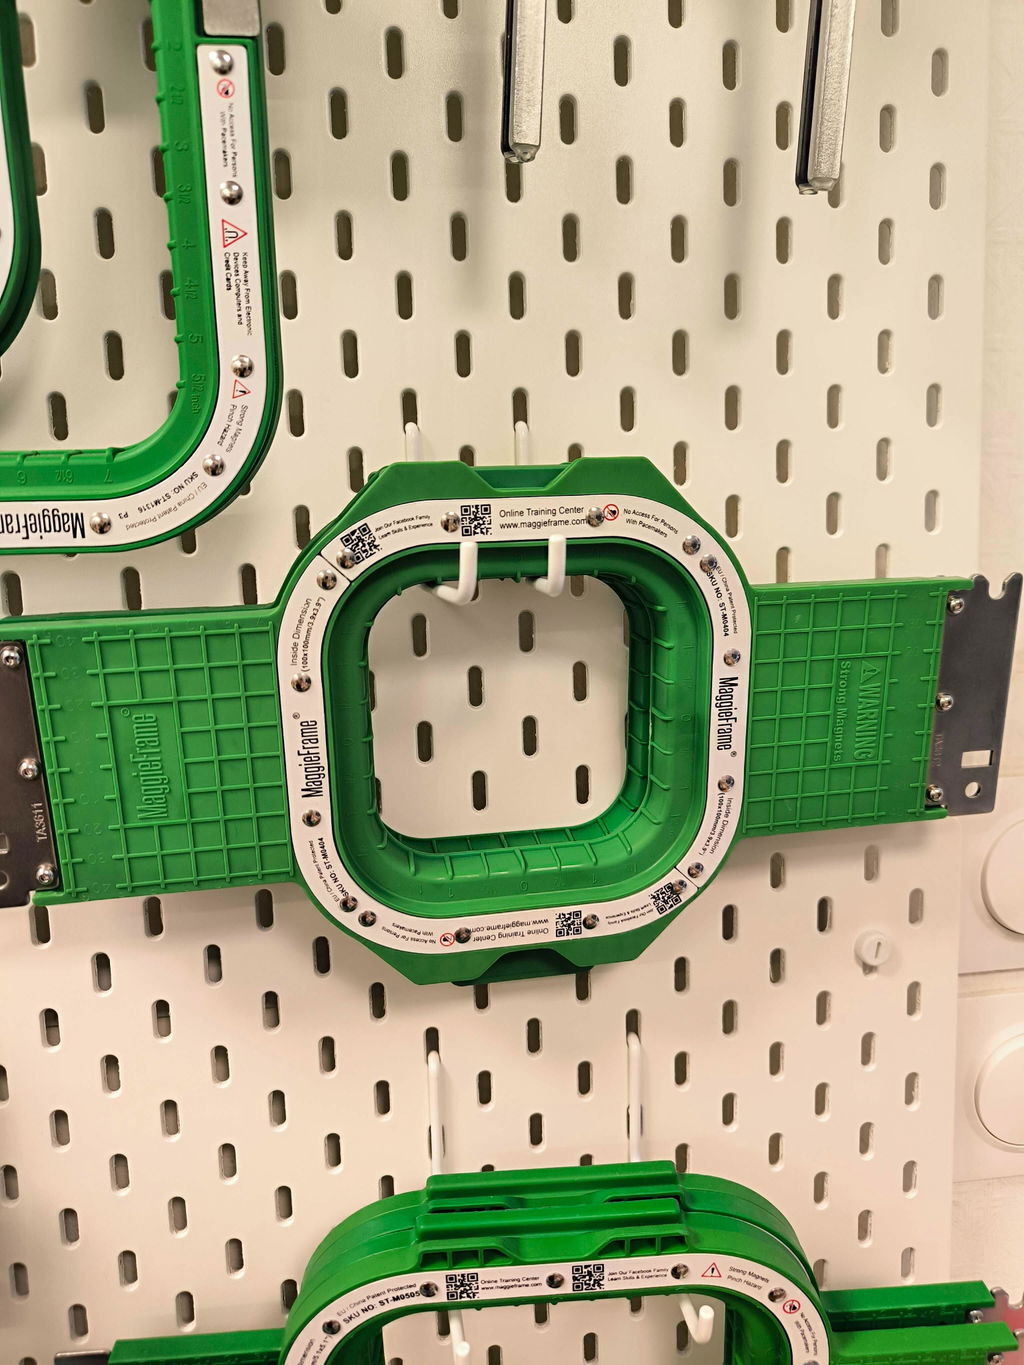
Achieving professional embroidery on garments isn’t just about the machine—it’s about the tools you use for hooping and fabric handling. Here’s where Brother magnetic hoops like MaggieFrame step into the spotlight.
Why Magnetic Hoops (MaggieFrame) Make a Difference
Traditional screw hoops can be time-consuming and prone to uneven tension or hoop burn—those unsightly marks left on fabric after embroidery. MaggieFrame magnetic hoops, designed specifically for garment embroidery, transform the process:
- Effortless and Even Tension: The powerful magnetic clamping system automatically adapts to different fabric thicknesses, from delicate silks to multi-layered denim, holding fabric taut without manual adjustments.
- Prevents Hoop Burn: Unlike screw-based frames, the magnetic force distributes pressure evenly, dramatically reducing the risk of visible marks on finished garments.
- Speed and Ease: Snap the hoop into place in seconds—no more wrestling with screws or risking fabric misalignment. This is especially valuable for high-volume production or intricate designs.
- Durability and Compatibility: Made from high-grade PPSU engineering plastic and N50-grade magnets, MaggieFrame hoops are built to last and fit most commercial embroidery machines with the right bracket.
Real-World Benefits
- Save Time: Hooping each garment takes just 30 seconds, compared to up to 3 minutes with traditional hoops—a 90% time savings for busy shops.
- Reduce Defects: Consistent tension means fewer misalignments and less fabric waste.
- User-Friendly: Even beginners can achieve pro-level results, thanks to easy operation and thoughtful design features like reference lines for quick alignment.
If you’re looking to elevate your garment embroidery—whether for a home studio or a full-scale production line—MaggieFrame magnetic hoops offer a fast, safe, and user-friendly solution. Once you experience the difference, you may never go back to screw-based frames.
6. Model Comparison: CP2160P vs. CS7000X
Choosing between Brother’s CP2160P and CS7000X? Let’s break down the specs and value so you can pick the perfect partner for your sewing ambitions.
6.1 Specification Breakdown
| Feature | Brother CS7000X | Brother CP2160P |
|---|---|---|
| Built-in Stitches | 70 | 60 |
| Buttonhole Styles | 7 automatic | 7 automatic |
| Presser Feet Included | 10 | 7 |
| Max Sewing Speed | 750 spm | 750 spm |
| Needle Threading | Automatic | Automatic |
| LCD Display | Yes | Yes |
| Wide Table Included | Yes | No |
| Weight | 10.5 lbs | 10.5 lbs |
CS7000X stands out with 70 built-in stitches, including utility, decorative, and quilting options, plus 10 specialized presser feet—walking foot, ¼" piecing foot, and more—making it a versatile choice for quilters and advanced sewists. The detachable wide table is a bonus for handling larger projects.
CP2160P offers 60 built-in stitches, 7 styles of one-step buttonholes, and 7 included sewing feet (zigzag, buttonhole, zipper, button sewing, overcasting, blind stitch, and monogramming). It features an advanced needle threading system, Quick-Set bobbin, and a bright LED-lit work area. While it doesn’t include a wide table, it packs plenty of power and features in a compact, lightweight frame.
6.2 Value Analysis by Use Case
For Quilters and Advanced Sewists: The CS7000X is the clear winner if you need a broader stitch library, more presser feet, and a wide table for quilting or bulkier projects. Its automatic needle threading, sturdy metal frame, and free arm capabilities make it ideal for both precision work and creative exploration.
For Beginners or General Sewing: The CP2160P is a budget-friendly, user-friendly option that doesn’t skimp on essentials. Its 60 stitches, easy stitch selector, and advanced threading system make it perfect for everyday garment sewing, home décor, and light quilting. The compact size and included accessories make it a great fit for small spaces or new sewists.
| Aspect | Brother CS7000X | Brother CP2160P |
|---|---|---|
| Target Audience | Advanced sewists, quilters | Beginners, general sewists |
| Key Strengths | Stitch variety, quilting tools, automatic threading, wide table | Compact, affordable, essential features |
| Limitations | Smaller LCD, basic buttonholes | Fewer feet, no wide table |
Bottom Line: If quilting or advanced techniques are your focus, the CS7000X’s extra features and accessories justify the investment. For straightforward sewing and great value, the CP2160P delivers reliability and ease of use without overwhelming you with options.
Ready to take your sewing to the next level? Shop Brother embroidery machine deals to find the perfect match for your ambitions—and don’t forget, the right accessories (like MaggieFrame magnetic hoops for garment embroidery) can make all the difference in your creative journey!
7. Troubleshooting Complex Errors
Even the most advanced Brother computerized sewing machines can hit a snag—literally or figuratively. When your creative flow grinds to a halt due to a mysterious error code or a stubborn thread jam, don’t panic. Let’s break down the most common complex issues and how to resolve them, so you can get back to stitching with confidence.
Thread-Related Errors
Thread Jams and Breaks: Thread nests, breakage, or skipped stitches often trace back to simple missteps: incorrect threading, low-quality thread, or improper tension. Sometimes, computerized sensors may misread thread resistance, compounding the problem.
How to Fix:
1. Re-thread Completely: Always re-thread both the upper and lower threads with the presser foot raised and the needle at its highest position. This ensures the thread seats correctly in the tension discs.
2. Test Thread Quality: Pull the thread through the machine (with the presser foot up); it should glide smoothly. If not, switch to a higher-quality, machine-specific thread.
3. Adjust Tension: Use the tension dial—higher settings for thick fabrics, lower for delicate ones. Test on a scrap before resuming your project.
4. Clean Internal Components: Remove the needle plate and bobbin case, then clear out any lint or debris, especially after working with bulky fabrics.
Bobbin Thread Issues: If the bobbin thread won’t pull up or stitches are uneven, check for:
- Proper Bobbin Installation: The bobbin should sit flat and unwind counterclockwise.
- Correct Winding: Rewind if the thread is too loose or tight.
- Thread Nests: Remove any tangles from the bobbin area.
Calibration and Timing Errors
Stitch Misalignment: If stitches are skipping or misaligned, the timing between the needle and hook may be off.
Quick Checks:
- Ensure the needle is fully inserted with the flat side facing the rear.
- If problems persist, professional service may be needed for timing adjustments.
Multi-Needle Calibration: For multi-needle models, follow your manual for precise threading of each needle bar and use the machine’s color management system to assign threads correctly.
Electronic and Sensor Errors
Error Codes and System Glitches:
- F4 Code: Indicates a foot pedal connection issue—check the cord and pedal alignment.
- No Needle Movement: If the machine whirs but doesn’t sew, a sensor or motor may be at fault. Unplug, wait a moment, and restart.
Solutions:
- Reset the Machine: Power cycle (turn off/on) to clear temporary glitches.
- Update Firmware: Visit Brother’s website for any available software updates.
Thread Sensor Malfunctions: If sensors misread thread tension, gently clean them with a soft brush or cotton swab, then re-thread to recalibrate.
Advanced Maintenance and Prevention
- Internal Cleaning: Remove the needle plate and bobbin case, brush out lint, and reassemble.
- Thread Selection: Always use high-quality, machine-specific threads to avoid sensor confusion.
- Regular Servicing: Schedule periodic professional maintenance for timing and tension calibration.
Comparison: Basic vs. Computerized Machine Issues
| Issue | Basic Machine | Computerized Machine |
|---|---|---|
| Thread Jam | Manual removal of debris | Sensor alerts; automated tension reset |
| Bobbin Errors | Manual rethreading | Automated winding and alignment checks |
| Stitch Calibration | Manual tension adjustment | Digital parameter customization |
| Error Resolution | Manual troubleshooting | Error codes and guided diagnostics |
When to Seek Professional Help
- Persistent timing issues or recurring sensor errors may indicate hardware failure.
- For complex multi-needle calibration or repairs, contact a certified Brother technician.
Pro Tip: Most issues can be solved with careful re-threading, cleaning, and a calm approach. If you’re ever in doubt, Brother’s extensive manuals and online video tutorials are your best friends for step-by-step guidance.
8. Conclusion: Mastering Your Brother Workflow
Brother computerized sewing machines blend innovation with reliability, empowering you to tackle everything from simple repairs to intricate embroidery. By understanding your machine’s features, choosing the right model for your needs, and following regular maintenance routines, you’ll ensure smooth, frustration-free sewing for years to come. Remember: a little troubleshooting know-how goes a long way—so embrace the technology, and let your creativity soar!
9. Frequently Asked Questions
9.1 Q: What are the main differences between computerized and mechanical sewing machines?
A: Computerized sewing machines automate many functions—like stitch selection, needle threading, and tension adjustment—making them more precise and versatile than mechanical models. With just a button press, you can access a wide range of stitches, built-in fonts, and custom settings. While computerized machines have a learning curve, their intuitive interfaces and automation streamline complex tasks, making them ideal for both beginners and experienced sewists. Mechanical machines, on the other hand, rely on manual dials and offer fewer features, but can be simpler for basic projects.
9.2 Q: Can I integrate Brother computerized machines with design software like PE-Design or Artspira?
A: Yes! Many Brother computerized embroidery machines are compatible with Brother PE Design software for digitizing custom patterns. Additionally, the Artspira app allows wireless transfer of embroidery designs directly to your machine. This integration streamlines the creative process—no USB sticks or cables required—making it easy to bring your digital designs to life on fabric. Always check your specific model’s compatibility with these software options for the best experience.