1. Introduction to Machine Embroidery Stitches
embroidery machines have transformed textile design, unlocking a world where intricate patterns and vibrant textures are stitched with precision and speed. At the heart of every professional embroidery project are three foundational stitches: running, satin, and fill (tatami). Mastering these core stitch types is the key to achieving crisp outlines, glossy lettering, and richly textured fills—regardless of whether you’re digitizing a logo or crafting a detailed landscape.
This guide unpacks the essential characteristics, applications, and practical settings for each stitch. We’ll explore how to select the right stitch for every design element, optimize your settings for different fabrics, and troubleshoot common pitfalls like puckering or thread breaks. Whether you’re a seasoned studio owner or a newcomer eager to create polished results, you’ll find actionable insights to elevate your embroidery.
Ready to discover how these three simple stitches can create anything your imagination dreams up? Let’s dive in.
Table of Contents
- 1. Introduction to Machine Embroidery Stitches
- 2. Core Stitch Types Explained: Running, Satin & Fill/Tatami
- 3. Practical Application Guide: Settings, Fabrics & Pitfalls
- 4. Strategic Stitch Selection for Design Elements
- 5. Advanced Techniques: Textures, Digitizing & Efficiency
- 6. Conclusion: Mastering Stitches for Professional Outcomes
- 7. Frequently Asked Questions
2. Core Stitch Types Explained: Running, Satin & Fill/Tatami
2.1 Running Stitch: The Precision Outline Specialist
The running stitch is the backbone of machine embroidery—a straightforward, single-line stitch formed by the machine’s needle moving in a continuous path. Visually, it creates fine, linear details with minimal bulk, making it ideal for outlining shapes, adding delicate accents, or connecting elements within a design. Because of its low thread consumption, it’s perfect for lightweight, airy effects or for reducing stitch count in large projects.
Key characteristics:
- Linear and subtle: Produces thin lines that can be straight or gently curved.
- Low bulk: Won’t add thickness to your design, keeping details crisp.
- Versatile applications: Commonly used for outlines, underlays, fine details, and even as placement lines for appliqué.
Technical guidelines:
- Stitch length: For best results, keep running stitch lengths between 1.25 mm (minimum) and 7 mm (maximum). Shorter stitches (around 2.5 mm) are ideal for curves and fine detail, while longer stitches can be used for basting or travel lines.
- Appliqué placement: The running stitch is often used to mark where fabric pieces should be placed before securing them with other stitches.
Pro tip: For bolder outlines, try a double or bean stitch (multiple passes over the same path). But remember, excessive density on curves can cause puckering—keep it balanced for smooth results.
2.2 Satin Stitch: Creating Smooth, Glossy Surfaces
If you crave that signature embroidery shine, the satin stitch is your go-to. This dense, parallel stitch structure forms a smooth, reflective surface that stands out beautifully on text, borders, and decorative elements. Satin stitches are like a tightly packed zigzag, laying thread side-by-side to create a slightly raised, polished look.
Key characteristics:
- Glossy, raised finish: Offers a luxurious sheen and tactile dimension.
- Width-dependent: The width of the satin stitch determines its coverage and visual impact.
Technical guidelines:
- Width: For most embroidery machines, keep satin columns between 2 mm and 10 mm wide. For wearables, a maximum of 7 mm is recommended to prevent snags and distortion.
- Density: Adjust density for the desired coverage—tighter for bold, solid fills; slightly looser for curves or delicate fabrics.
- Applications: Satin stitches excel at lettering, monograms, borders, and small, intricate shapes. They’re also used for free-standing lace and decorative blends.
Caution: Avoid making satin stitches wider than 10 mm—excessive width can lead to skipped stitches, troughs, or snagging. For very wide areas, embroidery software can auto-split satin stitches to maintain stability and appearance.
2.3 Fill/Tatami Stitch: Mastering Large-Area Coverage
When your design calls for solid backgrounds, textured fills, or coverage of large shapes, the fill stitch (also known as tatami stitch) is your best friend. Constructed from rows of tightly packed running stitches arranged in a woven, mat-like pattern, fill stitches create a flat, uniform surface that can be customized for texture and density.
Key characteristics:
- Textured, even coverage: Mimics the look of woven fabric, providing a solid base for backgrounds or large design elements.
- Adjustable density and pattern: Control stitch spacing, angle, and pattern to achieve everything from smooth fills to fur-like textures or brickwork effects.
Technical guidelines:
- Density: Moderate density (e.g., 4.5–5.0) balances coverage and efficiency. Too dense can cause stiffness; too loose may leave gaps.
- Stitch length: Adjust based on fabric weight—shorter for lighter fabrics, longer for heavier materials.
- Applications: Use fill stitches for backgrounds, shadows, animal fur, or any large area requiring consistent coverage. They’re especially effective on stretchy fabrics when paired with proper stabilizers.
Comparison to satin: Satin stitches are best for small, glossy details; fill stitches excel at covering space with texture and minimizing thread usage for bulk areas.
Creative tip: Modern embroidery software offers a variety of fill patterns—experiment with different angles, motifs, or meander fills to add dimension and interest to your designs.
| Feature | Running Stitch | Satin Stitch | Fill/Tatami Stitch |
|---|---|---|---|
| Stitch Density | Low (single line) | High (closely spaced) | Moderate (repetitive rows) |
| Best For | Outlines, fine details | Text, borders, small shapes | Backgrounds, large areas |
| Fabric Suitability | Lightweight, delicate | Stable fabrics (cotton) | Stretchy (with stabilizer) |
| Thread Usage | Minimal | High | Moderate |
| Visual Effect | Linear, subtle | Glossy, raised | Textured, flat |
3. Practical Application Guide: Settings, Fabrics & Pitfalls
3.1 Optimal Settings for Each Stitch Type
| Stitch Type | Primary Use | Optimal Stitch Length (stitches/inch) | Density Setting | Fabric Compatibility | Key Tips |
|---|---|---|---|---|---|
| Running | Outlines, details | 10–16 | 4.2 | Lightweight fabrics | Use sharp needle; avoid tight density |
| Satin | Fills, lettering | 8–12 | 4.0 | Stable fabrics | Stabilize stretchy fabrics |
| Fill (Tatami) | Large areas, textures | 10–13 | 4.5–5.0 | Medium-weight fabrics | Always add underlay |
| Zigzag | Edges, fraying prevention | 10–12 | N/A | Stretchy/loose-weave | Avoid curves; narrow for lightweight |
| Bean | Bold outlines | 12–16 | 4.5 | Medium-weight fabrics | Mimics satin density with fewer stitches |
| Underlay | Fabric stabilization | 10–12 | 5.0 | All fabrics | Essential before fills/satin |
Achieving professional embroidery results hinges on dialing in the right settings for each stitch type. Here’s a quick reference to help you get started:
Stitch sequencing: Always sequence your stitches to minimize jumps and trims—outline first, fill next, details last. Adjust tension for each fabric type to avoid thread breaks or puckering.
3.2 Fabric Compatibility and Stabilization Strategies
Selecting the right stitch type for your fabric is crucial. Here’s how to match them up:
- Satin stitches: Work best on stable fabrics like cotton or linen. For stretchy materials, always use a stabilizer or underlay to prevent distortion.
- Fill stitches: Ideal for medium to heavy fabrics (denim, fleece) and for covering large areas. Pair with underlay stitches to stabilize the fabric and prevent gapping.
- Running stitches: Shine on lightweight, delicate fabrics for outlines and fine details.
Underlay techniques: Before applying dense fills or satin stitches, lay down a running stitch underlay. This anchors the fabric, reduces puckering, and ensures crisp results.
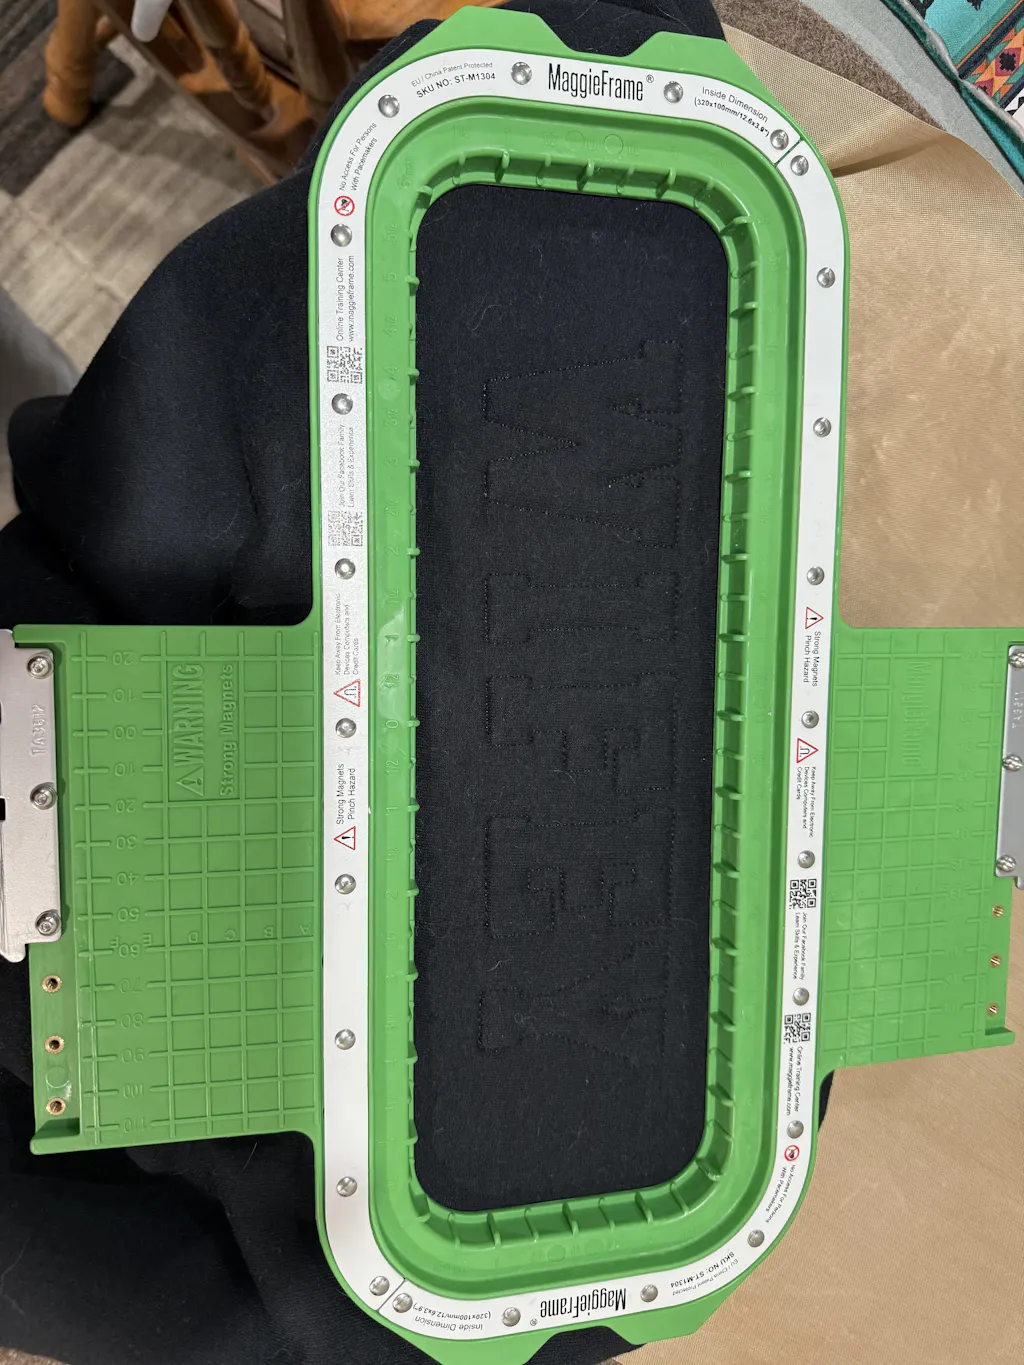
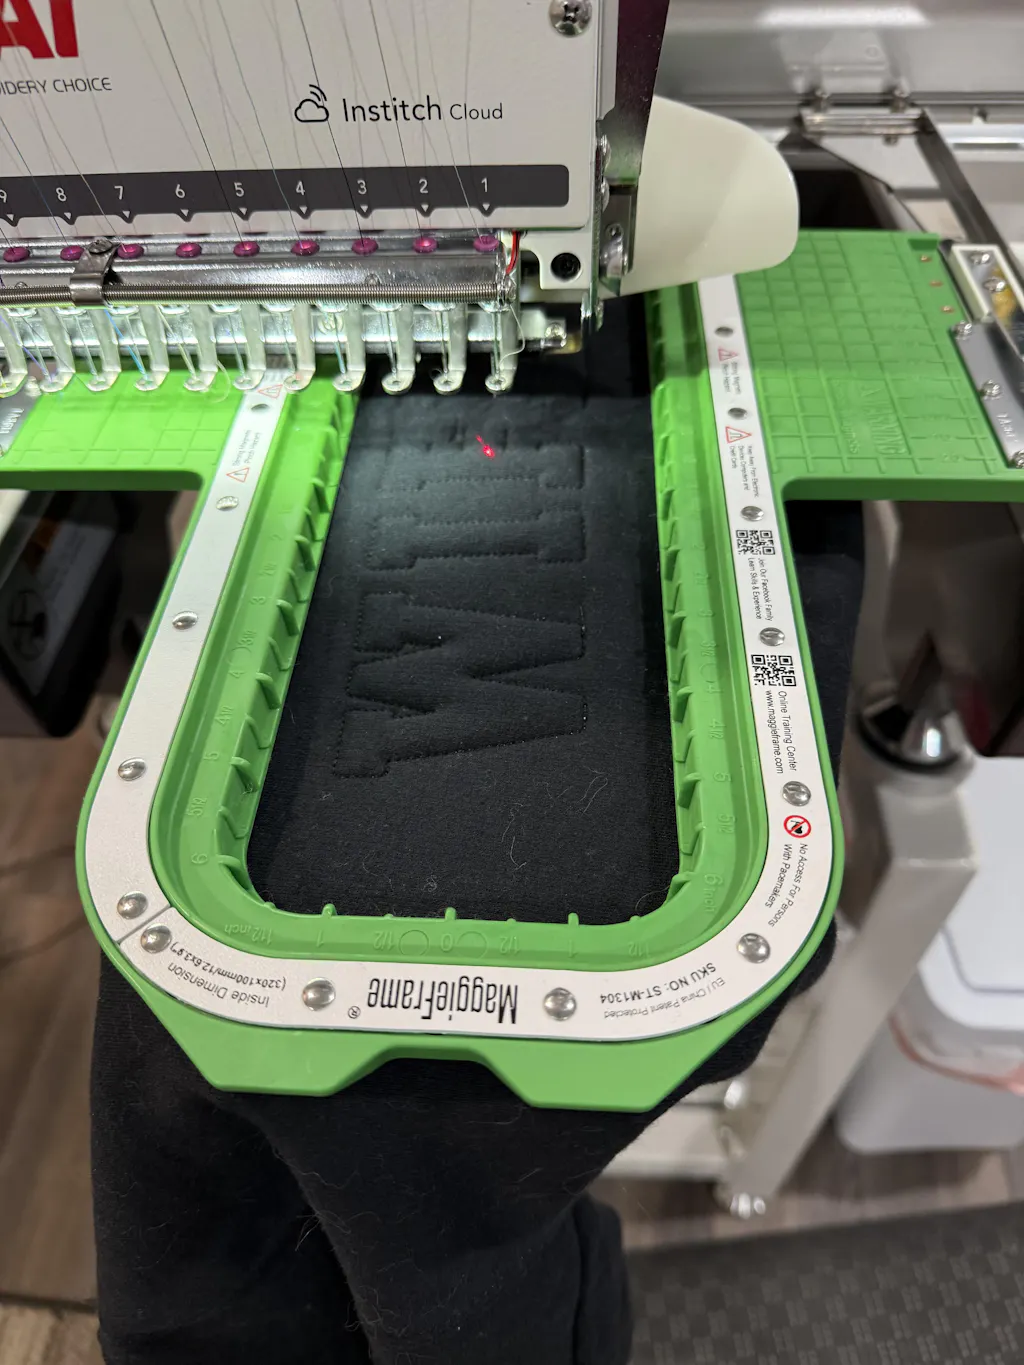
Efficiency tip: For garment embroidery, using a MaggieFrame magnetic hoops for embroidery machines can dramatically improve stabilization. Its powerful magnetic system ensures even tension across the fabric, adapts to various thicknesses, and slashes hooping time by up to 90%. This not only prevents distortion but also saves valuable production hours—especially in high-volume settings.
3.3 Avoiding Common Errors: Puckering, Breaks & Distortion
Even seasoned embroiderers face challenges like puckering, thread breaks, or uneven stitches. Here’s how to troubleshoot:
- Puckering:
- Use underlay stitches for fills and satin areas.
- Adjust density—lower numbers (tighter) for wide areas, higher (looser) for curves.
- Ensure proper fabric stabilization with the right hoop and stabilizer.
- Thread breaks:
- Match needle type to fabric (sharp for satin, blunt for fills).
- Check thread weight and tension.
- Avoid excessive density, especially on curves or thick fabrics.
- Gaps in fill stitches:
- Increase density slightly or adjust stitch angle.
- Add underlay to stabilize the area.
- Fabric stretching:
- For knits, gently stretch seams during stitching.
- Use stabilizers and ensure even hoop tension—magnetic hoops like MaggieFrame are especially effective here.
Final recommendations:
- Always test your settings on scrap fabric.
- Adjust stitch length and density for fabric weight.
- Balance density for the area being covered—tight for large fills, looser for details.
By mastering these practical guidelines, you’ll minimize errors, optimize your workflow, and consistently achieve professional-grade embroidery.
4. Strategic Stitch Selection for Design Elements
Choosing the right stitch for each element of your design isn't just a technical decision—it's the secret sauce that transforms "good enough" embroidery into head-turning, professional embroidery machine designs. Think of your stitch toolbox as a painter's palette: each type brings unique texture, sheen, and dimension. Let's break down how to strategically deploy satin, fill, and running stitches for crisp lettering, bold backgrounds, and intricate details.
4.1 Lettering and Borders: Why Satin Reigns Supreme
If you want your text and borders to pop with elegance, satin stitch is your undisputed champion. Why? Satin's dense, glossy structure creates a raised, light-catching surface that instantly draws the eye—perfect for monograms, logos, and those bold borders framing your design.
Technical sweet spot:
- Width: For most embroidery machines, satin shines brightest between 2 mm and 7 mm. This range ensures the stitch is wide enough for a smooth, lustrous finish, but not so wide that it risks distortion or thread snags.
- Visibility: Perplexity data and leading embroidery guides agree—satin's minimum thickness of 2 mm guarantees legibility, while 7 mm is the upper limit for stability, especially on wearables.
-
Applications:
- Lettering: Crisp, readable, and professional—think classic varsity jackets or elegant script on towels.
- Borders: Satin's perpendicular stitch direction hugs the edge, creating a polished, dimensional outline.
Pro tip: For extra-bold borders, consider a bean (triple-running) stitch as an alternative, but nothing beats satin for that signature, high-end finish.
Real-world example: Google's top embroidery resources consistently showcase satin-stitched monograms with sharp, clean edges—no fuzz, no gaps, just pure embroidery eye candy.
Watch out: Go wider than 7 mm and you risk "troughs," skipped stitches, or even fabric puckering. If you need to fill a larger area, it's time to switch to a fill stitch.
4.2 Large Areas and Backgrounds: Fill Stitch Efficiency
When your design calls for solid coverage—think the sky in a landscape, a bold logo background, or the body of a mascot—fill (tatami) stitch is your go-to. This stitch weaves back and forth in rows, creating a flat, textured surface that's both efficient and visually rich.
When and how to use fill stitches:
- Coverage: Fill stitches excel at covering expansive spaces where satin would be inefficient or prone to distortion.
- Texture: By adjusting the stitch direction, you can create subtle patterns—meander, tartan, contour fills—that add depth and interest.
- Density: Standard fill density sits between 4–6 mm (Perplexity data), balancing solid coverage with fabric flexibility.
Directional adjustments:
- For backgrounds, change up the fill angle to mimic natural textures—horizontal for skies, diagonal for hills, or even wavy lines for water.
- Case studies from top SERP results highlight how landscape scenes use multiple fill directions to create realistic shading and movement.
Pro tip: Always use underlay stitches beneath large fill areas to stabilize the fabric and prevent puckering. And remember, fill is less suitable for tiny details—save it for the big stuff.
4.3 Fine Details and Outlines: Running Stitch Precision
For those delicate lines, facial features, or intricate motifs that demand surgical precision, the running stitch is your best friend. This single-line stitch traces curves and corners with minimal bulk, perfect for outlining, accenting, or adding subtle texture.
Applications:
- Fine details: Facial features, intricate patterns, or delicate line art—running stitch keeps things sharp without overwhelming the design.
- Outlines: Use it for outlining shapes or adding definition to filled areas.
- Redwork: Classic embroidery styles (like redwork) rely on running stitch for their signature look.
Technical guidelines:
- Thickness: Running stitch is most effective at ≤1 mm thickness (Perplexity), making it ideal for tiny details where satin or fill would be overkill.
- Stitch density: Aim for 3–8 stitches per mm to ensure visibility without bulk.
Pro tip: For bolder outlines, layer a bean stitch (triple-pass running stitch) for extra definition.
Limitations:
- Running stitch isn't great for filling space or creating bold, raised effects. Use it where subtlety and precision matter most.
5. Advanced Techniques: Textures, Digitizing & Efficiency
Ready to level up? Advanced stitch variations and digitizing tweaks can unlock creative textures, 3D effects, and serious production efficiency. Here’s how to push your embroidery beyond the basics.
5.1 Specialty Stitches: Bean, Ripple & Programmable Fills
Bean Stitch:
- Think of bean stitch as the running stitch’s bolder cousin. By stitching back and forth over the same path (typically three times), it creates a raised, textured line—perfect for outlines that need to stand out or for adding 3D effects.
- Machine requirements: Modern embroidery machines (like Brother or Janome) with triple-stitch capability handle bean stitches with ease.
- Applications: Bold outlines, faux-hand-embroidered looks, or anywhere you want extra definition without the bulk of satin.
Ripple Stitch:
- Ripple stitches create spirals, grids, or wavy textures across a surface, adding movement and decorative flair to backgrounds or accents. While not universally supported, some advanced software (like Ink/Stitch) includes ripple as a programmable option.
Programmable Fills:
- These are customizable fill patterns—think meander, tartan, contour, or even motif fills—that let you mimic organic textures (fur, grass, water) or geometric patterns.
- How to use: Adjust stitch direction, density, and pattern in your embroidery software for endless creative possibilities.
Pro tip:
- Experiment with layering different fills and specialty stitches for unique textures—just like mixing paints, the combinations are endless.
5.2 Digitizing Parameters: Underlay and Compensation
Digitizing is where the magic happens—best embroidery digitizing software like Hatch, Wilcom, or StitchArtist lets you fine-tune every stitch for flawless results.
Underlay strategies:
- Underlay stitches act as a foundation, stabilizing fabric and preventing distortion.
- Types include center run (for central support), edge walk (reinforces borders), zigzag (for stretch fabrics), and tatami (for thick materials).
- Software integration: Tools like Wilcom and Hatch allow you to adjust underlay length, density, and direction to match your fabric and design needs.
Push/pull compensation:
- Embroidery stitches can “push” or “pull” fabric, causing designs to shrink or stretch.
- Manual adjustments: Tweak stitch angles, add underlay, or insert compensation stitches to counteract distortion.
- Digital tools: Advanced software automates these tweaks, ensuring your stitched design matches the digital preview.
Best practices:
- Always test your digitized file on scrap fabric first.
- Use auto-underlay and compensation as a starting point, then refine for your specific fabric and design.
5.3 Resource Optimization for Production Efficiency
In high-volume embroidery, every second and every inch of thread counts. Here’s how to maximize output without sacrificing quality:
Thread consumption models:
- Calculate thread needs with: Thread consumption (cones) = [Stitch Quantity × Stitch Length (mm) × Number of Garments] / [Length of Thread per Cone (m) × 1000]
- Add 10–15% for wastage (breakage, trimming, downtime).
Stitch type optimization:
- Use lockstitch for bulk areas, overedge only for edges—overedge consumes 5–6× more thread than lockstitch.
- Reduce stitch density by 10–20% where possible to save thread without compromising durability.
Machine and design efficiency:
- Commercial machines with automatic thread trimming and multi-needle setups cut waste and speed up production.
- Optimize digitized files to minimize jump stitches and redundant paths.
Wastage management:
- Track thread breaks, jump stitches, and trimmings—aim for a total wastage rate below 15%.
Case study:
- For a design with 4,500 stitches at 2.5 mm length on 100 garments, you’ll need about 14.4 cones of thread (with 500 m per cone), plus wastage.
MaggieFrame’s role in efficiency:
- For garment embroidery, the MaggieFrame magnetic embroidery hoop can reduce hooping time by up to 90% compared to traditional screw-based hoops.
- Its powerful magnetic system ensures even tension, slashes setup time, and minimizes fabric distortion—freeing up labor and boosting production output.
6. Conclusion: Mastering Stitches for Professional Outcomes
Mastering machine embroidery is all about matching the right stitch to each design element, optimizing your settings, and embracing advanced techniques for texture and efficiency. Whether you’re outlining with running stitch, making your text shine with satin, or filling backgrounds with creative fills, strategic selection is the key to professional results. Don’t forget to experiment, test on real materials, and refine your digitizing for each project. And remember—using the right tools, like MaggieFrame magnetic embroidery hoops, can make all the difference in achieving flawless, efficient, and satisfying embroidery outcomes. Happy stitching!
7. Frequently Asked Questions
7.1 Q: Can I use satin stitch for large areas?
A: While satin stitch delivers a beautiful, glossy finish, it's not ideal for covering large areas. Industry guidelines and leading embroidery resources agree: satin stitches should be kept under 7 mm wide for wearables and under 10 mm for most machine applications. Beyond these widths, satin stitches become prone to distortion, skipped stitches, and unsightly "troughs" or loops—especially on garments that experience friction or stretching.
For broader coverage, fill (tatami) stitch is the preferred choice. Fill stitches are designed to cover large spaces with a woven, mat-like texture, offering stability and minimizing thread snags or gaps. If your design calls for a smooth look over a big area, digitizing software can split wider satin sections into multiple columns or automatically convert them to fill stitches. In short: use satin for text, borders, and small shapes—switch to fill for anything wider than 7 mm to ensure professional, durable results.
7.2 Q: How do I prevent thread breaks with dense satin stitches?
A: Thread breaks during dense satin stitching can be frustrating, but a few targeted adjustments can make all the difference:
- Needle Type and Size: Use a sharp needle appropriate for your fabric and thread weight. For dense satins, a slightly larger needle can help the thread glide smoothly.
- Tension Adjustments: Check both upper and bobbin thread tensions. Too much tension increases friction and breakage; too little can cause looping. Test and fine-tune on scrap fabric before starting your main project.
- Stabilizer Use: Always use a quality stabilizer—especially on stretchy or delicate fabrics. A good stabilizer supports dense stitches, prevents puckering, and reduces stress on the thread.
- Density Settings: Avoid making satin stitches too dense. If you notice frequent breaks, try loosening the density slightly in your embroidery software.
- Underlay Stitches: Add a zigzag or edge-walk underlay beneath your satin areas. This provides a foundation, reducing friction and supporting the top thread.
By combining the right needle, balanced tension, proper stabilizer, and smart digitizing, you'll dramatically reduce thread breaks and enjoy smoother, more reliable satin stitching.
7.3 Q: What's the minimum text size for readable embroidery?
A: For crisp, legible embroidered text, the minimum recommended height is 0.25 inches (about 6.4 mm). At this size, details remain clear and thread coverage is sufficient for most sans-serif fonts. Industry studies and top embroidery guides consistently caution against going smaller—letters below 0.25" tend to lose definition, resulting in cramped, hard-to-read text.
Font choice matters, too:
- Sans-serif fonts (like Arial or Helvetica) are best for small text, as they avoid the tiny "tails" that can blur or disappear in stitching.
- Simple, bold letterforms enhance clarity and reduce the risk of gaps or thread bunching.
If your design requires even smaller text, consider using a running stitch for a "sketched" look, but keep expectations realistic—fine detail will always be limited by the physical properties of thread and fabric. For most professional results, stick to 0.25" or larger with a clean, sans-serif font.