1. Introduction to Machine Embroidered Flags
Embroidered flags are making a vibrant comeback—gracing porches, gardens, and public spaces with their tactile beauty and enduring symbolism. Whether it’s a patriotic banner fluttering on Independence Day or a custom garden flag welcoming guests, machine embroidery has elevated flag-making to new heights. Today’s enthusiasts and professionals alike are drawn to embroidered flags created with the best embroidery machines for their rich textures, lasting durability, and the sheer artistry they bring to any setting.
This guide explores the essential techniques and creative possibilities of machine-embroidered flags. We’ll dive into must-know machine embroidery methods, DIY project walkthroughs, commercial flag services, and smart material selection. By blending time-honored craftsmanship with modern embroidery technology, you can achieve professional, long-lasting results—flags that endure the elements and stand out with every stitch.
Table of Contents
- 1. Introduction to Machine Embroidered Flags
- 2. Essential Machine Embroidery Techniques for Flags
- 3. Purchasing Custom Embroidered Flags: Services and Options
- 4. DIY Embroidered Garden Flags: Step-by-Step Guide
- 5. Optimal Materials and Supplies for Flag Embroidery
- 6. Troubleshooting Common Flag Embroidery Issues
- 7. Sourcing Flag-Themed Embroidery Designs
- 8. Conclusion: Mastering the Art of Flag Embroidery
- 9. Frequently Asked Questions
2. Essential Machine Embroidery Techniques for Flags
Creating a stunning embroidered flag is both a science and an art. The right stabilizer, construction method, and thread selection can mean the difference between a flag that waves proudly for years and one that quickly fades or frays. Let’s break down the core techniques every flag embroiderer should master.
2.1 Stabilizer Selection and Application Methods
Choosing the correct stabilizer is the foundation of successful flag embroidery. Here’s how the main types stack up:
- Tear-Away Stabilizers: Best for stable, non-stretch fabrics—think classic garden flags or banners. They’re easy to remove and work well for materials like woven cotton or vinyl. As recommended by industry guides, "Use a Tear Away Stabilizer if the fabric is stable woven."
- Cut-Away Stabilizers: Essential for stretchy or knit fabrics, or for flags exposed to outdoor wear and tear. Cut-away stabilizers provide lasting support, especially for heavy stitch counts or designs that will be washed often. "Use Cut Away stabilizer if the fabric has any stretch—t-shirts, sweatshirts, knits, etc."
- Wash-Away Stabilizers: Ideal for sheer fabrics or specialty projects, like organza or freestanding lace. Wash-away types dissolve after embroidery, leaving no trace.
Pro Tips for Application:
- Fusible Stabilizers: Fusing the stabilizer to your fabric can boost stability, especially for tricky materials.
- Quality Check: Always inspect your stabilizer under a light—any thin spots or irregularities can transfer to your finished embroidery.
- Avoid Common Mistakes: Don’t assume one stabilizer fits all. Using the wrong type can cause puckering, distortion, or poor stitch quality, especially after repeated washes.
Practical Workflow:
- Press your flag fabric with low heat.
- Fuse stabilizer to the wrong side of the flag front.
- Mark the flag’s center using folding and crosshair techniques for precise placement.
- Use temporary basting adhesive to secure the stabilizer and fabric in the hoop—especially helpful for odd shapes or thick materials.
These steps, echoed in both professional tutorials and YouTube walkthroughs, ensure your flag starts with a solid, distortion-free base.
2.2 Flag Construction and Border Techniques
Once your fabric is stabilized, it’s time to construct and finish your flag with professional flair.
Preparation and Placement:
- Mark the flag center with a disappearing ink marker or by folding.
- Use your machine’s grid or pinpoint placement features for exact design alignment.
Bordering Methods:
- Flip & Fold Technique: Place a fabric strip over your stitched placement line, stitch it down, then trim close to the seam. Add a second strip face down, stitch, and mitre the corners for crisp, professional edges. Finger-press and secure before final stitching. This method, detailed in Sweet Pea Machine Embroidery’s tutorials, ensures neat, durable borders.
- Appliqué Border Method: Cut a rectangle of fringe fabric, mark and cut the fringe, then baste it to the flag’s edge. Use embroidery tape to keep fringe away from the stitching line, ensuring clean, decorative borders.
Final Assembly:
- Switch your machine from embroidery to sewing mode. Use an 80/12 Microtex needle and matching thread.
- Align the back and front flag pieces, right sides together, and stitch the perimeter—leaving an opening for turning.
- For garden flags, attach straps or rod pockets as needed, following placement guides for a professional finish.
YouTube Insights:
Tutorials highlight the importance of careful pressing, secure basting, and precise trimming—especially at corners and borders. Wonder clips, temporary adhesive sprays, and careful use of stabilizer all help manage bulky or slippery fabrics.
2.3 Thread, Machine Setup, and Digitizing Considerations
The right thread and setup are crucial for flags that last.
Thread and Needle Choices:
- Use a 50wt cotton thread for embroidery—strong enough for outdoor use, yet fine for detailed designs.
- An 80/12 Microtex needle offers precision without damaging the fabric.
- For bobbins, consider threads like DecoBob for fewer bobbin changes during large projects.
Machine Settings:
- Adjust tension based on your fabric, stabilizer, and thread combination. Always test on a scrap before starting the main project.
- Engage features like "Dual Feed" for even fabric movement, and use grid or pinpoint placement for perfect design alignment.
Digitizing Tips:
- Center your design carefully—flags demand perfect symmetry for best visual impact.
- Use appropriate stitch density for outdoor durability; denser stitching helps designs withstand wind and weather.
- Account for border and casing allowances in your design file.
Weatherproofing:
For outdoor flags, consider adding a water-resistant spray after embroidery to help your creation brave the elements.
3. Purchasing Custom Embroidered Flags: Services and Options
Not everyone wants to DIY—sometimes, you need a professional touch. Whether you’re outfitting a school, business, or government office, custom embroidered flag services deliver premium quality and lasting value.
3.1 Materials and Production Processes
Industry-Standard Materials:
- Nylon: The go-to for strength, colorfastness, and crisp embroidered detail. Manufacturers layer nylon pieces for multi-color designs.
- Polyester: Used for its durability and weather resistance, especially in larger flags or high-wind environments.
- Thread Types: Polyester threads offer outdoor durability and color retention, while rayon threads provide high luster for indoor flags. Specialty metallic threads are sometimes added for decorative elements.
Production Workflow:
- Digitizing: Your design is converted into a digital embroidery file—a critical step for accurate, high-quality results.
- Embroidery Execution: Computerized commercial embroidery machine for sale stitch the design, often using multiple thread colors and complex layering.
- Size-Specific Methods: Smaller flags (like 12' x 18') may be fully embroidered, while larger flags (15' x 25' and up) often use appliqué for technical reasons.
- Quality Control: Every flag undergoes inspection for stitch quality, tension, and design accuracy before shipping.
Use Cases: Custom embroidered flags are favored by government agencies, military branches, schools, and corporations for their prestige and durability.
3.2 Leading Providers and Ordering Workflow
Top Providers:
- Gettysburg Flag Works: Renowned for fully embroidered custom flags, with decades of experience and expert consultation.
- Embassy Flag, Inc.: Specializes in flags for government, military, and institutional clients, offering both embroidery and other production methods.
- Moritz Embroidery Works: Offers both hand-embroidered and machine-embroidered flags, with a wide range of fabrics, sizes, and finishing options.
Ordering Process:
- Consultation: Submit your design or collaborate with the provider’s design team. Expect guidance on file formats, color matching (often using Pantone® PMS), and material choices.
- Production Method Selection: Choose between embroidery, appliqué, or digital printing based on your needs and budget.
- Order Placement: Request a quote, confirm details, and place your order online, by phone, or by email.
- Production Timeline: Embroidered flags typically require longer lead times than printed ones—plan ahead, especially for large or complex orders.
- Customization Options: Select from single or double-sided flags, various mounting methods (grommets, pole sleeves), and finishing touches like fringe for indoor or ceremonial use.
Cost Considerations: Embroidered flags are a premium product—expect higher costs than printed alternatives, reflecting the labor, materials, and craftsmanship involved.
Summary: For organizations seeking flags that convey prestige, permanence, and unmatched durability, custom embroidered flags—crafted by leading providers—are the gold standard. From digitizing to finishing, every step is tailored to deliver a flag worthy of its place of honor.
4. DIY Embroidered Garden Flags: Step-by-Step Guide
Dreaming of a garden that greets every guest with a splash of color and a touch of personality? DIY embroidered garden flags are your ticket to transforming any outdoor space into a canvas for creativity. Whether you’re new to machine embroidery for beginners or a seasoned embroiderer, this section will guide you through fabric selection, stabilization, embroidery, and finishing—ensuring your flag stands tall against sun, wind, and rain.
4.1 Fabric Selection and Stabilization Strategies
The foundation of a long-lasting garden flag is the fabric you choose. For outdoor resilience, opt for Sunbrella fabric—a high-performance acrylic engineered to resist fading and deterioration. It’s the gold standard for garden flags, though it requires a hot knife for cutting to prevent fraying. Another top contender is rip-stop nylon, celebrated for its lightweight durability and proven to withstand years of outdoor exposure.
If you’re after a classic look, heavy-duty cotton or polyester blends offer stability and can handle dense stitching, making them suitable for both indoor and sheltered outdoor flags. Canvas and denim also provide sturdy bases, while blackout curtain polyester adds opacity and strength. For decorative borders, lightweight, no-fray fabrics with a bit of sparkle—like stretch lamé—add playful movement.
But fabric alone isn’t enough. Stabilization is what keeps your flag crisp and your stitches sharp. For most outdoor projects, a cutaway stabilizer is the go-to, especially with Sunbrella or similar fabrics. Products like OESD StabilStick CutAway are frequently recommended—just be sure to cut your stabilizer so it extends 1.5–2 inches beyond your hoop on all sides for maximum support.
For lighter cottons, double up with two layers of tear-away stabilizer, removing each layer separately post-embroidery. When working with textured or high-pile fabrics, add a water-soluble topping like StitcH2O to prevent stitches from sinking in.
Hooping and Adhesive Tips:
- Fuse a woven stabilizer (like OESD Fusible Woven) to the flag’s wrong side before embroidery.
- Hoop the stabilizer first, then press your fabric onto it, ensuring it’s drum-tight and wrinkle-free.
- Use temporary spray adhesives (such as KK2000 or 505 Spray) to keep everything in place—especially helpful for tricky fabrics.
- Always orient your fabric vertically in the hoop, matching the flag’s long sides to the hoop’s sides for proper grain alignment.
Pro Tip: Mark your flag’s center with a fold and a light pencil line for perfect design placement. Using template sheets can make this step nearly foolproof.
4.2 Embroidery Execution and Finishing Methods
With your fabric stabilized and hooped, it’s time to bring your design to life. Start with placement stitching—this outlines where appliqué pieces or lettering will go. For appliqué, lay your chosen fabric over the placement stitches, secure with a dab of temporary adhesive, and run the tack-down stitch. Trim excess fabric close to the stitch line, then finish with a satin or decorative stitch for a polished edge.
As your design unfolds, keep an eye on thread color for maximum visibility—contrasting threads make your motifs pop. For dense or layered designs, an 80/12 Microtex needle is your best friend, gliding through tough fabrics without snagging.
Weatherproofing:
Once your embroidery is complete, protect your masterpiece with a weatherproofing spray like Rust-Oleum NeverWet. Always test on a scrap first to ensure the spray doesn’t alter your fabric’s color or texture.
Final Assembly:
- Attach straps or rod pockets by placing them between guide marks, taping in place, and securing with a tack stitch.
- For borders, consider adding a rectangle of fringe fabric—cut and baste it along the flag’s edge, mitring corners for a professional finish.
- To assemble, align flag fronts and backs (right sides together), sew around the perimeter—leaving an opening for turning—then press for a crisp, tailored look.
Binding & Reinforcement:
For extra durability, bind the edges with rip-stop nylon, double-stitch the binding, and reinforce corners with an X/box stitch. This not only adds longevity but also a touch of artisan flair.
YouTube Insights:
Tutorials emphasize the importance of drum-tight stabilizer, careful pressing, and strategic use of adhesives and basting. Wonder clips and template sheets are invaluable for managing layers and ensuring everything stays put.
Longevity Secrets:
- Use double stitching and reinforced corners for flags that last season after season.
- The right stabilizer and weatherproofing can mean the difference between a flag that fades fast and one that becomes a garden staple.
So, ready to let your creativity fly? With the right materials and a few pro techniques, your garden flag will wave proudly—rain or shine.
5. Optimal Materials and Supplies for Flag Embroidery
Choosing the right materials is the secret sauce behind vibrant, resilient flags that stand up to the elements and the test of time. Let’s break down the best fabrics, threads, and hoops for your next flag embroidery project.
5.1 Fabric and Thread Selection
Fabric Choices:
- Polyester (2-Ply Spun): The industry standard for outdoor flags, polyester is prized for its durability, color retention, and resistance to wind, rain, and UV rays. It’s the go-to for flags that need to weather the storm—literally.
- Nylon: Lightweight yet tough, nylon is perfect for flags that need to flutter gracefully while resisting tearing and fading. It’s especially popular for multi-color or intricate designs.
- Burlap with Plastic Coating: A favorite for decorative garden flags, burlap brings rustic charm but requires a plastic backing for weather resistance. Embroidering on burlap can be tricky—use stabilizers and adhesives to keep stitches crisp.
Thread Selection:
- Polyester Thread: For outdoor flags, nothing beats premium, extra-strength polyester thread. It stands up to UV rays, moisture, and repeated exposure, keeping your designs bold and beautiful.
- Embroidery Yarn: For standout elements like stars, high-quality, colorfast embroidery yarn delivers shine and visibility.
Thread Weight:
Stick with machine embroidery thread designed for high-speed stitching. For hand embroidery, use 2–3 strands of polyester floss for durability, but avoid all six strands unless you want extra thickness.
Pro Tips:
- Always test your fabric and thread combo before diving into your main project.
- For lighter fabrics, consider mesh stabilizers to prevent show-through and maintain a clean finish.
5.2 Hoop Solutions for Garment Embroidery
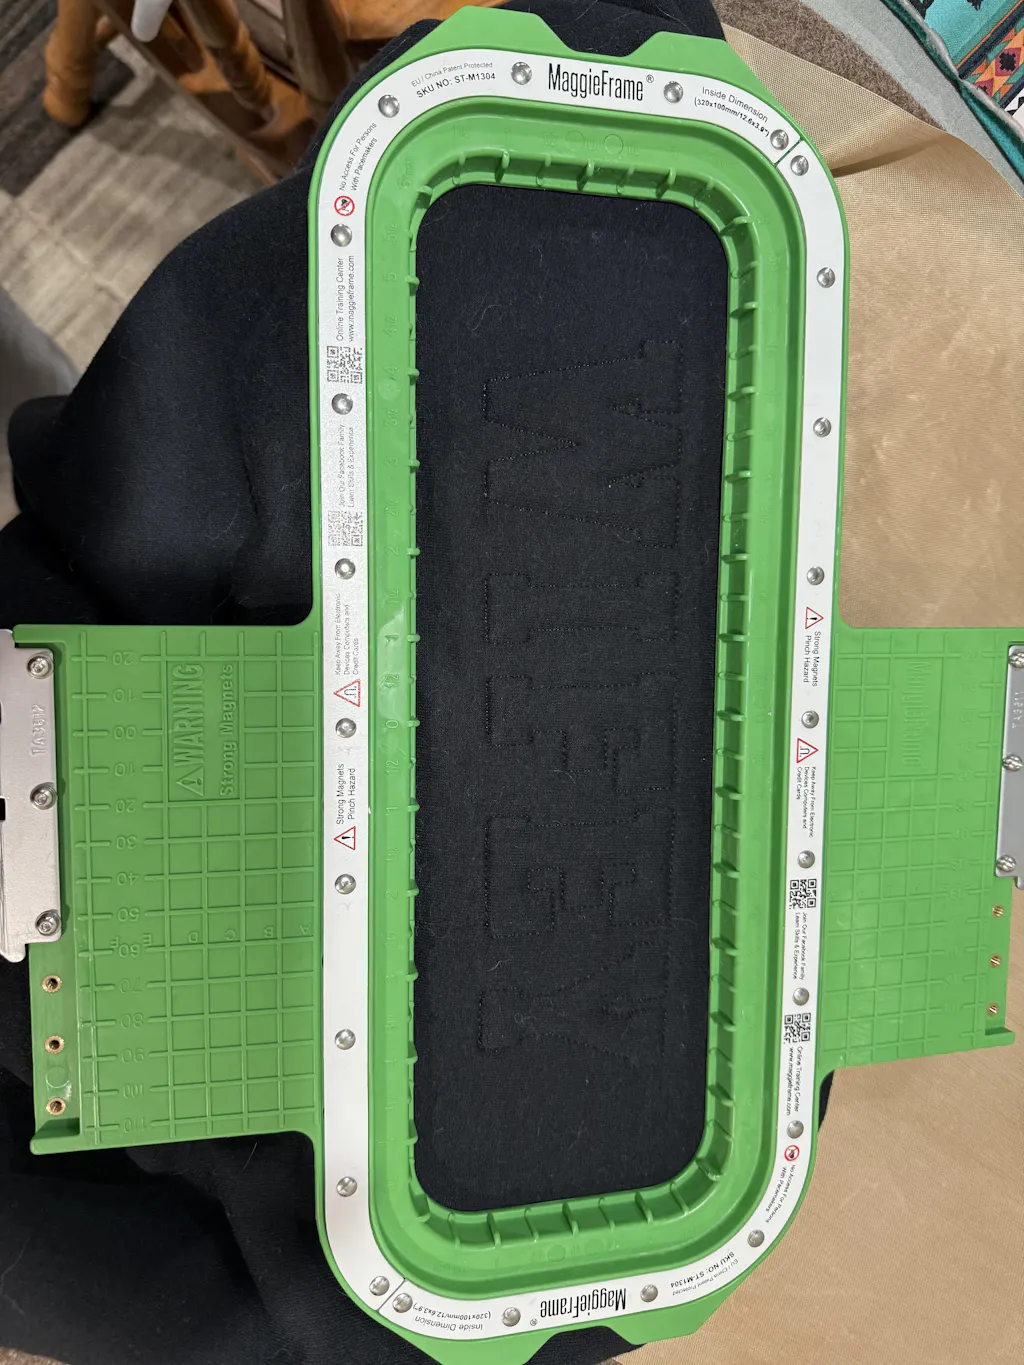
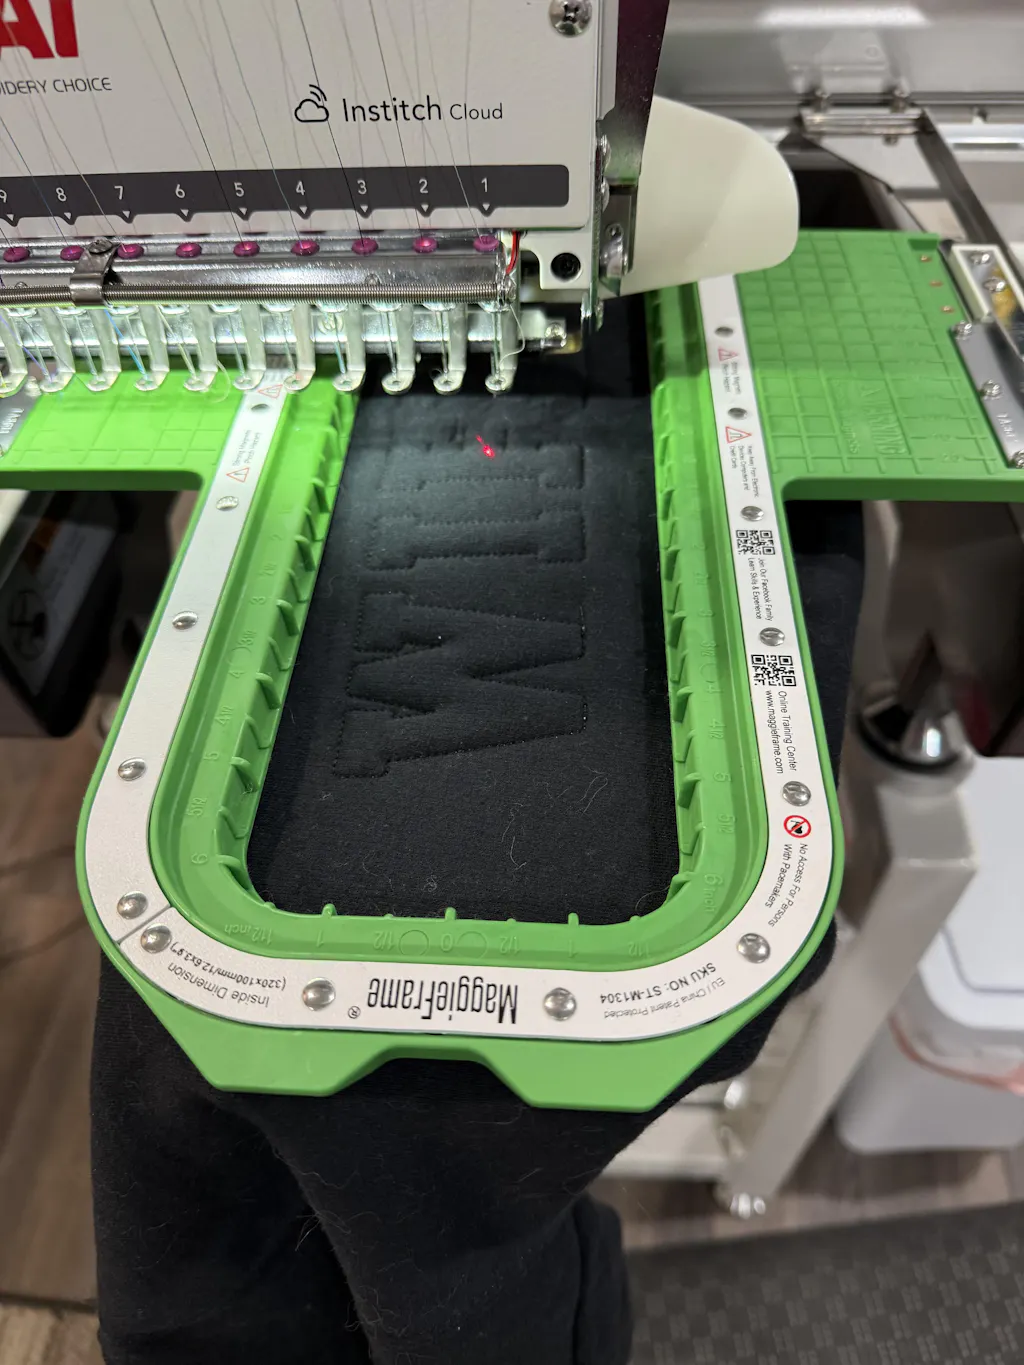
When it comes to garment flag embroidery, the right hoop can make or break your project—literally. Magnetic embroidery hoops like the MaggieFrame are becoming essential tools. Enter the MaggieFrame magnetic embroidery hoop, a game-changer for anyone seeking efficiency, precision, and fabric protection.
Why Choose MaggieFrame?
- Automatic Fabric Adaptation: MaggieFrame’s powerful magnetic system instantly adjusts to various fabric thicknesses, from delicate silks to thick sweatshirts, ensuring even tension without manual screw adjustments.
- Reduced Hoop Burn: The magnetic force distributes pressure evenly, dramatically minimizing hoop marks that can mar your finished piece.
- Industrial Compatibility: With over 17 sizes and compatibility across hundreds of commercial and industrial embroidery machines (including Tajima, Brother, Barudan, and more), MaggieFrame fits seamlessly into any workflow.
- Durability: Crafted from high-grade PPSU engineering plastic and N50-grade rare-earth magnets, MaggieFrame outlasts ordinary plastic hoops by a wide margin—standing up to the rigors of high-volume production.
- User-Friendly Design: Built-in reference lines make fabric alignment a breeze, while the quick-release system slashes hooping time from minutes to seconds.
| Feature | MaggieFrame Magnetic Hoop | Traditional Plastic Hoop |
|---|---|---|
| Fabric Adaptation | Automatic, suits all thicknesses | Manual screw adjustment required |
| Hoop Burn | Greatly reduced | Common, especially on delicate fabrics |
| Durability | Ultra-high, industrial-grade materials | Lower, prone to wear and breakage |
| Ease of Use | Quick, ergonomic, less hand strain | Time-consuming, requires skill |
| Machine Compatibility | 200+ brands, 17+ sizes | Limited |
For garment flag projects, MaggieFrame isn’t just a tool—it’s an upgrade in speed, quality, and comfort. If you’re tired of fighting with screw-tightened hoops or dealing with hoop marks, it’s time to experience the magnetic difference.
6. Troubleshooting Common Flag Embroidery Issues
Even seasoned embroiderers hit a snag now and then—literally. Flag embroidery comes with its own set of challenges, from fabric shifting to thread tension woes. Here’s how to keep your flags flawless, no matter what the machine throws your way.
6.1 Fabric Shifting and Stabilization Solutions
The Problem: Lightweight or slippery flag fabrics like nylon and polyester are notorious for shifting during embroidery, leading to misaligned designs and puckering.
Common Causes:
- Improper hooping technique—fabric isn’t taut or gets stretched out of shape.
- Loose or insecure hoop, especially with large or thick materials.
- Insufficient or incorrect stabilizer for the fabric type.
Solutions:
- Reinforced Hooping: Ensure your fabric is drum-tight in the hoop, but avoid over-stretching. For tricky materials, hoop the stabilizer first, then press the fabric onto it.
- Magnetic Hoops: Magnetic solutions like MaggieFrame hold fabric evenly without distortion, maintaining consistent tension throughout the embroidery process.
- Stabilizer Selection: Use stabilizers designed for lightweight or stretchy fabrics, and always allow extra stabilizer around the hoop (1.5–2 inches) for added grip.
- Basting Stitches: Run a basting box around your design to secure all layers—especially helpful for odd shapes or multi-layered flags.
Pro Tip: Never tug or pull your fabric after hooping. Let the stabilizer and hoop do the heavy lifting.
6.2 Thread Tension and Alignment Fixes
The Problem: Looping, birdnesting, and misalignment can turn a promising flag into a frustrating mess.
Thread Tension Issues:
- Loose or loopy top thread often signals improper threading or tension that’s too loose.
- Birdnesting—giant tangles of thread on the underside—usually means the thread isn’t seated correctly in the tension discs.
Fixes:
- Threading Check: Rethread your machine, making sure the thread is firmly seated in all tension guides.
- Tension Adjustments: Tighten needle tension in small increments (¼ to ½ turns) until stitches are balanced.
- Quality Thread: Use thread designed for high-speed embroidery—old or poor-quality thread is a recipe for breakage.
Alignment Issues:
- Fabric slipping in the hoop or a loose hoop can throw off your design.
- Double-check design positioning in your embroidery software before starting.
- For minor misalignments, a fine-tipped marker can camouflage tiny gaps.
Digitizing Verification:
- If alignment issues persist, review your digitizing file. Use slow-motion playback to pinpoint trouble spots.
Maintenance Matters:
- Change your needle regularly—after five embroideries is a good rule of thumb.
- Clean or replace worn tension discs for consistent results.
Systematic Troubleshooting:
- Observe the problem—looping, skipped stitches, or misalignment?
- Check needle and thread—replace if needed.
- Analyze when the issue occurs—certain designs or points in the process?
- Verify threading and tension settings.
- Consult your machine’s manual for model-specific tips.
With these strategies, you’ll turn embroidery headaches into smooth, satisfying victories—one perfectly stitched flag at a time.
7. Sourcing Flag-Themed Embroidery Designs
Finding the perfect flag-themed embroidery design is like choosing the right flag to fly—it’s all about expressing identity, pride, and creativity. Whether you’re aiming for a classic national flag, a quirky garden banner, or a commemorative patch, the world of downloadable embroidery patterns offers something for every project and skill level. Let’s explore the types of designs available, file format essentials, and where to find both free and premium patterns that will make your next flag project wave with distinction.
7.1 Design Types and File Formats
Flag embroidery isn’t just about stars and stripes—there’s a vibrant spectrum of design categories and technical considerations to navigate.
Types of Flag Embroidery Designs:
- National Flags: Full representations of countries like the United States, Canada, or the UK are perennial favorites, especially around holidays and international events.
- Regional and State Flags: From Texas to Ontario, regional flags let you showcase local pride or commemorate special places.
- Historical Flags: Vintage designs—think Betsy Ross or Civil War banners—add a sense of heritage to your embroidery.
- Patriotic Elements: Beyond literal flags, popular motifs include stars, fireworks, hearts in red, white, and blue, and military insignia. Collections like “USA Patriotic Collection” or “USA Military Collection” bundle these elements for themed projects.
-
Specialized Formats:
- Corner Designs: Ideal for garment accents or subtle flag touches.
- Appliqué Versions: Reduce stitch complexity and add texture.
- In-the-Hoop (ITH) Projects: Complete banners or wall hangings stitched entirely in the hoop.
File Formats and Technical Specs:
Embroidery machines speak many languages—choosing the right file format is crucial for a smooth stitch-out. The most common formats include:
| Format | Machine Brand(s) | Availability Across Platforms |
|---|---|---|
| PES | Brother | Universal |
| DST | Tajima | Universal |
| JEF | Janome | Widespread |
| HUS | Husqvarna/Viking | Common |
| VP3 | Various | Common |
| EXP | Melco | Available |
Size Considerations:
Designs are often optimized for standard hoop sizes (e.g., 4x4", 5x7", 8x12"). ThreadArt.com, for example, notes that their flag sets are “designed for 4x4 hoops.” If you’re planning a large banner or a tiny patch, make sure your chosen pattern fits your hoop and project dimensions.
Digitizing Complexity:
Some flags, like the U.S. flag with its 13 stripes and 50 stars, pose unique digitizing challenges. Professional digitizers often break these into component shapes to keep stitch counts reasonable and avoid excessive density—no one wants a 3-inch flag with 20,000 stitches! Always review stitch counts and, if possible, test-stitch new designs before committing to your final fabric.
7.2 Free and Commercial Pattern Resources
The hunt for flag-themed embroidery designs can take you from generous freebie libraries to curated commercial collections—each with its own perks.
Free Design Resources:
- AnnTheGran.com: Boasts one of the largest collections of free flag embroidery designs, updated weekly. Expect a wide variety, from classic national flags to playful patriotic motifs. Note: Free downloads may require email registration.
- FeedourLife Blog: Offers an A–Z list of free patriotic machine embroidery designs, including multiple U.S. flag variations, stars, and themed collections.
- EmbroideryDesigns.com: Features a selection of free flag designs, ranging from traditional to modern styles.
Pro Tip: Free designs are great for practice or small projects, but always review usage rights—most platforms prohibit reselling digital files or finished products without proper licensing.
Commercial Pattern Providers:
- Designs by JuJu: Known for vibrant, beginner-friendly patriotic collections, especially for Fourth of July projects. Their bundles often include appliqué, redwork, and filled-stitch options.
- ThreadArt.com: Sells flag design sets in multiple formats, emphasizing quality control and compatibility. Their “Flags(1)” set, for example, includes 16 different designs and is tested before listing.
- The Embroidery Spot: Focuses on quality assurance, promising that each design is test-stitched before sale—an important consideration for complex motifs.
What Sets Commercial Designs Apart?
- Quality Control: Reputable sellers test their files before release, reducing the risk of stitch-out surprises.
- Format Variety: Paid platforms almost always offer a full suite of file types for broad compatibility.
- Customer Support: Providers like Designs by JuJu offer help with downloading, stitching, and selecting the right pattern for your needs.
Collections and Market Trends:
- Bundled Sets: Increasingly, consumers prefer to purchase themed collections (“USA Patriotic Collection – 28 designs”) for greater variety and value.
- Seasonal Promotions: Expect special releases and discounts around major holidays—especially the Fourth of July.
Evaluating Design Quality:
- Stitch Count: For a 3–4" flag, a stitch count between 8,000–12,000 is typical; higher counts may indicate inefficient digitizing.
- Color Separation: Look for clean transitions and minimal thread jumps.
- Test Stitching: Whenever possible, choose providers who test their files before listing.
Usage Rights:
Read the fine print! Most commercial providers restrict digital file resale and may differentiate between personal and commercial use.
With these resources and tips, you’ll be well-equipped to find or purchase the perfect flag embroidery design—whether you’re stitching a single patch or decking out your entire porch in patriotic flair.
8. Conclusion: Mastering the Art of Flag Embroidery
Mastering embroidered flags is all about combining the right techniques with a spirit of experimentation. From stabilizer selection and precision construction to troubleshooting tricky threads, each step shapes the durability and beauty of your finished flag. Don’t be afraid to test new machine settings or explore fresh design sources—durability and creativity go hand in hand. With the right approach, your embroidered flags will not only catch the eye but also stand the test of time, waving proudly through every season.
9. Frequently Asked Questions
9.1 Q: What are the best fabrics for outdoor embroidered flags?
A: Outdoor flags thrive on durable, weather-resistant fabrics like polyester (especially 2-ply spun) and nylon. These materials resist fading, tearing, and moisture, making them ideal for long-term display.
9.2 Q: How complex is digitizing stars and stripes for flag embroidery?
A: Digitizing intricate elements like the U.S. flag's 13 stripes and 50 stars requires careful planning. Professional digitizers often break the flag into component shapes to manage stitch count and ensure clean details. Testing the design before final embroidery is highly recommended.
9.3 Q: How should I adjust tension for thick or layered flag materials?
A: For thick fabrics or multiple layers, start by tightening your needle tension in small increments and use high-quality thread designed for embroidery. Always test your settings on a fabric scrap to achieve balanced, even stitches.
9.4 Q: How do I ensure accurate design placement on my flag?
A: Mark the flag's center using folding or crosshair techniques, and use your machine's grid or pinpoint placement features for precision. Templates and temporary adhesives can further help keep your design perfectly aligned throughout the embroidery process.