1. Introduction to Free Floral Embroidery Patterns
Flowers and embroidery—a match made in creative heaven! Whether you're a seasoned stitcher or just starting your journey, floral embroidery patterns have a universal appeal that transcends trends and skill levels. Why do these designs capture so many hearts? Simple: flowers are endlessly versatile, brimming with color, texture, and meaning. They can brighten up a pillowcase, transform a denim jacket, or turn a simple hoop into a work of art.
In this guide, we’ll explore the world of free floral embroidery patterns, from where to find high-quality free machine embroidery designs to the essential techniques you’ll need to bring them to life. You’ll discover how to access printable designs, learn beginner-friendly stitches, and uncover inspiring project ideas for home décor and accessories. Ready to let your creativity bloom? Let’s dive in and stitch some joy!
Table of Contents
- 1. Introduction to Free Floral Embroidery Patterns
- 2. Top Sources for Free Downloadable Floral Designs
- 3. Beginner Techniques for Floral Machine Embroidery
- 4. Printable Patterns & Transfer Methods Demystified
- 5. Inspirational Floral Design Styles and Themes
- 6. Step-by-Step Tutorials for Common Challenges
- 7. Creative Project Applications
- 8. Conclusion: Elevating Your Floral Embroidery Journey
- 9. FAQ on Free Flower Embroidery Patterns
2. Top Sources for Free Downloadable Floral Designs
Finding the perfect floral embroidery pattern shouldn’t feel like searching for a needle in a haystack. Luckily, the internet is bursting with reputable platforms offering free embroidery designs online—no registration or hidden fees required. Let’s break down the best places to start your search, demystify file formats, and help you choose the right design for your next masterpiece.
2.1 Trusted Platforms with Instant Access
If you’re eager to start stitching right away, these platforms have you covered:
- Embroideres.com: This site boasts a dedicated “Flowers” category with a rich library of free designs. What sets Embroideres.com apart? You can download patterns instantly—no sign-up required. Their collection is regularly updated, ensuring fresh inspiration every week. Notably, their Forget-Me-Not bouquet (2.94 x 3.91") has garnered over 591 downloads and multiple user comments, making it a community favorite.
- AnnTheGran.com: AnnTheGran claims to host one of the largest collections of free floral embroidery designs, adding a new free PDF pattern every week. Their no-registration policy and weekly additions make it a go-to for both beginners and experienced embroiderers.
- EmbroideryDesigns.com: This platform also features an extensive library of free floral designs, available in multiple machine formats for broad compatibility.
- Designsbyjuju.com: If you’re drawn to vintage sketch-style florals, you’ll love the free selections here. Their “Spring Garden Sketch” series is a standout for those seeking a classic touch.
What do these platforms have in common? Instant downloads, multi-format support, and a commitment to quality—all designed to get you stitching sooner and with confidence.
2.2 File Format Compatibility Explained
Ever downloaded a gorgeous pattern only to discover it won’t work with your machine? File format compatibility is key. Fortunately, leading platforms recognize the diversity of embroidery machines and offer patterns in a wide range of formats:
| Format | Common Machines Supported |
|---|---|
| PES | Brother, Baby Lock |
| DST | Tajima, commercial machines |
| EXP | Melco, Bernina |
| JEF | Janome |
| VP3 | Husqvarna Viking, Pfaff |
| HUS | Husqvarna Viking |
| XXX | Singer |
| ART | Bernina |
| PEC | Brother |
| SEW | Janome, Elna |
| VIP | Husqvarna Viking, Pfaff |
Some platforms, like AnnTheGran.com, offer up to 11 different file types, ensuring you’ll find a format that fits your machine like a glove. This multi-format approach means you can download with confidence, knowing your chosen design will stitch out beautifully—no technical headaches required.
2.3 Design Sizing and Application Guide
Not all floral designs are created equal—especially when it comes to size. Download statistics and platform recommendations reveal a clear trend: smaller, versatile patterns are the most popular. For example, the Forget-Me-Not bouquet (2.94 x 3.91") leads in downloads, while medium and larger designs, like the Trio Flowers (4.72 x 3.75") and Tulip and Flowers (5.83 x 6.62"), are also widely used.
So, where do these patterns shine?
- Small Designs (under 4 inches): Perfect for towels, handkerchiefs, and accessories. Their sentimental value and adaptability make them crowd favorites.
- Medium Designs (4–6 inches): Great for pillowcases, table linens, and framed hoop art.
- Larger Designs (over 6 inches): Ideal for statement pieces like wall hangings or decorative cushions.
Whether you’re embellishing a tote bag, refreshing home décor, or crafting a heartfelt gift, there’s a floral pattern—and a size—to suit every project and skill level.
3. Beginner Techniques for Floral Machine Embroidery
Ready to transform those digital patterns into stitched reality? Don’t worry if you’re new to machine embroidery for beginners—floral designs are the perfect playground for learning essential techniques. Let’s walk through the foundational methods, from dimensional appliqué to the stitches that bring petals and vines to life, and how to achieve flawless fabric tension for professional results.
3.1 Appliqué Method for Dimensional Flowers
The in-the-hoop appliqué method is a beginner-friendly way to add depth and texture to your floral embroidery. Here’s a step-by-step guide based on expert tutorials:
- Placement Stitch: Your machine first outlines where the fabric piece will go.
- Fabric Positioning: Place your chosen fabric right side up, covering the placement line.
- Stitching Down: Let the machine secure the fabric with a tack-down stitch.
- Trimming: Remove the hoop from the machine and trim the excess fabric close to the stitch line.
- Satin Stitch Outlining: Return the hoop and let the machine finish the edge with a neat satin stitch.
- Detail Embroidery: The machine adds intricate details—think veins, centers, or background elements.
This process can be repeated for each layer or element in your floral design, making it easy to build up complex, dimensional flowers. Special note for knit fabrics: extra stabilization is key to prevent distortion and achieve crisp, realistic results.
3.2 Essential Stitches for Botanical Accuracy
You don’t need a library of stitches to create beautiful flowers—just a few basics, used well, can work wonders. Drawing from both machine and hand embroidery resources, here are the essentials:
- Satin Stitch: Ideal for smooth, filled petals and leaves. Machine embroidery uses programmed satin stitches to create those lush, shiny surfaces.
- Stem Stitch: Perfect for vines and stems, offering a rope-like, textured line.
- Backstitch & Split Stitch: Great for outlining and adding definition to your motifs.
- Lazy Daisy (Detached Chain Stitch): A favorite for simple petals and leaves, especially in hand embroidery-inspired designs.
- French Knots & Beads: Add dimension to flower centers or accents.
YouTube tutorials often recommend practicing these stitches on a sampler before tackling a full project. Managing hoop tension is also crucial—keep your fabric taut but not stretched to avoid puckering and ensure clean, even stitches.
3.3 Achieving Perfect Fabric Tension with Magnetic Hoops
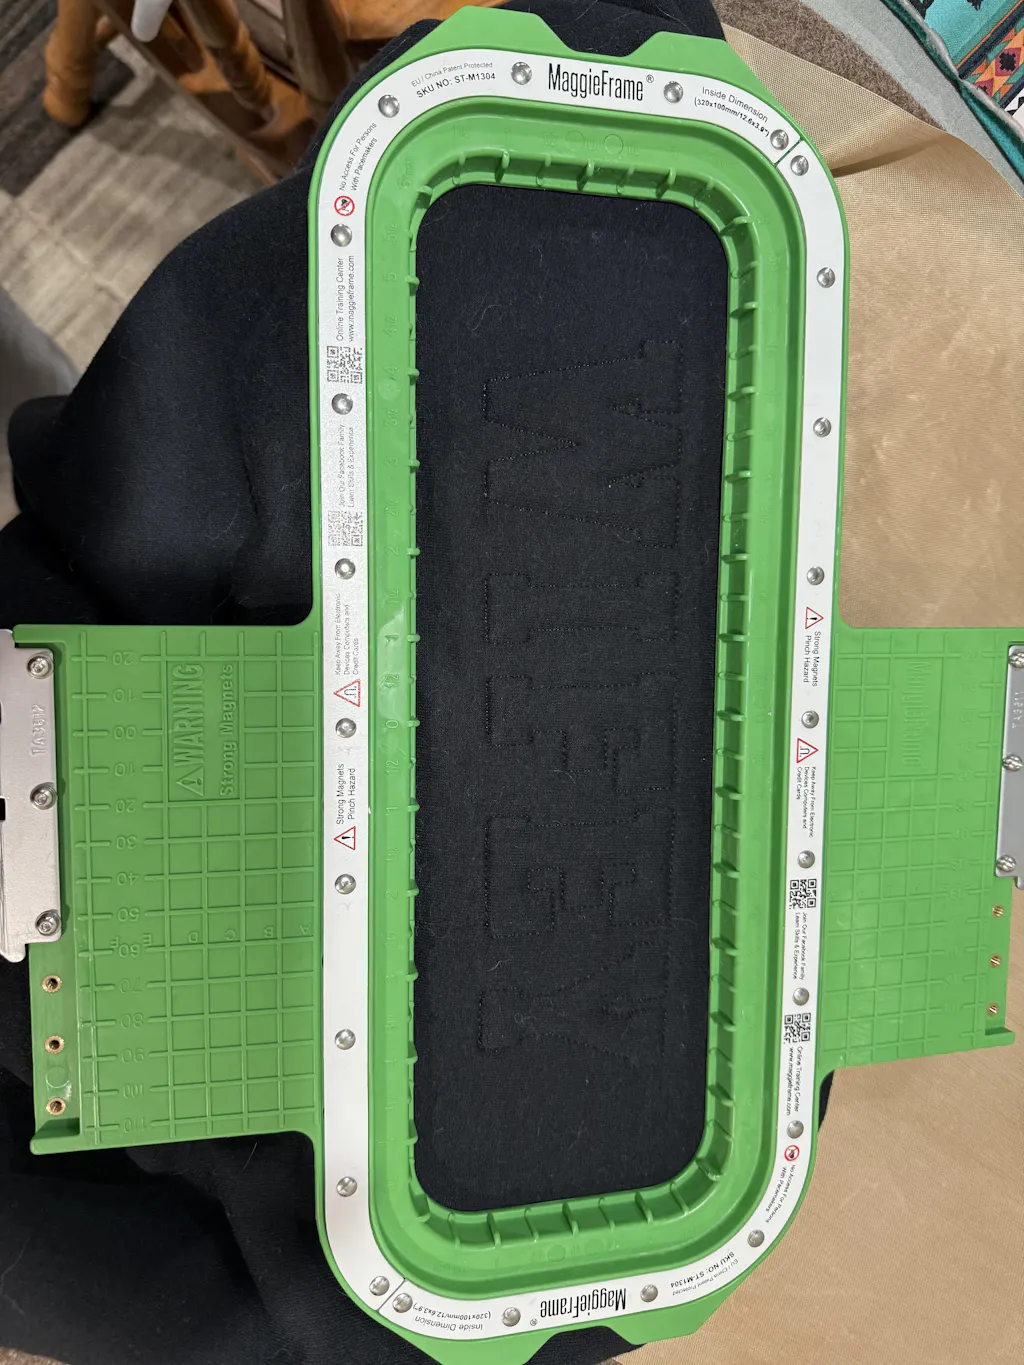
Let’s face it: nothing ruins a beautiful floral design faster than puckered fabric or misaligned stitches. That’s where magnetic embroidery hoops come in—especially for garment projects on tricky fabrics like denim or sweaters. Brands like MaggieFrame have revolutionized the hooping process with their powerful magnetic systems.
Here’s how MaggieFrame makes a difference:
- Even Tension Every Time: The magnetic system automatically adapts to fabric thickness, holding everything securely without manual adjustments.
- Prevents Distortion: No more stretched or warped flowers—your design stays crisp and true.
- Time-Saving: Quick to set up and remove, freeing you to focus on creativity rather than fiddling with screws.
- Versatile Application: Works beautifully on a range of fabrics, from delicate knits to sturdy denim, making it a favorite for both beginners and pros.
By ensuring stable, even tension, magnetic hoops like MaggieFrame help you achieve professional-quality results—so your floral embroidery looks as fresh and flawless as a bouquet in full bloom.
Ready to put these tips into practice? The next sections will guide you through pattern transfers, creative design ideas, and troubleshooting common challenges. Stay tuned, and let your embroidery garden grow!
4. Printable Patterns & Transfer Methods Demystified
Transferring your favorite floral embroidery pattern onto fabric is where the magic begins—but with so many methods out there, how do you choose the right one? Let’s break down the most popular printable pattern transfer techniques, their pros and cons, and how to get crisp, accurate outlines every time, no matter your fabric or design complexity.
4.1 Heat Transfer vs. Carbon Paper Techniques
When it comes to getting your printed design onto fabric, two classic approaches dominate: heat (iron-on) transfer and carbon paper transfer. Each has its quirks, so let’s see which fits your project best.
Heat/Iron-On Transfer Method-
How It Works:
Print your design in mirror image, trace it with a heat transfer pen (or use a pre-made iron-on), place it face down on your fabric, and press with an iron. -
Best For:
Most fabric types—except slippery poly satin, where the transfer may not stick well. -
Pros:
- Fast and beginner-friendly—great for those who want to jump right in.
- Produces permanent lines that won’t smudge while you stitch.
-
Cons:
- Transfer lines are thicker than other methods, which may show through lighter stitches.
- Not suitable for heat-sensitive fabrics.
- Always remember to print your design as a mirror image, or your motif will come out backwards!
-
Pro Tip:
This method shines on linen and cotton, as noted in multiple tutorials and user experiences.
-
How It Works:
Place the colored side of carbon paper down on your fabric, position the pattern on top, and trace the lines with a ballpoint pen. -
Best For:
Most fabric types, especially when you want a traditional, cost-effective approach. -
Pros:
- Inexpensive and accessible—carbon paper is a staple in many craft rooms.
- Passed down through generations, it’s a tried-and-true favorite.
-
Cons:
- Lines can smudge if you’re working on the project over several days.
- Press too hard, and you might mark or stain the fabric.
- For best results, re-trace the lines with a water-soluble pen after removing the carbon paper to sharpen the design.
-
Pro Tip:
This method is especially handy for thicker fabrics or when you want to avoid heat altogether.
Choosing Between the Two:
If you’re looking for speed and permanence, heat transfer is your friend. Prefer a gentler, more flexible approach? Carbon paper is a classic for a reason. And always check your fabric type—some methods simply play nicer with certain materials.
4.2 Light-Based and Prick-and-Pounce Approaches
Sometimes, you need a lighter touch—literally. For sheer fabrics or dark textiles, light-based and prick-and-pounce methods offer unique solutions.
Light-Based Transfer Method-
How It Works:
Tape your printed design to a light box or a sunny window, then tape your fabric over it. Trace the visible lines directly onto the fabric. -
Best For:
Sheer or lightly colored fabrics where the design shows through easily. -
Pros:
- No special materials required—just a good light source.
- Preserves your original pattern for future use.
- Produces clean, direct lines.
-
Cons:
- Doesn’t work well on thick or dark fabrics.
- Can be tricky for highly detailed or complex designs.
- Daylight hours (or a light box) required.
-
Pro Tip:
Use a fine-tipped, water-soluble pen for crisp, removable lines.
-
How It Works:
Prick tiny holes along your design lines on paper, place the paper on your fabric, and dust chalk powder over the holes. The powder marks the fabric with a dotted outline, which you then trace with a pen. -
Best For:
Dark fabrics, velvets, or projects where other methods fall short. -
Pros:
- Excellent for large, complex designs or pile fabrics.
- Creates precise transfer points, especially on challenging surfaces.
-
Cons:
- More involved—requires patience and a steady hand.
- Chalk lines can rub away easily, so tracing over them is a must.
-
Pro Tip:
Use a needle point tracer wheel for even holes, and follow up with a water-soluble pen to lock in your design.
-
How It Works:
Print your design directly onto fabric (with a laser printer) or onto transfer paper and apply heat. -
Best For:
Quick, detailed transfers—if you have the right printer. -
Cons:
- Not suitable for inkjet printers.
- Transfers can be light—test before committing to your final fabric.
Final Thoughts:
No matter which method you choose, always consider your fabric type, the complexity of your design, and your comfort level with each technique. And don’t forget: prepping and stabilizing your fabric before transfer is key to a flawless stitching experience.
5. Inspirational Floral Design Styles and Themes
Floral embroidery isn’t just about pretty petals—it’s a playground for artistic expression. Whether you’re drawn to lifelike botanicals, bold geometric shapes, or seasonal bouquets bursting with color, there’s a style to spark every stitcher’s imagination. Let’s explore machine embroidery ideas and inspiring floral motifs and trending themes lighting up the embroidery world.
5.1 Botanical vs. Abstract Floral Motifs
Botanical Motifs: If you crave realism, botanical embroidery is your garden of choice. These designs showcase scientific precision—think detailed petal veins, natural color transitions, and motifs inspired by everything from Celtic knotwork to tropical lotuses. Botanical patterns often require intricate digitizing and a high stitch count (typically 4,000+ stitches) to capture the subtle beauty of real flowers. They’re perfect for traditional projects, heritage-inspired décor, or heartfelt gifts that feel like pressed flowers come to life.
Abstract Floral Motifs: Prefer to let your creativity run wild? Abstract florals swap realism for bold geometry, expressive brushstrokes, and emotional impact. These designs use geometric shapes, vibrant color blocks, and playful stitch combinations to evoke the essence of flowers without strict adherence to nature. Abstract styles are ideal for modern wall art, accessories, or any project where you want to break the rules and make a statement.
Choosing Your Style: Botanical embroidery is like painting with thread—layer by layer, you build up lifelike blooms. Abstract motifs, on the other hand, are your invitation to experiment: mix stitches, play with color, and create something uniquely yours. No matter your skill level, there’s a floral style that fits your vision.
5.2 Seasonal Bouquets and Festive Arrangements
Flowers aren’t just for spring—each season brings its own bouquet of inspiration. Let’s look at how seasonal and festive themes can breathe new life into your embroidery projects.
Spring and Summer: Celebrate renewal with wildflowers, garden scenes, and fresh color palettes. Designs like Gathered.how’s sunflower hoop capture the joy of summer with bold petals and textured stitches—perfect for practicing your satin stitch and French knots. Spring motifs often feature daffodils, daisies, and whimsical meadow blooms, sometimes paired with bees or butterflies for extra charm.
Autumn and Winter: As the air turns crisp, embroidery shifts to sunflowers, harvest bouquets, and rich, earthy tones. Fall designs might include wheat, pumpkins, or retro sunflowers. When winter arrives, festive arrangements take center stage: poinsettias, Christmas cacti, and holly leaves become the stars of holiday décor. Many pattern libraries organize their collections by season, making it easy to find the perfect motif for any time of year.
Festive Arrangements: Holiday embroidery isn’t just about flowers—think wreaths, monogrammed bouquets, and even three-dimensional blooms for ornaments or gifts. Whether you’re stitching a Christmas poinsettia or a spring garden sampler, seasonal designs add a timely touch to home décor, accessories, and handmade presents.
Pro Tip: Don’t be afraid to mix and match styles or add your own twist. A vintage-inspired bouquet can take on new life with bold colors or modern stitches, while a minimalist abstract motif might become the centerpiece of a festive table runner.
6. Step-by-Step Tutorials for Common Challenges
Every embroiderer—beginner or pro—faces a few hurdles along the way. From managing pesky knots to smoothing out puckered fabric, mastering these challenges is what transforms a good project into a great one. Here’s your roadmap to overcoming the most common floral embroidery obstacles, with expert-backed techniques and practical tips.
6.1 Mastering Thread Management and Knots
Nothing derails a stitching session faster than tangled threads or unsightly knots. Fortunately, the embroidery community has developed several foolproof methods to keep your work neat and frustration-free.
Three Knot-Free Starting Methods (from Wandering Threads):
-
Knot and Stitch Over:
- Make a knot at the end of your thread and bring it up through the fabric, leaving the knot on top about an inch from your starting point.
- Make 3–4 tiny anchor stitches near the knot, then gently pull the knot up and snip it off.
- Continue stitching over the spot for a seamless start.
-
Thread Weaving Technique:
- Start stitching toward the knot, weaving your thread alternately on either side of the fabric’s back to secure it—no need to constantly check the reverse side.
-
Knot Removal Technique:
- Make a row of tiny securing stitches, then pull gently on the knot and snip it off, working over the secured area.
Color Selection for Realistic Florals: DMC embroidery floss is a favorite for its vibrant, consistent colors. For lifelike flowers, try pairing shades like DMC #3836 (for lavender blossoms) and #3346 (for stems), using 6 strands for petals and 4 for stems. Bright, high-quality threads bring your patterns to life—don’t be afraid to experiment with color!
Pro Tip: Always use fabric with a high thread count (like linen or cotton) for best results, and keep a small, sharp pair of embroidery scissors handy for precise thread cutting.
6.2 Troubleshooting Puckering and Alignment
Fabric puckering and misaligned stitches can turn even the prettiest pattern into a headache. Here’s how to keep your fabric smooth and your stitches on track:
Stabilizer Weight Formulas: Choose a stabilizer that matches your fabric’s weight—lightweight for delicate cottons, heavier for denim or thicker materials. Proper stabilization is your first line of defense against puckering.
Hoop Repositioning Protocols: If you need to move your hoop mid-project, always remove the hoop gently and re-hoop carefully, ensuring the fabric remains taut but not stretched. This prevents distortion and keeps your design aligned.
Managing Tension: Keep your fabric taut in the hoop, but avoid overstretching. Adjust your hoop as needed and check tension regularly, especially when working on large or multi-layered designs.
Pro Tip: For dark or pile fabrics, consider using chalk powder or a water-soluble pen to mark your design—these are easy to remove and won’t interfere with your stitches.
Final Word: Mastering these techniques means fewer headaches and more beautiful results. With a little practice and the right tools, you’ll conquer every embroidery challenge that comes your way—one stitch at a time.
Ready to take your floral embroidery to the next level? Keep experimenting with new patterns, transfer methods, and techniques—your next masterpiece is just a stitch away!
7. Creative Project Applications
Floral embroidery patterns aren’t just for show—they’re the secret ingredient that transforms everyday items into works of art. Whether you’re looking to refresh your living space or add a personal flair to your wardrobe, machine embroidery flower designs offer endless possibilities. Let’s dig into some of the most inspiring and practical ways to put those free patterns to use, with tips for choosing the right fabrics and tools for flawless results.
7.1 Home Décor: Pillows, Linens, and Wall Art
Imagine walking into a room where the cushions whisper of wild meadows, the table runner blooms with intricate petals, and the walls showcase hoops bursting with sunflowers or delicate wreaths. According to Embroideres.com, a whopping 78% of floral embroidery patterns are destined for home use—a testament to their power to elevate interiors with a touch of handmade charm.
Pillow and Cushion Embellishment
Floral motifs look stunning on throw pillows and cushion covers, instantly creating a refined botanical theme. These make thoughtful gifts for loved ones or statement pieces for your own sofa. Lightweight fabrics like cotton and linen are ideal for detailed designs, ensuring crisp stitches and lasting beauty.
Table Linens and Runners
Table runners, napkins, and placemats become conversation starters when adorned with embroidered flowers. The lightweight nature of these textiles makes them perfect canvases for intricate motifs without sacrificing functionality. Try a spring bouquet for a seasonal refresh, or a classic rose border for timeless elegance.
Wall Hangings and Hoop Art
Turn embroidery hoop frames into ready-to-hang wall décor. Gathered.how, for example, features Maggie Schücker’s sunflower hoop—a rich, burgundy-backed masterpiece that doubles as both art and a skill-building project. Framed floral embroidery brings the outdoors in, adding warmth and personality to any space.
Pro Tip:
For beginners, start with simpler floral patterns on cotton or linen. As your skills grow, experiment with larger or more detailed designs—just be sure to use appropriate stabilizers to keep your fabric smooth and your stitches flawless.
7.2 Fashion Embellishment: Garments and Accessories
Why stop at home décor? Floral embroidery breathes new life into garments and accessories, making each piece uniquely yours. Think beyond the basics—your closet is a canvas waiting to bloom.
Tote Bags and Pouches
Embroideres.com highlights tote bags and pouches as perfect for floral motifs. A simple canvas tote, once stitched with a vibrant bouquet, becomes a chic, personalized accessory. These practical projects are beginner-friendly and make for delightful gifts.
Scarves and Wraps
Lightweight scarves are transformed with subtle floral accents, adding a touch of sophistication. Choose airy fabrics and delicate designs for a look that’s both elegant and wearable.
Denim Jackets and T-Shirts
Denim is always on trend, but why not make it unforgettable? Upcycle a jacket or tee with textured florals—think bold sunflowers, wildflowers, or even a trailing vine. Gathered.how shares inspiring examples, from shoulder patches to full-back designs.
Handkerchiefs and Pocket Squares
Small-format projects like handkerchiefs and pocket squares are perfect for experimenting with new stitches or color palettes. They also make heartfelt keepsakes or wedding accessories.
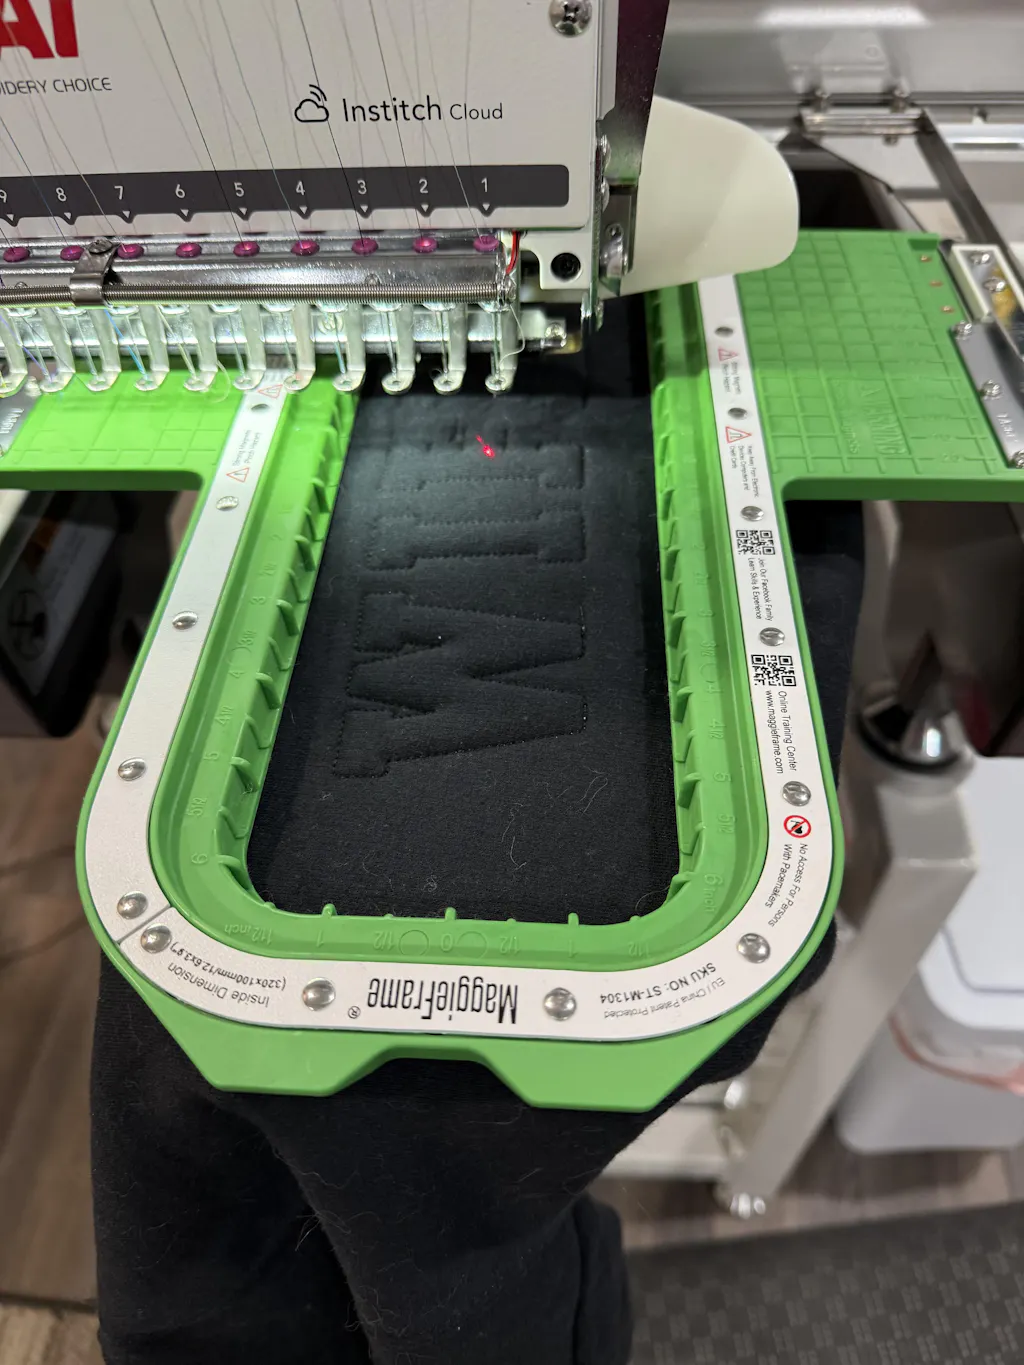
Achieving Professional Results with MaggieFrame
When working on garments—especially stretch fabrics like knits, sweaters, or even denim—fabric stability is key. This is where MaggieFrame’s magnetic embroidery hoops shine. Their powerful magnetic system holds fabric evenly and securely, preventing distortion and puckering that can ruin your design. The even tension ensures your stitches stay crisp, while the quick setup saves precious time—letting you focus on creativity, not fiddly adjustments. Whether you’re embellishing a scarf or personalizing a jacket, MaggieFrame helps you achieve results that look (and feel) professional.
Fabric and Technical Considerations
- Lightweight fabrics (cotton, linen): Best for detailed floral motifs.
- Thicker materials (denim, canvas): Choose bold, textured fills or larger motifs.
- Stabilizers: Always use the right stabilizer to prevent puckering, especially on thinner fabrics.
- Stitch Density: Match your design’s stitch count to your fabric’s weight for optimal results.
Emerging Trends:
- AI-Driven Customization: New tools are making it easier to adapt free patterns for different projects, automatically adjusting stitch density and correcting errors before you even start stitching.
- Sustainable Materials: Eco-friendly fabrics like organic cotton and recycled polyester are gaining popularity, letting you create beautiful—and responsible—embroidered pieces.
Ready to get started?
Pick a free pattern from trusted sources like Cutesy Crafts, DMC, or Embroideres.com, choose your project, and let your creativity bloom. With the right tools and a little inspiration, the possibilities are as endless as a wildflower meadow.
8. Conclusion: Elevating Your Floral Embroidery Journey
Floral embroidery is more than just a craft—it’s a way to infuse everyday life with color, artistry, and meaning. By sourcing reliable free patterns, mastering transfer techniques, and choosing projects that inspire you, you can transform simple fabrics into cherished décor and wearable art. Remember, stable hooping—especially with tools like MaggieFrame—makes all the difference for professional results. So experiment boldly, embrace new trends, and let your creativity flourish with every stitch. Happy embroidering!
9. FAQ on Free Flower Embroidery Patterns
9.1 Q: Where can I find large-format free embroidery patterns for embroidery machine?
A: Several reputable sites offer free large-format floral patterns. Platforms like DMC and Embroideres.com feature a variety of sizes, including larger motifs suitable for statement wall art or decorative cushions. Always check the file dimensions before downloading to ensure they fit your project. You can also find free embroidery patterns for embroidery machine at specialized suppliers.
9.2 Q: How do I avoid thread breaks in dense floral patterns?
A: Thread breaks often occur when stitch density is too high for your chosen fabric or thread type. To minimize breaks, select patterns with appropriate stitch counts for your fabric’s weight, use high-quality threads, and ensure your machine is properly maintained. Adding the correct stabilizer can also help distribute tension and reduce stress on the thread.
9.3 Q: What’s the best way to transfer intricate floral patterns onto dark fabric?
A: For dark textiles, the prick-and-pounce method works well: prick tiny holes along your pattern lines, dust chalk powder over the holes, and then trace the dotted outline with a water-soluble pen. This approach creates visible guidelines without damaging the fabric.
9.4 Q: Can I customize free floral patterns for different projects?
A: Absolutely! Many free patterns are available in multiple formats (PES, DST, JEF, etc.), making them easy to adapt for various machines and projects. Some platforms even offer AI-driven customization tools that adjust stitch density or size automatically. Just be sure to test your customized design on scrap fabric before stitching your final project.
9.5 Q: Are there beginner-friendly floral patterns available?
A: Yes! Many sites, such as Cutesy Crafts and Gathered.how, offer beginner-friendly floral designs with step-by-step tutorials. Look for patterns labeled as “easy” or “beginner,” and start with simple motifs before progressing to more complex projects.