1. Introduction to Puff Embroidery
3D puff embroidery has taken the fashion and branding world by storm, offering a bold, tactile twist on traditional embroidery. Unlike flat embroidery, puff embroidery uses a foam underlay to create designs that literally pop off the fabric—making logos, lettering, and graphics impossible to ignore. This technique is especially popular on hats, jackets, and sportswear, where brands crave that extra dimension and impact.
In this guide, you’ll discover how an embroidery machine with large hoop handles puff embroidery fundamentals, from how it works and what sets it apart, to the materials, machine requirements, and step-by-step methods for flawless results. We’ll also cover cost considerations, digitization tips, commercial applications, and troubleshooting solutions for common pitfalls. Whether you’re a seasoned pro or a creative newcomer, get ready to master the secrets of 3D puff embroidery and elevate your next project.
Table of Contents
- 1. Introduction to Puff Embroidery
- 2. Understanding 3D Puff Embroidery Fundamentals
- 3. Practical Execution: Step-by-Step Techniques
- 4. Materials and Design Specifications
- 5. Cost Analysis and Commercial Applications
- 6. Advanced Digitization Techniques
- 7. Troubleshooting and Innovations
- 8. Conclusion
- 9. FAQ
2. Understanding 3D Puff Embroidery Fundamentals
2.1 Core Concepts and Techniques
Let’s peel back the layers—literally—on what makes 3D puff embroidery so unique. At its heart, puff embroidery is all about creating a raised, three-dimensional effect by stitching over a foam underlay. Here’s how the magic happens:
- Foam Underlay Mechanics: A piece of foam, typically 0.2–0.5 inches thick, is cut to match the design’s outline and placed between the fabric and the embroidery thread. The embroidery machine then densely stitches over the foam, compressing it and causing the design to puff outward.
- Stitch Compression Principles: Satin or tatami stitches are used to tightly wrap the foam, ensuring it stays in place and delivers that signature “pop.” Thicker threads and denser stitching help compress the foam for a crisp, dimensional effect.
- Dimensional Effects: The result? Designs that stand tall—literally—above the fabric, adding texture and visual intrigue that flat embroidery simply can’t match.
How Does Puff Embroidery Compare to Flat Embroidery?
| Aspect | 3D Puff Embroidery | Standard (Flat) Embroidery |
|---|---|---|
| Texture | Raised, bumpy surface due to foam underlay | Smooth, flat finish |
| Appearance | Bold, dimensional effect for logos/graphics | Intricate details, seamless 2D look |
| Design Suitability | Best for simple, large designs (e.g., logos) | Ideal for complex, detailed artwork |
| Cost | Higher, due to materials and labor | Lower, with standard threads/fabrics |
| Time | Longer process due to foam and dense stitching | Faster, no extra layers required |
Key Techniques:
1. Foam Underlay: Cut to design shape, placed under fabric.
2. Stitch Types: Satin, tatami, or chenille stitches compress foam for the 3D effect.
3. Design Specs: Designs must be 0.2–0.5 inches thick, with at least 0.07-inch spacing between puffed areas.
Where Does Puff Embroidery Shine?
- Apparel: Especially hats, jackets, and sports merchandise.
- Patches: Pre-made 3D puff patches for easy application.
- Hybrid Designs: Combine flat and puff embroidery for layered textures.
Practical Considerations:
- Puff embroidery is roughly twice as expensive as flat embroidery due to specialized materials and extra labor.
- Not suitable for intricate or tiny designs—think bold, simple shapes for best results.
- Foam must be engineered to resist shrinkage or deformation over time.
2.2 Machine and Design Requirements
To pull off flawless puff embroidery, you’ll need the right tools and design strategy.
Machine Specifications:
- The best embroidery machines (industrial models) are preferred for their larger thread capacity and ability to handle dense stitching over foam.
- Thread and Needle: Thicker threads and needles (such as 75/11) are often used for better coverage and durability.
- Speed: Puff embroidery takes longer than flat embroidery due to the extra foam layer and dense stitching.
Design Constraints:
- Thickness: Elements should be 0.2–0.5 inches thick to accommodate foam.
- Spacing: Maintain at least 0.07-inch gaps between raised elements to prevent distortion.
- Satin Stitch Width: For puff, keep shapes between 0.2 and 0.5 inches wide; wider areas may require splitting into multiple sections.
- Simplicity is Key: Avoid small text, thin lines, or intricate details—these don’t translate well to puff embroidery.
Pro Tip: Always digitize designs specifically for puff embroidery. The file for flat embroidery won’t work, as the stitch types, densities, and underlay requirements are different.
3. Practical Execution: Step-by-Step Techniques
3.1 Preparation and Machine Configuration
Before you dive in, preparation is everything—think of it as setting the stage for a show-stopping performance.
Stabilizer Selection:
- Use a cutaway stabilizer for garments to prevent shifting and ensure crisp, distortion-free results. For hats, tear-away stabilizer may suffice.
Hooping Tension:
- Hoop the fabric tightly and evenly, aligning the design with the embroidery field. Proper hooping ensures the foam stays in place and the design remains sharp.
Machine Settings:
- Stitch Density: Increase by about 50% compared to standard embroidery to secure the foam without puckering.
- Pull Compensation: Adjust stitch lengths to counteract fabric tension, maintaining crisp lines.
- Underlay Stitches: Employ a light underlay to stabilize both fabric and foam before the main satin stitches.
Needle Selection:
- Sharp needles (e.g., 75/11 or titanium-coated) help cut through foam cleanly and reduce thread breaks.
Thread Tension:
- Loosen slightly to avoid crushing the foam and to allow the thread to sit nicely on top.
Digitizing Tip: Insert stop codes in your design file to pause the machine after outlining—this gives you time to place the foam.
3.2 Foam Application and Stitching Process
Now for the hands-on magic:
Foam Placement:
- After the machine stops at the designated "foam" color, center the foam under the design area.
- Secure with adhesive spray or tape to prevent shifting during stitching.
Thread and Foam Color Matching:
- Match the foam color to your thread to hide imperfections and ensure a seamless look.
Stitching Steps:
- Tack-Down Stitches: Start with short, dense stitches to anchor the foam.
- Satin Stitch Execution: Use increased density, overlapping edges to cover corners and prevent gaps.
- Stitch Direction: Keep it consistent to avoid distortion and ensure the design holds its shape.
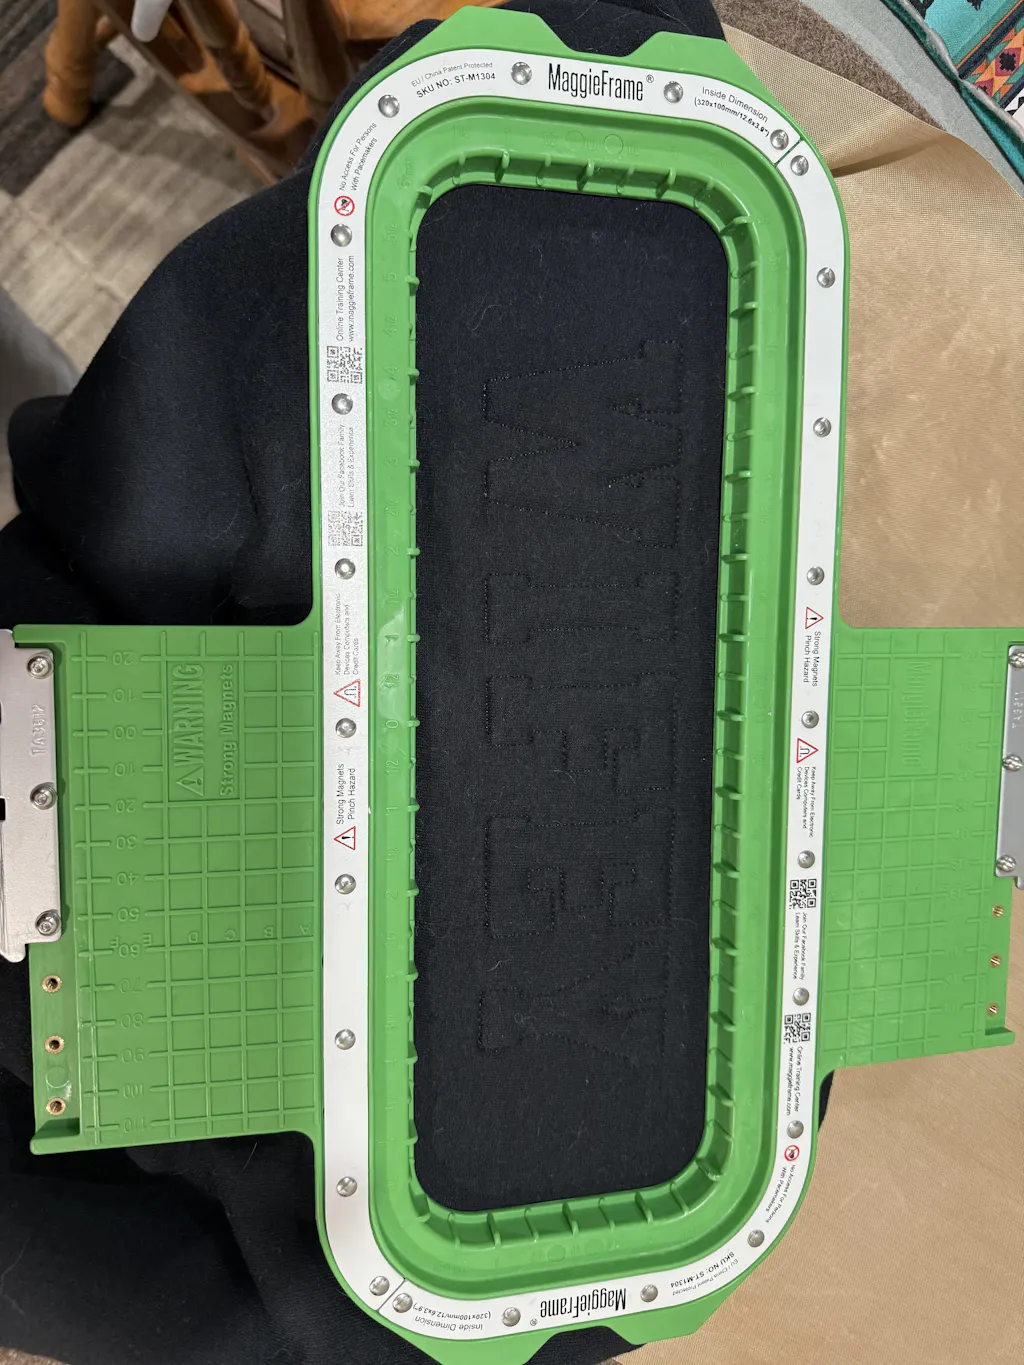
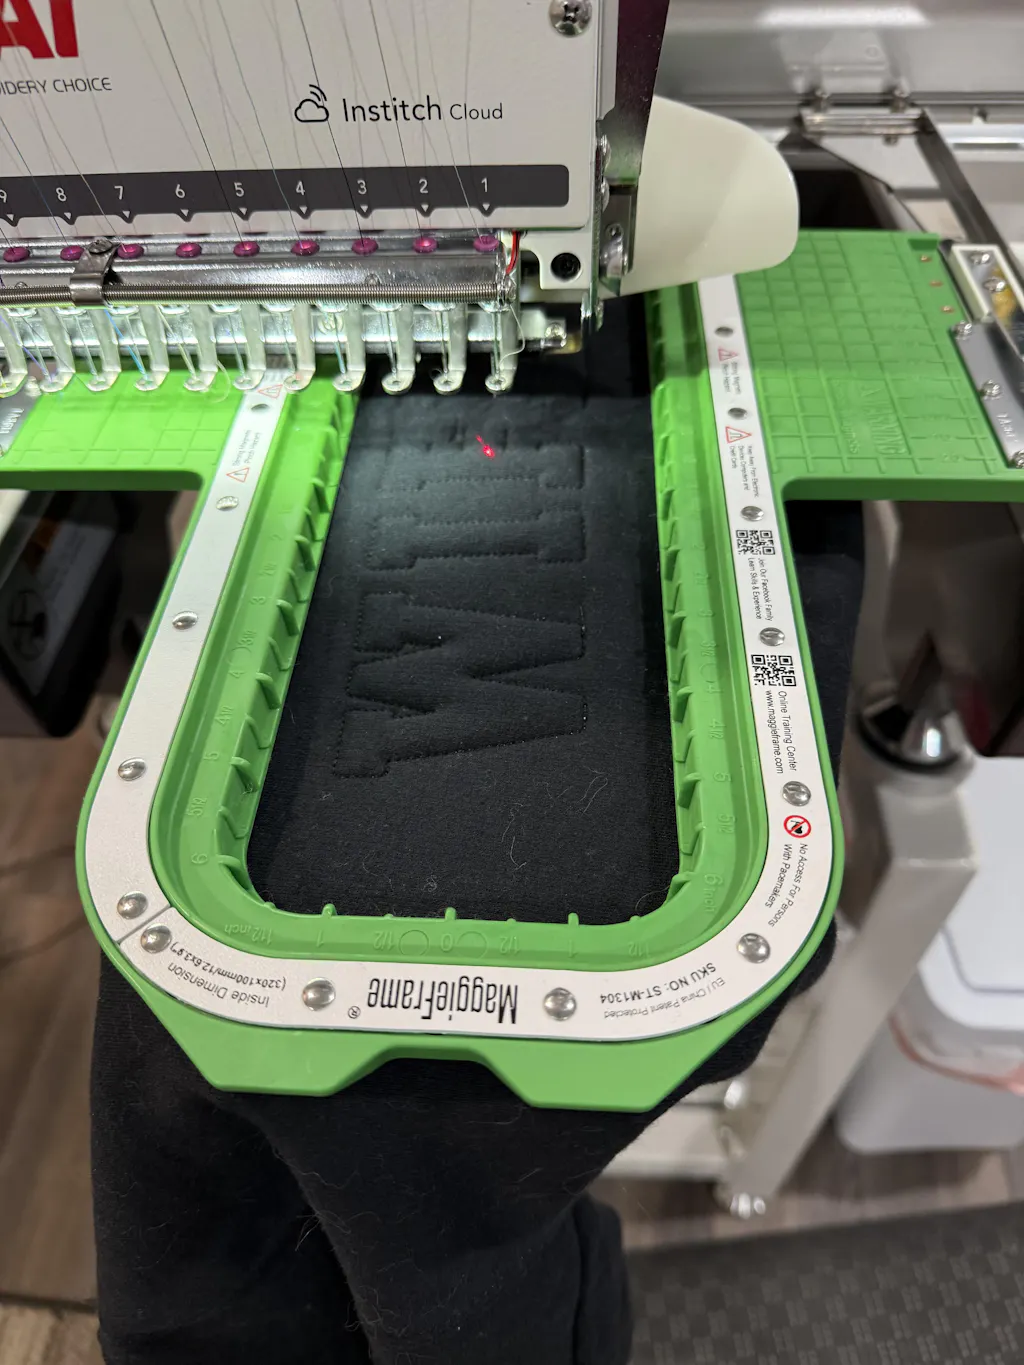
Why MaggieFrame Matters: During high-density stitching, garment stability is crucial. magnetic embroidery hoops like MaggieFrame provide even tension and a secure hold, minimizing distortion and slippage—especially valuable when working with thick foam and dense designs. MaggieFrame's powerful magnetic system makes hooping faster and more reliable, freeing you to focus on creativity rather than troubleshooting.
3.3 Finishing and Quality Control
The final act is all about polish and perfection:
Trimming Excess Foam:
- Carefully trim with scissors or use a heat gun on a low setting to melt away small foam remnants. Keep the heat gun moving to avoid damaging stitches.
Post-Stitch Cleanup:
- Use your fingernail or a blunt tool to press any leftover foam under the thread, ensuring a neat, professional finish.
Inspection and Reinforcement:
- Check for gaps or uneven coverage. If needed, reinforce with additional stitches.
- Inspect the design for any loose threads or foam peeking out.
Care Tips:
- Advise customers to turn garments inside out before washing and lay flat to dry. Avoid machine washing or dry cleaning to preserve the foam's structure.
By following these steps and optimizing your setup, you'll achieve professional-grade 3D puff embroidery with durability, dimension, and undeniable visual impact. Ready to make your designs stand out? Give puff embroidery a try—and let your creativity rise to new heights!
4. Materials and Design Specifications
4.1 Optimal Fabrics and Foam Types
If you want your puff embroidery to truly stand out—and last—you need to start with the right foundation. Not all fabrics and foams are created equal, and choosing the wrong combo can turn your bold 3D vision into a saggy, disappointing mess. So, what works best?
Compatible Fabrics: The Sturdy Crew
Puff embroidery thrives on stable, medium-to-heavyweight fabrics. Why? Because the foam and dense stitching need a solid base to hold their shape and resist distortion. Here’s how the top contenders stack up:
| Fabric Type | Characteristics | Best Uses |
|---|---|---|
| Cotton | Breathable, holds stitches well | Apparel, accessories, structured caps |
| Polyester | Durable, resists wrinkles | Sportswear, bags, crisp stitching |
| Denim/Canvas | Thick, rigid support | Jackets, hats, bold designs |
| Fleece | Soft, warm base | Winter wear, casual apparel |
Pro tip: Avoid thin or stretchy knits. They just can’t support the weight and tension of puff embroidery—think of trying to build a skyscraper on a trampoline. The result? Collapsed designs and wasted effort.
Foam Types and Specifications: The Backbone of the Puff
The foam you choose is the secret ingredient that gives your embroidery its signature pop. Here’s what you need to know:
| Foam Thickness | Use Case | Material Notes |
|---|---|---|
| 2–3 mm | Subtle depth | Ideal for small logos or delicate designs |
| 3–4 mm | Standard puff | Common for hats, jackets, moderate-sized designs |
| 5–6 mm | Bold elevation | For large, pronounced 3D effects on thick fabrics |
- Material: Polyurethane or HDPE foam is the gold standard—tough enough to withstand repeated needle punctures and dense stitching.
- Color Matching: Proper embroidery frames and hoops ensure foam alignment during stitching. For a seamless look, match your foam color to your thread. If you want to highlight the 3D effect, use a contrasting color for extra drama.
- Avoid Craft Foam: Steer clear of regular craft foam (EVA-based). It’s less durable and can leave residue or cause uneven stitching.
Quick Comparison: Puff vs. Flat Embroidery Materials
| Factor | Puff Embroidery | Flat Embroidery |
|---|---|---|
| Fabric Support | Requires sturdy bases | Works on most fabrics |
| Stitch Density | Higher, wider stitches | Lower density, finer details |
| Design Flexibility | Limited to bold shapes | Suitable for intricate patterns |
| Material Costs | Higher (specialized foam) | Lower (standard threads) |
Bottom line: For crisp, eye-catching puff embroidery, prioritize cotton, polyester, or denim paired with 3–4 mm foam. Keep your designs simple and high-contrast for maximum impact.
4.2 Design Limitations and Best Practices
Puff embroidery isn’t the place for tiny flourishes or rainbow gradients. Its magic lies in boldness and simplicity. Let’s break down the boundaries and best practices to ensure your designs pop—without falling flat.
Design Complexity: Less Is More
- Bold Outlines & Large Elements: Puff embroidery excels with big, well-defined shapes. Fine lines and small text tend to blur or disappear, so think varsity letters, block logos, or chunky graphics.
- Minimal Color Changes: Each color change complicates the process and increases the risk of misalignment. Stick to one or two colors for clean, professional results.
- Size Constraints: Too small, and the puff effect is lost; too large, and the foam may not hold up. Aim for a Goldilocks zone—just right for your chosen fabric and application.
Technical Specifications: Getting It Right
-
Thread & Needles:
- Use polyester thread for its heat resistance and durability—especially important when cleaning up foam edges with heat.
- Needle size 75/11 (sharp) is recommended for clean cuts through foam.
-
Digitizing Requirements:
- Opt for wider satin stitches and higher-density underlays to secure the foam.
- Always test your digitized design on a fabric swatch before full production to catch any surprises.
Distortion Prevention: MaggieFrame’s Edge
When working with dense, high-stitch-count designs, fabric distortion can be a real headache. This is where the right hoop makes all the difference. MaggieFrame’s magnetic embroidery hoops are crafted from high-grade engineering plastics—specifically, BASF Ultrason P3010 PPSU—which deliver exceptional strength and stability. Their powerful magnetic clamping system keeps your garment taut and evenly tensioned, preventing the warping and misalignment that can ruin a dense puff design. For anyone serious about quality and efficiency, MaggieFrame is a game-changer in garment embroidery hooping.
Best Practices Checklist
- Simplify: Use bold, uncomplicated shapes.
- Test: Always run a test stitch on scrap fabric.
- Stabilize: Use a hoop that maintains even tension—like MaggieFrame—for best results.
- Match Materials: Ensure your foam, thread, and fabric are compatible.
- Inspect: After stitching, check for gaps or foam peeking through; reinforce as needed.
Remember: With puff embroidery, less really is more. Embrace simplicity, and let your designs rise above the rest.
5. Cost Analysis and Commercial Applications
5.1 Pricing Structures and Value Assessment
Let’s talk numbers—because that bold, dimensional look comes with its own price tag. Puff embroidery typically costs $2–5 more per design than standard flat embroidery. Why? It’s all about the extras: specialized foam, tougher threads, more stabilizer, and a slower, more labor-intensive process.
Breaking Down the Costs
| Factor | Flat Embroidery | Puff Embroidery |
|---|---|---|
| Base Cost Range | $7–15 per shirt | $9–20 per shirt |
| Material Use | Standard threads/fabrics | Foam, specialized threads |
| Production Time | Faster | Slower (denser stitching, cleanup) |
| Design Complexity | Simple, text-based | Detailed, 3D-raised elements |
- Material Costs: Foam and special tools add $2–5 per unit.
- Labor Intensity: Machines run 25–40% slower to prevent thread breaks and keep the design crisp.
- Post-Production: Manual cleanup (heat guns, trimming) adds time and skill.
Bulk Order Discounts
Both flat and puff embroidery offer bulk pricing, but puff’s higher base cost makes those discounts even more valuable:
-
Flat Embroidery:
- Polo shirts: $10–15 (small orders) → $7–10 (bulk)
- Hats: $8–12 (small) → $5–8 (100+ units)
-
Puff Embroidery:
- Pricing is tied to stitch count and order quantity.
- Text-based designs (0–2,500 stitches) cost less; logos (2,500–5,000 stitches) are moderate; detailed artwork (5,000–7,500 stitches) tops the scale.
ROI: Is Puff Worth the Premium?
| Criteria | Flat Embroidery | Puff Embroidery |
|---|---|---|
| Best For | Sleek, versatile designs | Bold, tactile branding |
| Fabric Compatibility | Cotton, polyester, wool | Structured fabrics (jackets, workwear) |
| Durability | Moderate | High (resists shrinkage) |
| Visibility | Subtle | Industrial embroidery machine costs are higher due to specialized materials and labor |
- Flat embroidery is ideal for budget projects or detailed, intricate designs.
- Puff embroidery shines for premium branding—think corporate uniforms, specialty merchandise, or any project where standing out is the goal.
Key Data Points
- Puff embroidery uses twice as many stitches as flat for similar designs.
- Stitch counts over 10,000 (like full backgrounds) drive up costs.
- Bulk orders reduce per-unit prices, but puff’s premium persists due to its specialized nature.
Bottom line: Puff embroidery’s higher upfront costs are offset by its durability and visual impact—making it a smart investment for branding that demands attention.
5.2 Industry Use Cases and Market Trends
Puff embroidery isn’t just a passing fad—it’s a full-blown trend, making waves across industries from sports to luxury fashion.
Where Puff Embroidery Pops
-
Apparel:
- Jackets, hoodies, and especially hats (think Major League Baseball caps) love the bold, tactile look.
-
Sports Merchandise:
- Team logos and mascots leap off the fabric, making every cap or jersey a statement piece.
-
Luxury Fashion:
- Designer brands use puff embroidery for limited-edition drops, adding texture and exclusivity to their collections.
Market Growth & Hybrid Techniques
- The puff embroidery market is on the rise, with a 2.1% compound annual growth rate (CAGR) reflecting its growing popularity in both mass-market and boutique sectors.
-
Hybrid Designs:
- Many brands are blending puff with flat embroidery for layered, multi-textured effects—think a flat logo outline with a puffed monogram in the center.
Why Businesses Love Puff Embroidery
- Brand Differentiation: The 3D effect makes logos and graphics impossible to ignore.
- Durability: Puff embroidery resists shrinkage and wear, ideal for workwear and uniforms.
- Customization: Short runs and one-off designs are feasible, letting brands experiment with new looks.
Curious about how puff embroidery could elevate your merchandise? Whether you’re outfitting a sports team, launching a fashion line, or just want your brand to stand out, puff embroidery offers a tactile, memorable edge.
6. Advanced Digitization Techniques
6.1 Stitch Density and Pattern Optimization
Digitizing for puff embroidery isn’t just a technical step—it’s the secret sauce that transforms a flat design into a show-stopping 3D masterpiece. Here’s how to get it right:
Underlay Stitching
- Start with a dense satin stitch foundation (0.4–0.6 mm density) to stabilize the foam and prevent the fabric from sinking.
- This underlay acts as the bedrock for your design, ensuring even coverage and a crisp, raised finish.
Tatami Zigzags and Columnar Reinforcement
- Use zigzag tatami stitches with high stitch counts to compress the foam and build up the 3D effect.
- Tie-down stitches (straight satin around the design perimeter) secure the foam in place.
- Columnar stitches (vertical satin) reinforce the structure and enhance dimensionality.
Stitch Density Optimization Table
| Factor | Recommendation |
|---|---|
| Base Density | 0.4–0.6 mm for broadcloth fills; 3.8 for general fills |
| Top Layer Density | Double base density (0.8–1.2 mm) for full foam coverage |
| Stitch Length | 4 mm for single-run stitches |
| Fabric Adjustment | Lower density for thick fabrics; higher for thin materials |
- Increased Density: Essential for compressing foam and avoiding thread gaps.
- Unit Variance: Adjust densities as needed for different fabrics and design elements.
Pattern Optimization Strategies
-
Simplify Designs:
- Avoid intricate details; bold shapes and minimal color changes work best.
- Use vector-to-stitch conversion tools in digitizing software (e.g., Wilcom, Hatch) for clean, scalable outlines.
-
Material Compatibility:
- Stick to 3–4 mm foam for optimal puff; avoid going above 4 mm to prevent machine strain.
- Polyester thread is your friend—rayon just can’t handle the stress.
- Stable fabrics (canvas, denim) outperform slippery options like silk.
-
Testing Protocols:
- Always stitch test runs on scrap fabric to spot thread buildup or distortion early.
- Adjust push compensation settings to counteract foam-induced stitch displacement.
Software Recommendations
- Machine embroidery digitizing software like Wilcom and Hatch are top picks for vector-to-stitch conversion and advanced pattern editing, making the digitizing process smoother and more precise.
Pro tip: Test designs incrementally, tweaking density and stitch length before committing to a full production run.
6.2 Testing and Material Compatibility
Before you go all-in on a production run, it pays to test, tweak, and test again. Here’s how to make sure your digitized designs and materials play nicely together:
Testing Protocols
- Scrap-Fabric Tests: Always run your design on a fabric swatch first. This helps catch issues like thread buildup, foam shifting, or distortion before they ruin a full batch.
- Push-Compensation Adjustments: Foam can cause stitches to shift or stretch. Adjust your digitizing software’s push compensation settings to maintain crisp, accurate outlines.
Thread and Needle Selection
- Needles: Use sharp 75/11 needles for clean foam perforation. For especially dense stitching, ballpoint needles can help prevent skipped stitches.
- Thread: Polyester thread is the gold standard—tough, heat-resistant, and built for the demands of puff embroidery. Avoid rayon for high-stress designs.
Advanced Material Selection Table
| Component | Recommendation |
|---|---|
| Foam | Match foam color to thread; use adhesive spray for stability |
| Needles | 75/11 sharp for foam; ballpoint for dense stitching |
| Threads | Polyester for durability; avoid rayon for stress |
Troubleshooting Common Issues
| Issue | Solution |
|---|---|
| Thread Buildup | Reduce density to 0.4–0.6 mm; use underlay stitches |
| Distortion | Increase density for thin fabrics; lower for stretch |
| Foam Shifting | Apply adhesive spray; reinforce with columnar stitches |
Final word: Meticulous testing and the right material choices are the difference between a mediocre puff design and a professional-grade, eye-catching result. Take the time to get it right—your embroidery (and your clients) will thank you.
Ready to bring your puff embroidery designs to life? With the right materials, smart digitization, and a few pro tricks, you’ll be creating bold, dimensional masterpieces that turn heads and build brands.
7. Troubleshooting and Innovations
Puff embroidery, for all its visual impact, can be a technical minefield—one stray thread or a poorly chosen foam, and your 3D masterpiece can quickly turn into a flattened flop. Let’s roll up our sleeves and tackle the most common failures, explore how home embroiderers can adapt pro techniques, and peek into the future with eco-friendly material alternatives.
7.1 Solving Common Failures
Even the most seasoned embroiderers occasionally battle foam tears, thread breakage, or designs that lose their puff. The good news? Most issues have clear, actionable solutions.
Foam Tearing and Visibility
- Causes:
- Narrow design columns may not fully cover the foam, leaving edges exposed and prone to fraying.
- Poor foam alignment during hooping can cause shifting, resulting in uneven coverage.
- Using foam thicker than 3mm can strain stitches, leading to tears.
| Problem | Solution |
|---|---|
| Foam fraying | Use a heat gun to shrink exposed foam hairs back into the stitches. |
| Visible foam edges | Stick to consistent foam thickness (2–3mm) and match foam color to thread. |
| Inadequate coverage | Increase stitch density (0.16–0.22mm) for secure foam compression. |
Thread Breakage
- Causes:
- Low-quality threads (like cotton) snap under tension.
- Incorrect tension settings—too tight on top or too loose in the bobbin.
- Narrow columns increase thread tension, causing frequent breaks.
| Problem | Solution |
|---|---|
| Frequent breaks | Use high-quality polyester or rayon threads; adjust tension to mid-range. |
| Tension imbalance | Re-thread the machine and test tension on scrap fabric before production. |
| Design strain | Widen stitch columns to reduce tension and accommodate foam. |
Dimensional Collapse
- Causes:
- Inconsistent hooping lets fabric and foam shift, flattening the design.
- Low stitch density fails to compress foam, resulting in loss of height.
- Using dull or oversized needles (>80/12) creates uneven compression.
| Problem | Solution |
|---|---|
| Uneven puff height | Ensure taut hooping; align foam precisely under the fabric. |
| Flat stitching | Increase stitch density to 0.16–0.22mm for optimal compression. |
| Needle damage | Use sharp 75/11 or 80/12 needles for clean foam penetration. |
Key Preventive Measures
- Material Compatibility: Use 2–3mm foam designed for 3D embroidery and match foam color to thread for a seamless look.
- Machine Maintenance: For complex issues, seek embroidery machine repairs near me professionals. Replace worn components to ensure consistent stitching.
- Design Optimization: Digitize with balanced stitch density and adequate column width. Always test on scrap fabric before full runs.
By dialing in these technical parameters, you’ll sidestep most pitfalls and consistently deliver professional-grade puff embroidery.
7.2 Home Machine Adaptations
Think puff embroidery is just for industrial giants? Think again! With a few tweaks, home embroiderers can achieve impressive 3D effects—even on consumer-grade machines.
Optimizing for Home Machines
- Stitch Density: Lower your stitch density to 0.4–0.6mm. Home machines often can’t handle the ultra-dense settings used in commercial setups.
- Manual Foam Placement: Place foam by hand when prompted by your design’s stop code. Use a dab of adhesive spray or tape to keep it from shifting.
- Simplified Designs: Stick to bold, uncomplicated shapes. Intricate details or tiny text are more likely to cause thread breaks or foam exposure.
- Embroidery Area Limitations: Be mindful of your machine’s maximum hoop size—most home machines have a smaller embroidery field than industrial models.
Pro Tips from the Field
- Always run a test stitch on scrap fabric to fine-tune tension and density.
- Use sharp needles (75/11 or 80/12) for clean foam cuts.
- Loosen thread tension slightly to avoid crushing the foam.
With a little patience and experimentation, your home machine can produce puff embroidery that rivals commercial results—just remember to keep designs simple and settings dialed in.
7.3 Eco-Friendly Material Alternatives
Sustainability is more than a buzzword—it’s a movement reshaping every creative industry, embroidery included. If you’re ready to go green with your puff embroidery, here’s what’s on the horizon.
Biodegradable and Recycled Foams
- Plant-Based Foams: Options like Enviro-Fiber® are made from renewable plant materials, offering a biodegradable alternative to traditional polyurethane.
- Recycled PET Fibers: Some foams incorporate fibers from recycled plastic bottles, reducing environmental impact without sacrificing performance.
Durability vs. Sustainability
- Traditional Polyurethane: Known for its durability and high melting point, it stands up well to repeated needle punctures and dense stitching.
- Eco-Friendly Alternatives: While plant-based and recycled foams are gentler on the planet, they may have lower melting points and slightly less resilience under heavy stitching. Always test new materials on scrap fabric to ensure they meet your quality standards.
Making the Switch
- Start with small projects to evaluate how eco-foams behave in your workflow.
- Match foam color to thread, just as you would with conventional materials.
- Monitor for any changes in stitch quality or dimensional stability.
The future of puff embroidery is bright—and green. By experimenting with sustainable materials, you’re not only innovating your craft but also contributing to a healthier planet.
8. Conclusion
Mastering puff embroidery means balancing simplicity in design, careful material selection, and a willingness to troubleshoot and experiment. Whether you’re running high-volume commercial jobs or crafting at home, success comes from understanding your materials, optimizing your setup, and embracing new innovations. Remember: quality control is your best friend, and every challenge is a chance to level up your skills. So go ahead—let your creativity rise, and watch your designs pop off the fabric!
9. FAQ
9.1 Q: Can puff embroidery be washed?
A: Yes, puff embroidery can be washed. For best results, turn garments inside out before washing and lay flat to dry. Avoid machine washing or dry cleaning to preserve the foam’s structure and dimensional effect.
9.2 Q: What is the minimum design size for puff embroidery?
A: Puff embroidery works best with bold, simple shapes. Designs should have a minimum width of about 0.2 inches (5mm) to accommodate the foam and ensure proper coverage. Intricate details or thin lines may not produce the desired 3D effect.
9.3 Q: Is puff embroidery suitable for stretch fabrics?
A: Puff embroidery is not recommended for thin or stretchy knits, as these fabrics may not support the weight and tension of the foam and dense stitching. For best results, use stable, medium-to-heavyweight fabrics like cotton, polyester, or denim.