1. Introduction to Hand Sewing Essentials
Hand sewing is more than just a practical skill—it’s a gateway to creativity, repair, and self-sufficiency. Whether you’re a beginner eager to mend a favorite shirt or an experienced sewist looking to refine your technique, mastering the basics of sewing with needle and thread unlocks endless possibilities. This guide will walk you through the core essentials: selecting tools, threading needles, tying secure knots, and executing foundational stitches. Along the way, we’ll share troubleshooting tips and ergonomic advice to make your sewing journey both enjoyable and effective. Ready to stitch your way to confidence? Let’s get started!
Table of Contents
2. Essential Tools and Materials for Beginners
A well-equipped sewing kit is your passport to smooth, frustration-free stitching. Let’s break down the must-have tools, fabric prep strategies, and time-saving innovations that set you up for success.
2.1 Core Sewing Kit Components
Every beginner’s sewing kit should include a thoughtful selection of tools designed for versatility and ease of use:
- Needles:
- Sharps: Medium-length, sharp-tipped needles with round eyes—ideal for general sewing and dressmaking. Sizes 7–8 are great for beginners.
- Betweens: Shorter, sharp needles, perfect for quilting and fine seams.
- Beading and Glover Needles: For specialized tasks like embellishing with beads or working with leather.
- Thread:
- Cotton thread is your go-to for natural fabrics and general projects.
- Polyester thread offers extra durability for heavy-duty items like bags or upholstery.
- Specialty threads, such as Gutermann Sew-All or Extra Upholstery, cater to unique needs.
- Cutting Tools:
- Fabric scissors—reserve these exclusively for fabric to maintain sharpness.
- Rotary cutter and blades for precise, straight cuts.
- Embroidery scissors for snipping threads with finesse.
- Fasteners and Accessories:
- Straight pins and Wonder Clips keep layers aligned.
- Seam ripper for those inevitable "oops" moments.
- Thimble to protect your fingers during hand sewing.
- Needle threader for easy threading, especially with fine needles.
- Measuring and Marking:
- Measuring tape and removable fabric markers or chalk for accurate lines and patterns.
Hand vs. Machine Needles: Hand-sewing needles (Sharps, Betweens) are designed for manual control and work well with a range of fabrics. Machine needles (Universal, Jeans, Leather) are tailored for automated stitching and specific material compatibility. For most beginners, Sharps (size 7–8) and Universal machine needles (size 80–90) cover a wide range of projects.
| Aspect | Hand-Sewing | Machine Sewing |
|---|---|---|
| Needle Choice | Sharps, Betweens, Beading | Universal, Jeans, Leather |
| Thread | Cotton, silk | Polyester, Gutermann |
| Speed | Slower, precise control | Faster, bulk production |
Pro tip: Always match your thread type and needle size to your fabric for the best results.
2.2 Fabric Preparation and Selection
Before you take your first stitch, proper fabric prep lays the foundation for success:
- Pre-wash Fabrics: Washing fabric before sewing helps prevent unwanted shrinkage or color bleeding later. Simply follow the care instructions on your fabric’s label.
- Marking Techniques: Use removable markers or chalk to draw seam lines, darts, or pattern outlines. These guidelines help keep your stitches straight and your project on track.
- Cutting and Pressing:
- Use rotary cutters and self-healing mats for accurate, clean cuts.
- Reserve fabric scissors for fabric only—dull blades can fray edges.
- Press seams as you sew with an iron or pressing bar for crisp, professional results.
- Choosing Beginner-Friendly Materials: Cotton, linen, and flannel are ideal for newcomers. They’re easy to handle, forgiving, and simple to pierce with a needle. If you’re working with stretch fabrics, stabilize them with a lightweight interfacing or use a zig-zag stitch to maintain flexibility.
Quick tip: Ironing your fabric before cutting or sewing smooths out wrinkles and makes handling much easier.
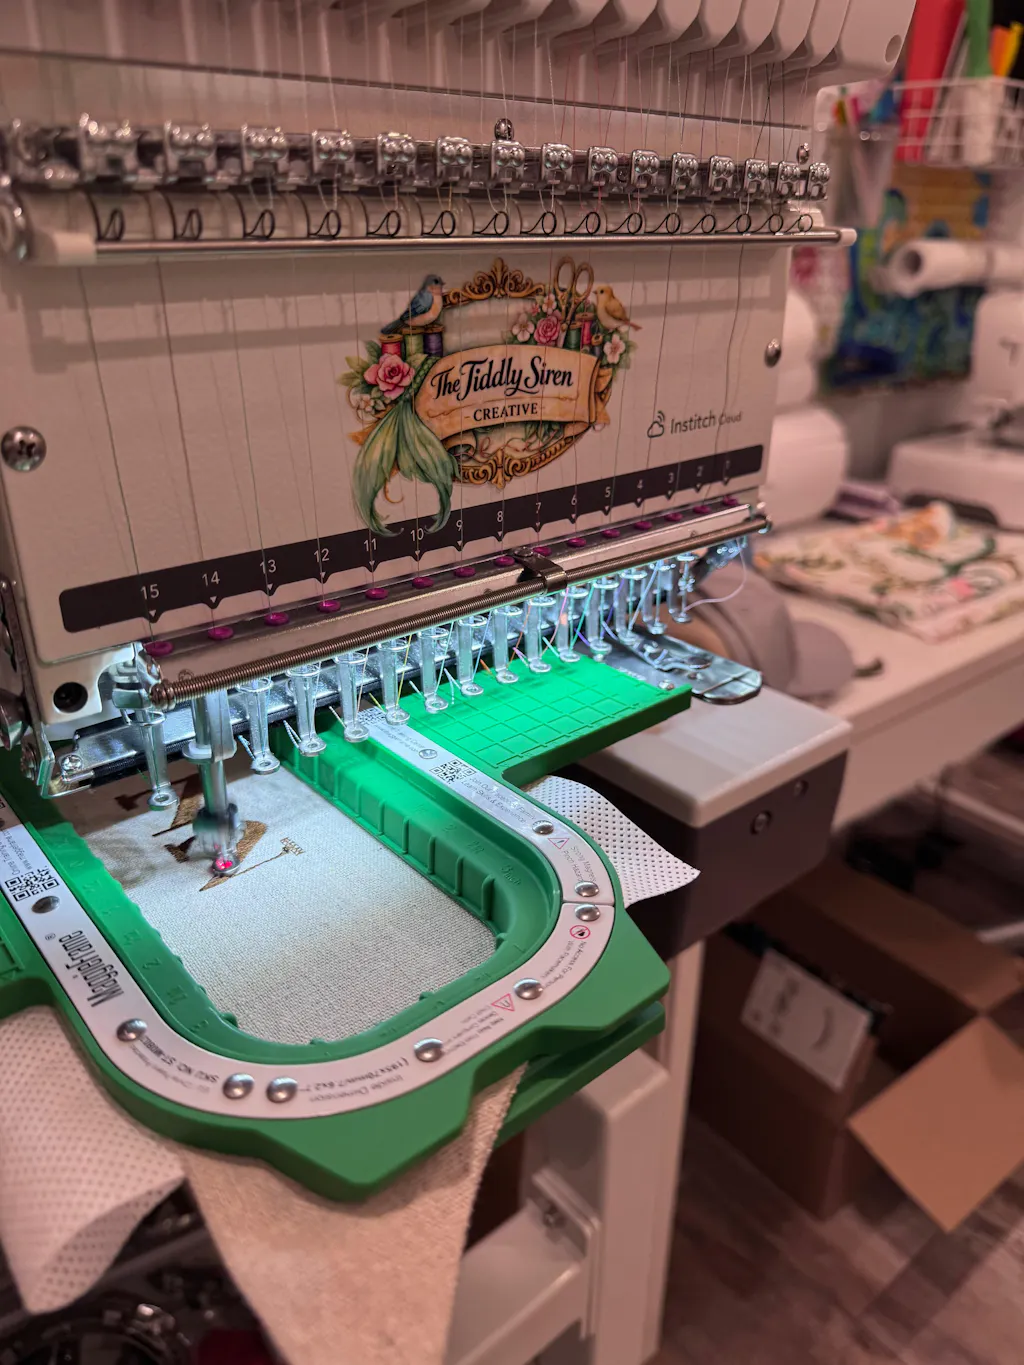
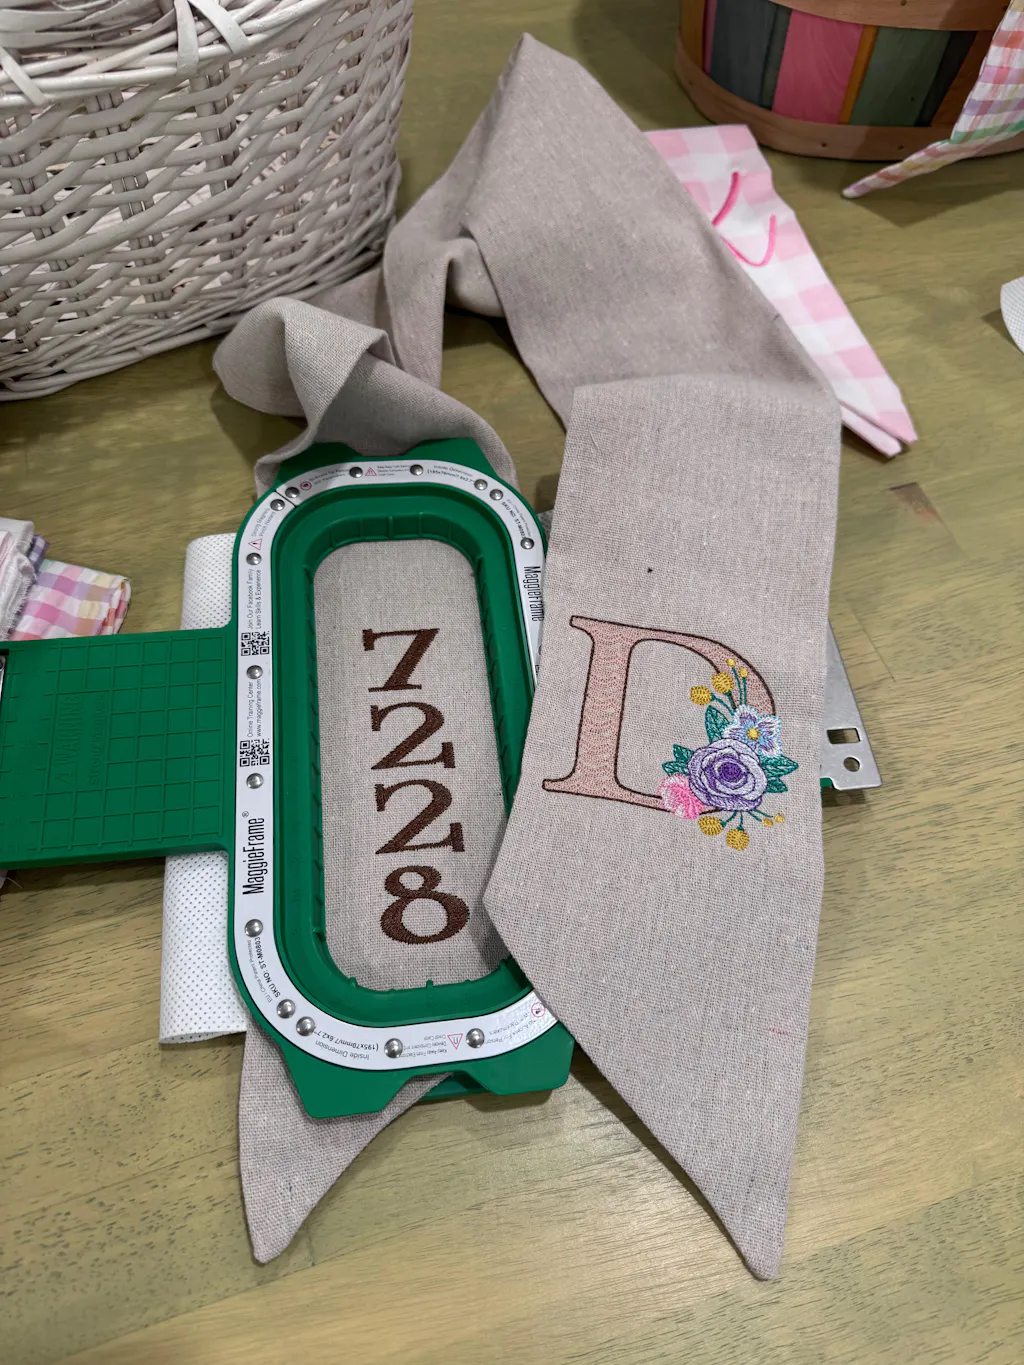
2.3 Enhancing Efficiency with Specialized Tools
For those venturing into machine embroidery, specialized tools like magnetic hoops embroidery can transform your workflow. MaggieFrame magnetic embroidery hoops, for example, are designed specifically for garment embroidery and offer several advantages:
- Time-Saving: The powerful magnetic clamping system allows for quick, effortless hooping—no more fiddling with screws or adjusting tension for different fabric thicknesses. This can reduce hooping time from several minutes to just seconds per garment.
- Consistent Tension: Even pressure across the entire hoop surface ensures your fabric stays flat, minimizing puckering and distortion—crucial for high-quality embroidery results.
- Ergonomic Benefits: The easy operation reduces repetitive strain, making large projects or batch production far more comfortable.
- Compatibility: MaggieFrame hoops come in over 17 sizes, fitting a wide range of industrial and commercial embroidery machines. Their design accommodates everything from delicate silks to heavy denim, adapting automatically to fabric thickness.
- Durability: Constructed from high-grade PPSU engineering plastic and equipped with robust N50 magnets, MaggieFrame hoops are built to withstand intensive use—lasting significantly longer than standard plastic hoops.
If you’re looking to streamline your embroidery process, minimize fabric waste, and boost productivity, investing in a quality magnetic hoop like MaggieFrame can be a game-changer. Just remember: MaggieFrame hoops are designed for garment embroidery, not for caps or hats.
3. Mastering Fundamental Stitches
With your tools ready and fabric prepped, it’s time to dive into the heart of hand sewing: the stitches themselves. Let’s explore the foundational techniques every sewist should master.
3.1 Running Stitch and Basting Techniques
The running stitch is the backbone of hand sewing—simple, versatile, and perfect for both temporary and permanent seams.
Step-by-Step Instructions:
1. Thread and Knot: Cut a length of thread (about 12–18 inches), thread your needle, and tie a secure knot at the end.
2. Start Stitching: Bring your needle up from the wrong side of the fabric, letting the knot catch underneath.
3. Create Stitches: Insert the needle about 1/4–1/2 inch ahead, push it through both layers, and pull the thread through. Repeat, keeping your stitches evenly spaced for a neat appearance.
4. Maintain Tension: Pull the thread snug, but not so tight that the fabric puckers. Consistent tension keeps your seam flat and strong.
5. Finishing: When you reach the end, tie off with a knot by looping the thread under the last stitch and pulling the needle through the loop. Repeat for extra security.
Tips for Consistency:
- Mark your stitch line with chalk or a fabric marker.
- Practice keeping stitch lengths uniform for durability and aesthetics.
Basting Stitch: Use longer running stitches for basting—these are temporary seams to hold layers together before final sewing. Basting is easy to remove and ideal for fitting or aligning pieces.
| Stitch Type | Purpose | Stitch Length | Removability |
|---|---|---|---|
| Running Stitch | Permanent seams, light fabrics | 1/4–1/2 inch | Permanent |
| Basting Stitch | Temporary holding, fitting | Longer (1/2 inch+) | Easy to remove |
3.2 Backstitch for Durable Seams
When strength matters—think seams that take stress, like denim or button areas—the backstitch is your go-to.
How to Backstitch:
1. Start as with a running stitch: Bring your needle up through the fabric, knot secured underneath.
2. First Stitch: Move forward about 1/4 inch, insert the needle, and pull through.
3. Backtrack: Bring the needle up again the same distance ahead, then insert it back into the end of the previous stitch. This overlapping creates a continuous, sturdy seam.
4. Repeat: Continue this pattern, always bringing the needle up ahead and inserting it back into the end of the last stitch.
Why Use Backstitch?
- Mimics the strength and appearance of machine stitching.
- Ideal for seams that will endure wear and tear—like repairing jeans or attaching buttons.
Error Prevention:
- Keep stitches close and evenly spaced for maximum durability.
- Don’t pull too tight; let the fabric lie flat.
Pro tip from YouTube tutorials: Backstitching takes a bit more time than running stitch, but the result is a seam that’s built to last—perfect for those “fix it once, fix it right” moments.
3.3 Slip Stitch and Decorative Finishes
For invisible closures and elegant edges, the slip stitch is a must-have in your sewing repertoire.
Slip Stitch (a.k.a. Ladder Stitch):
- Use Case: Closing openings in hems, pockets, or stuffed items where you want the seam to disappear.
- How-To: 1. Hide the knot inside the folded edge. 2. Insert the needle into the fold, travel about 1/4 inch, and exit. 3. Cross to the opposite fold and repeat, keeping stitches hidden within the fabric.
- Tip: Use thread that matches your fabric for a truly invisible finish.
Expanding Your Decorative Arsenal:
- Whip Stitch: Great for binding edges or joining two fabric pieces. Bring the needle up through the fabric edge, then over and through again in a spiral motion. This creates a visible, angled stitch—ideal for decorative edges or securing hems.
- Blanket Stitch: Used for edging blankets or decorative borders. Insert the needle through the fabric edge, loop the thread under the needle, and pull through to form a perpendicular line along the edge. Repeat for a tidy, ornamental finish.
| Stitch | Appearance | Best For |
|---|---|---|
| Slip Stitch | Nearly invisible | Hems, closing openings |
| Whip Stitch | Angled, visible on edge | Decorative edges, joining layers |
| Blanket Stitch | Perpendicular edge detailing | Blankets, felt projects, napkins |
Instructables and YouTube tutorials highlight the importance of matching thread color and practicing each stitch for best results. With these techniques, your hand-sewn projects will look polished and professional—no sewing machine required.
Ready to put needle to fabric? With these essentials, you’re well on your way to mastering the art—and joy—of hand sewing.
4. Needle Threading Solutions Simplified
Threading a needle—sounds simple, right? Yet, for many sewists, it’s the tiny hurdle that can slow down even the most inspired project. If you’ve ever squinted, licked, or muttered at a stubborn thread, you’re not alone. Let’s break down the best methods—manual and tool-assisted—for getting that thread through the eye, so you can spend less time fiddling and more time stitching.
4.1 Manual Threading Techniques
Let’s start with the classics. Manual threading is the old-school way—no gadgets, just you, your thread, and the needle. But even here, a few pro tips can make all the difference.
1. Trim and Prepare Your Thread
Always begin by cutting your thread with sharp scissors. A clean, angled cut helps prevent fraying and gives you a firm tip to work with. If your thread is misbehaving, try moistening the end—just a dab of water or a quick lick. This stiffens the fibers, making them less likely to split as you guide them through the needle’s eye. (Yes, your grandma did this too.)
2. The Classic Pinch and Push
Hold the needle between your thumb and forefinger, eye facing up. With your other hand, pinch the end of the thread tightly between your own thumb and forefinger, leaving just a tiny bit exposed. Bring the thread and needle together, pushing the thread straight through the eye. Sometimes, it’s easier to bring the needle down onto the thread rather than the other way around—experiment to see what works for you.
3. The Fold-and-Pinch Method
Here’s a little magic: Fold the thread over the needle to create a small loop. Pinch the loop tightly between your fingers, then slide the needle out, leaving the loop pinched. Position the eye of the needle directly above the loop and push it down onto the loop. With a bit of luck (and practice), the loop pops right through the eye. Grab it and pull the thread through—voilà!
4. Wetting and Stiffening
Wetting the thread isn’t just folklore—it genuinely helps. If you’re working with multi-strand embroidery floss or a thread that keeps splitting, flatten the end between your thumb and forefinger after moistening. This brings the plies together, making threading smoother.
5. Light and Contrast
Good lighting is your friend. Place a piece of white paper or fabric behind the needle to make the eye stand out, especially if you’re working with dark thread or at night.
6. Needle and Thread Pairing
Choose a needle with an eye that matches your thread’s thickness. If you’re struggling, try a needle with a larger eye, but remember: larger eyes make bigger holes in delicate fabrics.
Troubleshooting Manual Threading:
- If the thread keeps slipping out, leave a longer tail (at least 2 inches) after threading.
- For extra security, especially with slippery threads, try double-threading or tying a tiny knot near the needle’s eye (if your project allows).
When Manual Isn’t Enough—Enter the Tools
If your eyesight or dexterity isn’t what it used to be, or you’re working with especially fine needles, don’t hesitate to reach for a needle threader. There’s no shame in using a little help—many experienced sewists swear by them.
Needle Threaders: A Quick Overview
- Wire Loop Threaders: Budget-friendly and widely available, but can bend or break with thick threads or small eyes.
- Flat Hook Threaders: More robust, ideal for embroidery floss or yarn, and less likely to break.
- Automatic Threaders (like the Clover Desk Needle Threader): The gold standard for reliability and ease—no squinting, no poking, just a push of a lever and you’re threaded, even with tiny-eyed needles.
User Tips from the Pros:
- Always cut your thread fresh before threading—frayed ends are the enemy.
- Practice makes perfect! The more you thread needles, the easier it becomes.
- If you’re still struggling, try waxing your thread with beeswax for added stiffness.
Whether you’re a “lick and stick” traditionalist or a gadget-loving modernist, mastering needle threading opens the door to smooth, frustration-free sewing. So next time you face that tiny eye, remember: with the right technique, you’re just a moment away from your next masterpiece.
Ready to stitch? Your perfectly threaded needle awaits.