1. Introduction to the Brother PR670E Embroidery Machine
The Brother PR670E embroidery machine stands as a bridge between home embroidery enthusiasts and small business professionals, redefining what’s possible in semi-professional embroidery. As a 6-needle powerhouse, it merges the user-friendly features found in Brother’s home lineup with the speed, precision, and scalability expected from commercial-grade machines. Whether you’re eager to personalize gifts, expand your creative studio, or launch a home-based embroidery business, the PR670E offers a compelling blend of technical sophistication and intuitive design. In this guide, we’ll explore its core specifications, operational workflows, business potential, accessory options, and real-world user insights—equipping you to unlock the full potential of this versatile embroidery solution.
Table of Contents
- 1. Introduction to the Brother PR670E Embroidery Machine
- 2. Technical Specifications and Core Features
- 3. Operation, Maintenance, and Troubleshooting
- 4. Business Applications and Profitability
- 5. Comparative Analysis with Alternatives
- 6. Real-World User Tips and Workflow Optimizations
- 7. Accessory Utilization and Upgrades
- 8. Conclusion: Unlocking PR670E’s Full Potential
- 9. Frequently Asked Questions (FAQ)
2. Technical Specifications and Core Features
The Brother PR670E is engineered for creators who demand speed, flexibility, and professional results without the complexity of industrial machines. Let’s dive into the features that set it apart.
2.1 6-Needle System and High-Speed Performance
At the heart of the PR670E is its 6-needle embroidery system—a game-changer for anyone tackling multi-color designs. Each needle can be threaded with a different color, and the machine’s automatic color change function seamlessly switches threads as your design progresses. This dramatically reduces downtime, especially when working on intricate, multi-hued projects.
With a maximum speed of 1,000 stitches per minute (spm) and variable speed control (400–1,000 spm), the PR670E delivers industrial-level acceleration. Imagine completing projects up to seven times faster than traditional single-needle machines—turning what used to be an afternoon’s work into a task you can finish before your next coffee break. Customizable needle settings allow you to fine-tune thread tension and stitch quality for a variety of fabrics, ensuring both speed and precision.
2.2 Precision Tools: LED Pointer and Automatic Threading
Precision is paramount in embroidery, and the PR670E delivers with its suite of accuracy-enhancing tools. The LED positioning pointer (Droplight™) projects a pinpoint guide onto your fabric, making it effortless to align designs—even on challenging surfaces like sleeves or trouser legs. This feature, highlighted in YouTube demonstrations, takes the guesswork out of placement, letting you confidently tackle complex shapes and continuous border patterns.
Threading multiple needles might seem daunting, but Brother’s exclusive automatic threading system simplifies setup. With a press of a button, the mechanism guides thread through the needle’s eye, minimizing manual effort and reducing the risk of errors. The cylinder arm design further expands your creative possibilities, enabling embroidery on hard-to-reach areas—think caps, cuffs, and tubular garments.
2.3 Design Capabilities and Built-in Resources
Creativity flourishes with the PR670E’s 10.1-inch HD LCD touchscreen, offering intuitive navigation and access to 16 built-in video tutorials. The interface supports on-screen editing, including:
- Color Grouping: Edit multiple regions of a design simultaneously.
- Color Sort: Minimize thread changes by optimizing color sequence.
- Smart Stitch Management: Monitor progress with a visual bar and jump to specific stitches as needed.
With 37 built-in lettering fonts, 12 monogramming styles, and 25 embroidery fonts, you can personalize projects without external software. The machine also includes over 60 embroidery designs and supports a maximum embroidery area of 8" x 12" (300 x 200 mm)—ideal for everything from jackets to tote bags. Four included frames (ranging from 60 x 40 mm up to 300 x 200 mm) and our Brother embroidery machine comparison chart provide versatility for projects large and small, while optional accessories like cap frames and wide tables expand your creative toolkit.
Engineered for both speed and silence, the PR670E features noise reduction technology, making it suitable for home environments. Enhanced LED lighting ensures every detail is visible, reducing eye strain during long sessions. For those seeking to scale up, the machine supports multi-machine integration—link up to four PR670E units with PE-Design® Next software for synchronized mass production.
In summary, the PR670E’s technical prowess—spanning speed, precision, and design flexibility—makes it a robust choice for semi-professional users looking to elevate their embroidery game.
3. Operation, Maintenance, and Troubleshooting
Mastering the PR670E means more than just understanding its features—it’s about developing a smooth workflow, maintaining peak performance, and quickly resolving any hiccups along the way. Here’s how to get the most from your machine.
3.1 Step-by-Step Setup and Threading Guide
Hooping Fabric: Begin by securing your fabric in one of the included embroidery frames. Ensure the fabric is taut and evenly aligned with the frame’s edges. Attach the Brother hoops frame to the machine by aligning its hooks with the frame holder and locking it in place—a process made easier with the PR670E’s ergonomic design.
Pattern Selection and Embroidery Area Check: Navigate to the embroidery settings screen to select a built-in design or import your own. Use the preview function to confirm the design fits within the 8" x 12" embroidery area.
Threading Multiple Needles:
-
Automatic Threading:
- Position the desired needle using the on-screen controls.
- Press the needle threader button to lower the mechanism.
- Guide the thread through the appropriate path, using the built-in guides and notches, and trim excess thread with the integrated cutter.
-
Manual Threading Tips:
- Wrap the thread around the tension disks once, then route through the guides to the take-up lever and needle.
- For color changes, cut the current thread, tie a knot, and pull the new color through the tension system.
Calibration and Alignment: After hooping, use the machine’s built-in guides to ensure the frame is centered and secure. Adjust design rotation or scaling on the touchscreen to correct any misalignment or size issues.
YouTube tutorials reinforce these steps, showing how even threading six cones of thread becomes manageable with practice—especially when leveraging the PR670E’s intuitive interface and automatic features.
3.2 Routine Maintenance and Lubrication
Consistent care keeps your PR670E running smoothly and extends its lifespan.
-
Lubrication:
- Apply machine oil to the hook area as specified in the manual—typically once a day before use.
- Clean and lubricate tension disks to maintain even thread tension.
-
Cleaning:
- Remove lint and debris from the bobbin case and shuttle hook after each project.
- Wipe thread guides with a lint-free cloth to prevent jams.
-
Thread Management:
- Replace low-thread spools before they run out to avoid interruptions.
- Monitor and adjust thread tension if stitches appear loose or puckered.
Routine maintenance is echoed in the operation manual and Google search results, emphasizing preventive care as the key to reliable performance.
3.3 Advanced Troubleshooting Solutions
Even the best machines occasionally encounter issues. The PR670E’s resources and diagnostics make troubleshooting straightforward:
-
Thread Breakage:
- Check tension disks, ensure thread is properly seated, and replace worn needles.
-
Misaligned Stitches:
- Re-hoop the fabric, verify frame alignment, or recalibrate the machine.
-
Motor Errors:
- Restart the machine, confirm the frame is securely attached, and update firmware if needed.
-
Color Mismatch:
- Double-check that thread colors match the design file and reload the pattern if necessary.
For persistent problems, the operation manual provides error code interpretations and step-by-step solutions. Visual diagnostics—such as checking the needle threader’s alignment or recalibrating the hoop position—can resolve most issues quickly. YouTube demonstrations further illustrate these troubleshooting steps, making it easier to identify and fix problems without frustration.
By following these operational and maintenance guidelines, you’ll ensure your PR670E remains a reliable partner—ready to turn your creative visions into beautifully stitched reality.
4. Business Applications and Profitability
The Brother PR670E isn’t just a marvel of engineering—it’s a business partner designed to turn creativity into real-world profits. Whether you’re launching a home-based embroidery venture or scaling up an existing studio, understanding how this machine supports efficiency, ROI, and future growth is key to unlocking its full value.
4.1 Production Efficiency for Small-Scale Entrepreneurship
Speed and efficiency are the lifeblood of any embroidery business. The PR670E delivers on both fronts:
- High-Speed Stitching: With a maximum speed of 1,000 stitches per minute (SPM) on standard frames, you can complete a 10,000-stitch design in about 10 minutes. Even when embroidering caps, the machine maintains a brisk 400–600 SPM, ensuring you never sacrifice precision for speed.
- 6-Needle Multi-Color Power: The six-needle system lets you load up to six thread colors at once, dramatically reducing the need to pause and rethread for multi-color designs. The built-in Color Sort feature optimizes thread sequence, minimizing unnecessary stops and maximizing your output.
- Automation and Precision: Features like automatic thread trimming and the LED positioning marker eliminate manual trimming and guesswork, streamlining your workflow and reducing errors.
Let’s see how the PR670E stacks up against typical competitors:
| Feature | PR670E | Typical Competitors |
|---|---|---|
| Max Speed (SPM) | 1,000 | 600–800 |
| Embroidery Area | 12" x 8" | 10" x 6" |
| Needles | 6 | 4–6 |
| Built-in Designs | 60+ | 10–20 |
These advantages mean you can take on larger orders, deliver faster turnaround, and handle a wider variety of projects—from tote bags to jacket backs—without missing a beat.
4.2 ROI and Market Diversification Strategies
Profitability is more than just speed—it’s about making every stitch count. The PR670E is engineered to help you do just that:
- Labor and Material Savings: Automation features like automatic needle threading and thread trimming save valuable time, while color-sorting algorithms reduce thread waste and manual labor.
- Startup Costs and Pricing Models: While the initial investment may seem significant, the machine’s efficiency quickly pays dividends. Many embroidery businesses price their services between $0.01–$0.05 per stitch, allowing for flexible pricing based on project complexity and volume.
- Client Acquisition: In today’s digital world, attracting customers often starts online. Leveraging social media platforms and optimizing your website for SEO can help you reach local businesses, sports teams, and custom gift seekers. Showcase your portfolio, share behind-the-scenes videos, and engage with your audience to build trust and drive inquiries.
- Market Diversification: The PR670E’s compatibility with optional cap frames and its generous embroidery area enable you to expand into lucrative markets like branded headwear, uniforms, and promotional products. The built-in design library and on-screen editing tools mean you can offer personalized items without investing in external software.
- Cost-Effective Growth: Lower thread waste and reduced labor translate into higher margins. The machine’s quiet operation and built-in video tutorials also make it accessible for home-based entrepreneurs looking to minimize overhead.
4.3 Scaling with Multi-Machine Integration
Dreaming bigger? The PR670E grows with you:
- Modular Workflow: Using PE-Design® Next software, you can link up to four PR670E units, synchronizing production and managing up to 100 queued designs. This feature is perfect for handling bulk orders—think uniforms for an entire company or a batch of custom event merchandise.
- Workflow Synchronization: USB connectivity makes importing custom designs and updating software a breeze, while the intuitive touchscreen interface keeps your team coordinated and efficient.
- Affordable Expansion: Unlike industrial multi-head machines, adding another PR670E is a manageable investment, allowing you to scale at your own pace without overwhelming your workspace or budget.
In short: The Brother PR670E is more than a machine—it’s a launchpad for your embroidery business dreams, blending commercial-grade Brother commercial embroidery machine output with the flexibility and scalability that modern entrepreneurs demand.
5. Comparative Analysis with Alternatives
Choosing the right embroidery machine is a bit like picking your business partner: you want someone who’s reliable, adaptable, and ready to grow with you. Let’s break down how the PR670E stacks up against its closest contenders and industrial alternatives.
5.1 PR670E vs. PR680W: Speed and Interface
At first glance, the PR670E and PR680W look like siblings—both offer a blazing 1,000 SPM max speed and a 6-needle system. But look closer, and subtle differences emerge:
- Acceleration: The PR680W reaches full speed (0–1,000 SPM) in just 7 seconds, shaving precious seconds off each project—an edge for high-volume shops.
- Touchscreen and Tutorials: Both models feature a 10.1" HD touchscreen, but the PR680W adds shortcut keys, a more streamlined interface, and 25 video tutorials (compared to 24 on the PR670E), making onboarding and daily operation even smoother.
- Magnetic Frame Compatibility: The PR680W introduces Flash Magnetic Frames, which help reduce fabric shifting and hoop burn—an upgrade for those working with delicate or high-pile fabrics.
- Software and Connectivity: Both support PE-Design 11, but the PR680E relies on cable connections, while the PR680W offers wireless transfers via built-in Wi-Fi.
The Brother embroidery machine comparison chart below shows differences:
| Feature | PR670E | PR680W |
|---|---|---|
| Max Speed (SPM) | 1,000 | 1,000 |
| Acceleration Time | Not specified | 0–1,000 SPM in 7s |
| Included Frames | 4 sizes (up to 200x300mm) | 4 sizes + magnetic frames |
| Software Integration | PE-Design 11 (cable) | PE-Design 11 (wireless) |
| Tutorials | 24 | 25 |
Bottom line: If you crave the latest workflow shortcuts and magnetic frame support, the PR680W is a future-proof pick. For proven performance at a lower cost, the PR670E remains a rock-solid choice.
5.2 Industrial Machine Alternatives (e.g., Juki Tajima SAI)
What if you’re eyeing industrial-grade machines like the Juki Tajima SAI? Here’s what you need to know:
- Speed and Needles: The Juki Tajima SAI runs at 800 SPM—slower than both Brother models—but boasts 8 needles, offering more colors per run before a thread change.
- Noise Levels: While specific decibel data isn’t cited, user feedback suggests industrial machines often run louder, prioritizing speed and durability over quiet operation. For home studios or shared spaces, this could be a deal-breaker.
- Accessory Compatibility: The PR670E includes four frame sizes and supports optional ball cap and cylinder frames. Industrial models may include more specialized accessories out of the box, but at a higher upfront cost.
- User Interface: Brother’s intuitive touchscreen and built-in tutorials are major pluses for those who prefer a gentle learning curve. Industrial models may require more training and manual reference.
- Budget and Specialization: If you need maximum speed, multiple heads, or ultra-high volume, industrial machines shine. But for most small businesses, the PR670E offers a sweet spot of professional features without the industrial price tag or complexity.
In summary: Choose the PR670E for versatility, ease of use, and a quieter, more home-friendly experience. Go industrial if you’re ready to scale into factory-level production and can accommodate the learning curve—and the noise.
6. Real-World User Tips and Workflow Optimizations
The best embroidery machine is only as good as the hands (and minds) that guide it. Here’s a treasure trove of user-tested strategies, workflow hacks, and fabric-handling wisdom to help you get the most out of your Brother PR670E.
6.1 Favorite Features and Efficiency Hacks
Ask any PR670E owner about their favorite features, and you’ll hear a chorus of praise:
- 6-Needle Convenience: Most embroidery projects use six colors or fewer, so the ability to load all your threads at once means fewer interruptions and faster completion. As one user put it, “80% of embroideries have six colors or less, so I don’t have to stop to re-thread.”
- Large Embroidery Area (8" x 12"): The generous workspace is perfect for bulky items like tote bags and jackets. The tubular arm design makes it a breeze to embroider on hard-to-reach spots—think sleeves, jeans, or towels.
- 10.1" HD LCD Screen: The intuitive interface lets you preview, edit, and navigate designs with ease. Users love being able to arrange text, rotate patterns, and even bend lettering—all on-screen.
- LED Positioning Marker: This feature takes the guesswork out of design placement, ensuring every stitch lands exactly where you want.
- High-Speed Stitching (1,000 SPM): For commercial workflows, speed is everything. The PR670E’s rapid pace means you can deliver projects faster and take on more orders.
Efficiency Hacks:
- Manual Color Sequence for >6 Colors: For designs with more than six colors, enable “Manual Color Sequence” in the settings. This lets you assign colors beyond the default needle count, reorder them, or skip colors mid-design. Insert “no-stitch” commands to bypass unused threads—perfect for those intricate, multi-hued masterpieces.
- Tie-On Method for Thread Changes: Save time during color changes by tying the new thread to the old one and pulling it through the system. This trick, demonstrated in YouTube tutorials, keeps your workflow humming.
- Color Sort Feature: Automatically rearrange thread changes to minimize stops, especially when combining multiple designs. Less stopping, more stitching.
6.2 Fabric Handling and Thread Management
Every fabric tells a different story—and the PR670E is ready for them all.
- Stabilizing Knits and Denim: Always use a stabilizer suited to your fabric. For knits, a medium-weight tearaway stabilizer works wonders; for denim or heavy materials, consider a cutaway stabilizer for added support. The machine’s tubular arm and frame sensor accommodate everything from caps to jeans.
- Custom Thread Tables: Predefine your thread assignments for repeat designs. This not only streamlines your process but also ensures color consistency across orders.
- Tension Adjustments: Adjust stitch density and thread tension via the recalculator for each fabric type. If you notice puckering or loose stitches, a quick tweak can make all the difference.
- Tubular Arm Versatility: The PR670E’s tubular arm design allows you to embroider on cylindrical or hard-to-hoop items without repositioning, expanding your creative horizons and reducing setup time.
Pro tip: Leverage the built-in video tutorials for on-machine training, and don’t hesitate to experiment with the PR670E’s editing tools—text arrangement, font customization, and pattern rotation are all at your fingertips.
The bottom line: With the right workflow tweaks and fabric-handling know-how, the Brother PR670E transforms from a powerful tool into a true embroidery ally—one that adapts to your style, speeds up your process, and delivers professional results every time.
7. Accessory Utilization and Upgrades
When it comes to maximizing the Brother PR670E’s capabilities, the right accessories are your secret weapon. From versatile hoops to innovative magnetic frames, these upgrades can transform your workflow, minimize frustration, and unlock new creative possibilities. Let’s break down the options and best practices for getting the most out of your machine.
7.1 Compatible Hoops, Stabilizers, and Frame Holders
The PR670E comes equipped with a robust set of embroidery frames, including the spacious 300x200mm (8" x 12") and the compact 100x100mm (4" x 4") hoops—giving you the flexibility to tackle everything from jacket backs to monogrammed cuffs. But the real magic happens when you explore the world of optional accessories and upgrades.
Included and Optional Frames
- Included Frames:
- 300x200mm (8" x 12"): Perfect for large designs and bulkier garments.
- 100x100mm (4" x 4"): Ideal for smaller projects, patches, or monograms.
- Additional included sizes cover a wide range of embroidery needs.
- Optional Accessories:
- Wide Cap Sets: For those venturing into headwear embroidery, optional cap frames expand your business offerings.
- Specialty Frame Holders: The PRCL1 frame (90mm x 80mm) and the 180mm x 130mm frame are compatible for mid-sized or specialty projects.
- Tubular Frame Table: Enables continuous embroidery on long fabrics, such as sashes or scarves.
Magnetic Hoops: The Game-Changer
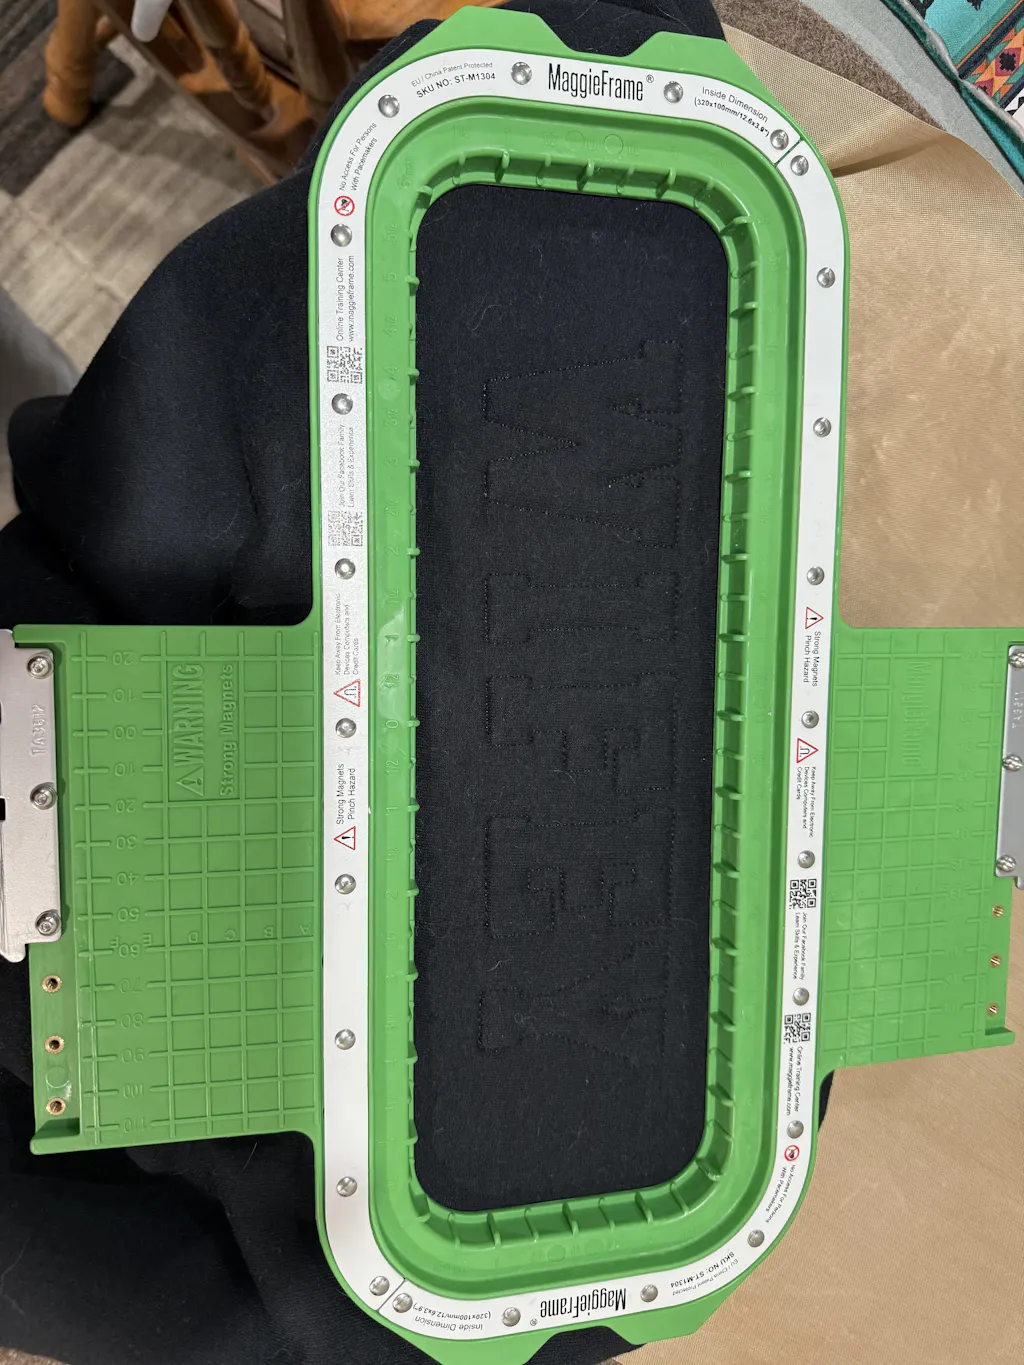
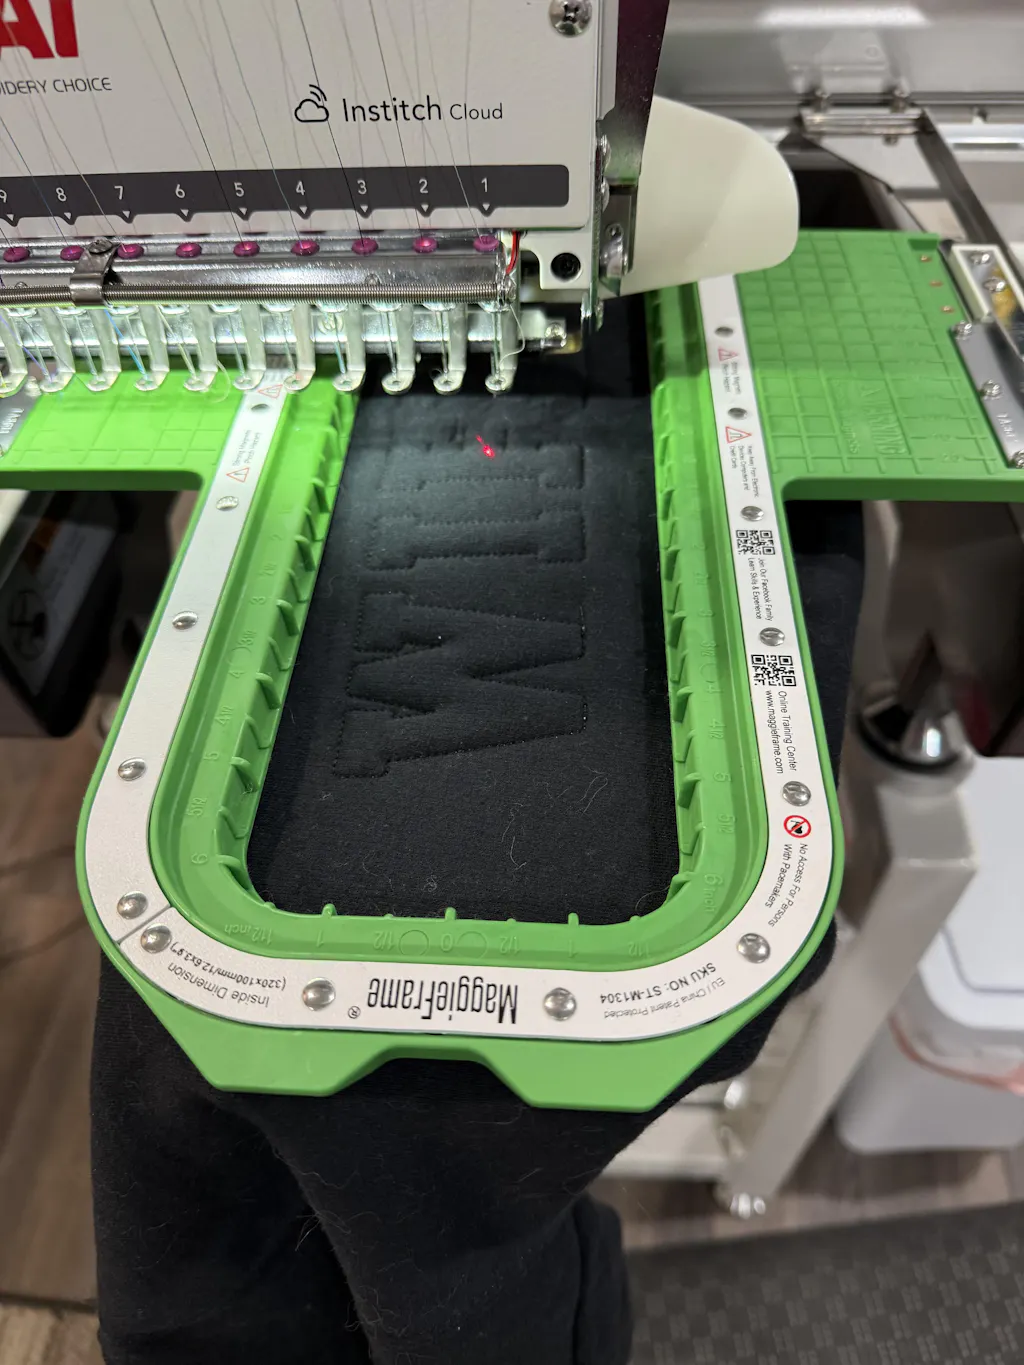
If you’re tired of fiddling with screws and struggling with fabric tension, magnetic hoop for Brother machines like MaggieFrame revolutionize the hooping process by using powerful magnets to securely and evenly hold your fabric—no manual tightening required.
Why choose magnetic hoops for garment embroidery?
- Lightning-Fast Setup: Traditional hoops can take up to 3 minutes per garment to set up, especially with thick or slippery fabrics. Magnetic hoops slash that time down to just 30 seconds—saving you 90% of your hooping time and letting you breeze through large orders.
- Even Tension, Less Fabric Distortion: The magnetic force automatically adapts to different fabric thicknesses, ensuring your material stays flat and taut. This means fewer puckers, less risk of hoop burn, and consistently professional results.
- Durability and Compatibility: MaggieFrame hoops are engineered for longevity, using high-grade materials and N50-grade magnets. They’re compatible with the PR670E and a range of other machines, including select Baby Lock models—making them a smart investment for multi-brand studios.
| Accessory | Specs/Use Case |
|---|---|
| 300x200mm Frame | Large designs, jackets, tote bags |
| 100x100mm Frame | Small items, patches, monograms |
| PRCL1 Frame | 90x80mm, specialty projects |
| 180x130mm Frame | Mid-sized projects |
| Tubular Frame Table | Continuous embroidery on long fabrics |
| MaggieFrame Magnetic | Fast setup (30s), even tension, garment embroidery |
| Wide Cap Set | Optional, for headwear embroidery |
With the right combination of hoops, stabilizers, and frame holders, your PR670E becomes a true embroidery powerhouse—ready to tackle any project with speed and precision.
7.2 Software Integration and Magnetic Hoop Advantages
The PR670E isn’t just about hardware—it’s the seamless integration of software and smart accessories that truly unlocks its potential. Let’s explore how you can boost productivity and quality with the right digital tools and magnetic hoop technology.
Software Integration: PE-DESIGN 11 and Beyond
- PE-DESIGN 11 Compatibility: The PR670E works smoothly with PE-DESIGN 11 software, empowering you to create, edit, and transfer complex embroidery designs. This software suite offers advanced editing, lettering, and digitizing tools—perfect for custom orders or intricate multi-layered projects.
- Firmware Updates: Keeping your machine’s firmware up to date ensures you have the latest features and bug fixes. Firmware updates can be accessed via the Brother Solutions Center and applied through USB.
- Wireless Transfers with Artspira: While the PR670E does not natively support Wi-Fi, design transfers can be managed via USB or compatible software. For users seeking wireless solutions, Artspira offers a streamlined way to send designs to select Brother machines.
Magnetic Hoop Advantages: Why MaggieFrame Stands Out
Magnetic hoops aren’t just about convenience—they’re about elevating your embroidery quality and efficiency. Here’s what sets MaggieFrame magnetic hoops apart for garment embroidery:
- N50-Grade Magnets for Even Tension: MaggieFrame’s use of N50 magnets ensures a firm, uniform grip across the entire hoop, automatically adjusting to fabric thickness. This means your stitches stay crisp, even on challenging materials.
- No More Hoop Burn: The even pressure of MaggieFrame’s magnetic system prevents those dreaded hoop marks on finished garments—a must for professional results.
- Time-Saving Efficiency: With setup times reduced from minutes to seconds, you’ll spend less time prepping and more time stitching (and selling).
- Durability and Cost-Effectiveness: MaggieFrame hoops are built to last, with high-grade engineering plastic and rigorous durability testing. They’re a smart investment for any embroidery business looking to scale.
8. Conclusion: Unlocking PR670E’s Full Potential
The Brother PR670E is more than just a machine—it’s a springboard for creativity, efficiency, and business growth. With its high-speed multi-needle system, intuitive editing tools, and robust accessory support, you can take on complex projects and scale your embroidery business with confidence. Don’t overlook the power of smart upgrades: features like color sorting and magnetic hoops can dramatically streamline your workflow and elevate your results. Embrace these enhancements to unlock the PR670E’s full potential and turn every stitch into an opportunity. Find Brother embroidery machine for sale to upgrade your game.
9. Frequently Asked Questions (FAQ)
9.1 Q: What is the maximum embroidery area of the Brother PR670E?
A: The PR670E offers a generous maximum embroidery area of 8" x 12" (300 x 200 mm), perfect for large projects like jacket backs and tote bags.
9.2 Q: How noisy is the PR670E during operation?
A: The PR670E is engineered with noise reduction technology, making it suitable for home studios and shared spaces. While not silent, it’s quieter than many industrial alternatives.
9.3 Q: What thread weights are recommended for the PR670E?
A: The PR670E is compatible with standard embroidery thread weights, including 40wt polyester and rayon. Always use high-quality threads for best results.
9.4 Q: How do I update the firmware on my PR670E?
A: Firmware updates can be downloaded from the Brother Solutions Center. Transfer the update file to your machine via USB and follow the on-screen instructions for installation.
9.5 Q: Can I use Wi-Fi to transfer designs to the PR670E?
A: The PR670E does not natively support Wi-Fi transfers. Use a USB drive or compatible software (such as Artspira) for design transfers.
9.6 Q: What stabilizers should I use for different fabrics?
A: Use cutaway stabilizers for knits, and tear-away or wash-away stabilizers for towels, denim, or heavier fabrics. Always match your stabilizer to your project for optimal results.
9.7 Q: Are replacement parts available for PR670E hoops and frames?
A: Yes, replacement screws, nuts, and springs for PR/Entrepreneur series hoops are available, ensuring long-term use and easy maintenance.
---
Ready to elevate your embroidery game? The PR670E, with the right accessories and upgrades, is your ticket to professional results and business success.